
A bootable USB serves as an emergency toolkit that protects your system from file corruption or crashes, which results in OS reinstallation. In fact, there are many tools that allow you to create a bootable USB out there, but like any other services, they are not treated equally, as some are scams, while others don't offer refund or have bad customer service.
If you have exhausted all your possibilities, but you have not found any reliable tool for creating a bootable Windows USB, then try Rufus. We have tried it several times and it worked perfectly. This tool stands out thanks to its simple, well-designed user interface and a full set of features that quickly fix any issues causing your OS to stop working.
In this tutorial, we will walk you through the steps on how to use Rufus for creating a bootable USB.
Table of Contents
1. What's Rufus
Rufus is a free and open source program that allows you to easily create a bootable USB devices. The coolest part is that you can use Rufus to install multiple operating systems on the same device. The tool is lightweight and can run right after you download it. In other words, it does not require any installation as it is a portable product.
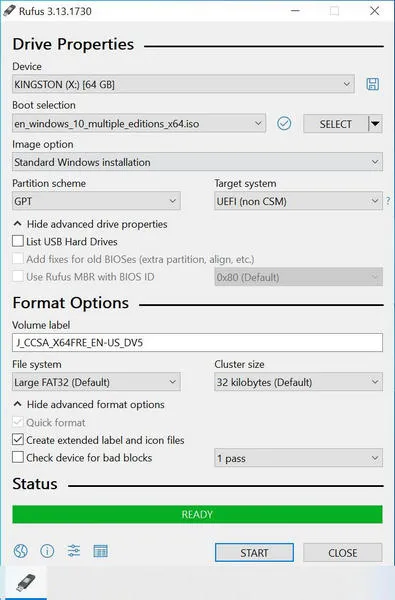
When you first open Rufus, you will be presented with its simple and intuitive interface. In fact, there are three sections for you to explore, including format options, drive properties, and status. Each option comes with advanced settings which can be accessed by extending the main window.
Another thing is that Rufus is an open-source program so it's basically a work in progress. The tool still needs some polishing, so it may come with bugs and crashes sometimes. However, this is not a big deal, as it runs smoothly most of the time in Windows 10.
2. Main Features of Rufus
Rufus is best known for its ability to create bootable USB drive by burning ISO image to USB. However, it's more than that. In fact, you can use Rufus to create a non-bootable BIOS or UEFI device with GPT or Super Floppy Disk partition scheme. Also, you can format USB device as NTFS, FAT32, or UDF, adjust the volume label, and set your own cluster size.
One of fan-favorite features lies in the ability to auto-download Windows 10 or Windows 8.1. Yeah, you read it right. You can ask Rufus to download the OS, select the release version, language, and architecture type.
Rufus Main Features:
- Create bootable USB from Windows/Linux/DOS/Unix ISO .
- Download Windows 10 or Windows 8 ISO image.
- Create Windows To Go USB from Windows ISO.
- Work with different ISO image types (.iso, .vhd, .img, .wim, .esd, .zip)
- Support GPT and MRB partition scheme.
- Full compatible with UEFI and Legacy Boot.
- 2X faster ISO writing speed than
- Support up to 38 languages.
3. Where to Download Rufus
The official website of Rufus is rufus.ie. You can download the latest version from there. Just scroll down the page a little bit and you will find the download options.
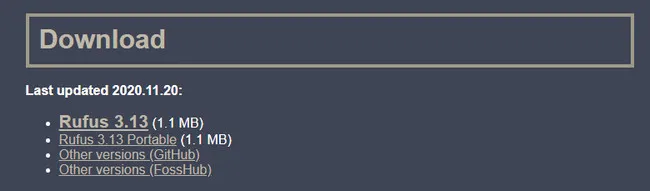
The latest version of Rufus is 3.13 and the latest update is on Nov 20, 2021. You can see the file size is very small, which only counts for 1.1 MB. Besides the official website, other download sources are included GitHub and FossHub. Both of them are legal and reputed website. Please don't worry about it.
Notice: Rufus is a pure Windows based application. This means Rufus for Linux or Rufus for Mac are not available till now! We will recommend corresponding Rufus alternatives in the following section.
4. How to Use Rufus to Create a Bootable USB from ISO Image
Making bootable USB from ISO image is the core function of Rufus, which makes its popular and famous. Currently, it supports Windows ISO, Linux ISO for various distributions, Unix ISO and ISO image from Windows PE and rescue kit.
Before getting started, please take a backup of USB at first. Also, you should know some background information for relevant terms if you never heard of. This will make sure you are using the right settings for target computer.
Partition scheme: It is a mechanism to cut a physical drive into different partitions. Each partition has it own partition table and storage space. Currently, there are two types of partition scheme in Rufus. One is UEFI, which is good for new or modern hardware. And the other is MBR, which is great for old hardware. For best practice, GPT is mostly paired with UEFI and MBR is with BIOS (Legacy Mode).
Target system: This is for basic input and out system on each motherboard, which manages the hardware configuration and boot order for computer. You have two options in Rufus: UEFI (non CSM) and BIOS or UEFI. The former option can be only used on computers which only supports UEFI boot. The later option supports both BIOS and UEFI boot in compatibility mode.
Simply put, please use GPT + UEFI combination if you want to use that bootable USB on a new computer. For old devices, please choose MBR + BIOS instead.
Let's get started if you already know the definitation of each phrase.
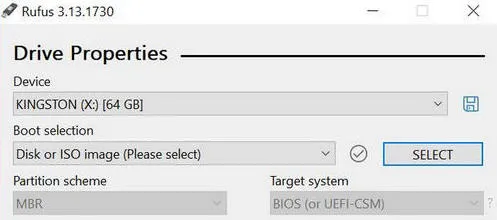
Step 1: Insert a USB flash drive into the computer and run Rufus.exe. Now, choose 'Disk or ISO images' from drop-down list under Boot selection and 'click on the Select button to proceed.
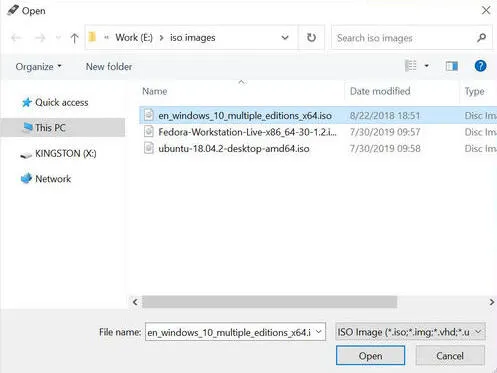
Step 2: In the Browse window, select an ISO file and hit the Open button to load it in Rufus.
Step 3: Once the ISO being imported, Rufus will set default options for this ISO based on built-in rules.
Step 4: Now, select MBR under the Partition Scheme section and BIOS or UEFI as the target system. Make sure you check the box next to 'Add fixes for old BIOSes' option if you plan to use this bootable USB on an old system.
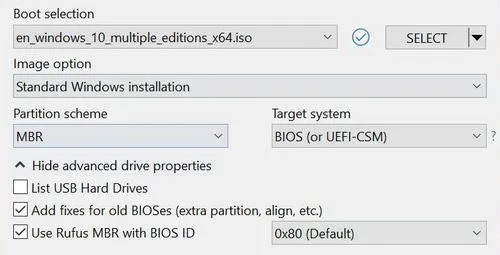
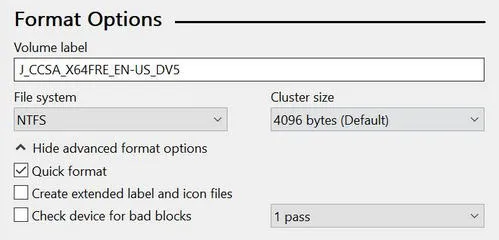
Step 5: You can change the name for your volume label from the Format Options window. If you have not already run a format on your USB drive, check the box next to Quick Format.
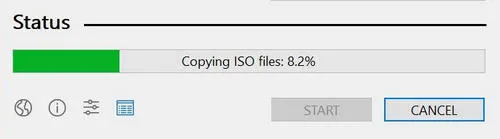
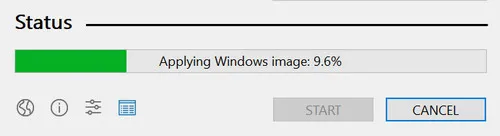
Step 6: Hit the Start button. You may be prompted to download additional files during the process. Just read the description from the Download required window and hit Yes.
Step 7: Rufus will start creating bootable USB drive (the process might take a few minutes) and the tool will ring a sound when it is done.
Now your USB is bootable, then you can plug into any computer and reinstall a specific OS.
5. How to Use Rufus to Create Windows To Go USB
With a new version of Rufus (2.0 or later), you can create a portable Windows USB in a few clicks. This way, you can install and run Windows 10 directly from USB drive on a secondary system, in case your primary one does not work properly. This is extremely useful when you are travelling frequently and don't want to carry a laptop.
In fact, Microsoft officially removed Windows To Go feature from latest Windows 10 2004. This means there is no built-in tool for creating Windows To Go USB now, which is why we are going to need a little help from Rufus. Here is tutorial on how to use Rufus to create Windows To GO USB drive.
Step 1: Insert your USB drive into your computer and launch Rufus. Make sure use an USB 3.0 or 3.1 USB drive, which has fast reading and writing speed. If you have enough budget, we recommend purchasing a Windows To Go Certified USB.
Step 2: Select your USB drive from the Device's pull-down menu and then select the partition scheme from the three available options.
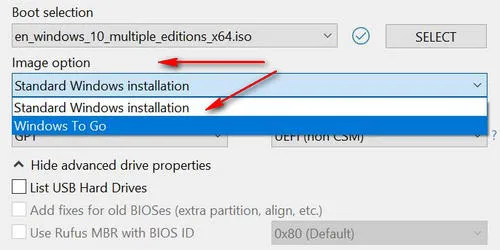
Step 3: Import Windows 10 ISO into Rufus and you will see a new option (Image option) above Partition scheme. Please choose 'Windows To Go' from drop-down menu.
Step 4: Set file system to NTFS and skip the cluster size section. Hit Start button and you will be asked to select a version of Windows you want to install to USB drive.
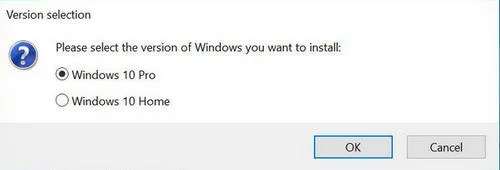
Step 5: Click YES button if you see a warning message. Confirm your action by hitting the Start button and Rufus will start to create a Windows To Go USB drive.
Windows To Go option is missing in Rufus? If you saw this error, this means the imported Windows ISO image is not eligible for creating a Windows To Go instances. You should download a newer version of Windows 10 ISO instead.
6. How to Use Rufus to Download Windows 10 ISO
It is realy hard to get a legit copy of Windows 10 ISO from Internet. There are a lot of scams, which injects ads, malware, even virus into the ISO file. And Microsoft does not provide direct download. It only let you download Media Creation Tool from Windows 10 Download page. However, Media Creation Tool sucks and does not work all the times. Fortunately, you can now use Rufus to download Windows 10 or Windows 8 ISO. However, the process is a bit trickly.
Step 1: Eject all removable drives from your computer.
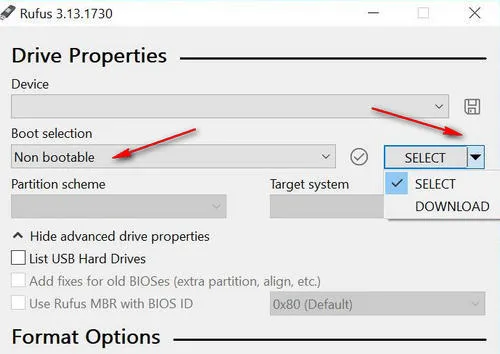
Step 2: Launch Rufus from desktop and choose 'Non bootable' option under Boot selection.
Step 3: Click the littble triangle icon besides SELECT button to open up the drop-down list. Now, hit on DOWNLOAD button and click DOWNLOAD button again to launch download wizard.
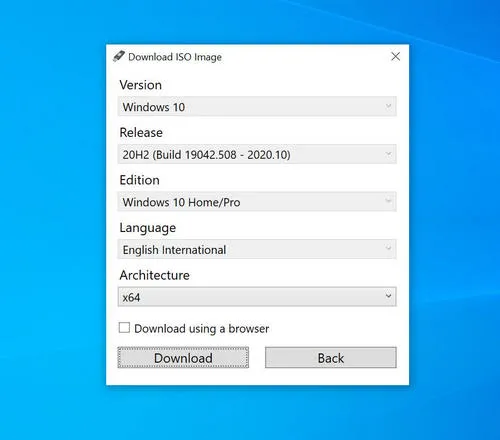
Step 3: Rufus will download fido script from GitHub and load 'Download ISO image' window in seconds. You should pick up a Windows version, release number, edition, language and architecture during the setup. At the last, you will be presented with a download option. Click on it and download Windows 10 ISO image from there!
7. Rufus Troubleshooting Guide
USB Not Seen as Bootable Device in Boot Menu: This does not mean bootable USB creation process failed. On UEFI based computers, secure boot is enabled by defaultm which prevents computer booting from external devices. You need to turn off secure boot in BIOS and try again.
Stuck at ISO Copying Stage: Please try one more times and close other unnecessary applications. Rufus needs to decompress ISO image file and write the files to USB. This process needs huge active memory. It could be got stuck when available memory is not enough.
Cannot Write ISO to USB: Rufus only supports genuine retail version of Windows ISO. Please make sure download it from reputable websites.
USB Not Detected. If your computer can not see USB neither, then install proper USB drivers first. Also check 'List USB Hard Drives' option under Advanced Drive Properties.
Best Rufus Alternative If Not Working
Rufus a one-man project and yet it is still not perfect. So you might have issue with Rufus. Some of them can be fixed but some of them are still not solved. In addition, Rufus only supports Windows platform up to data and the author does not have any plan to add support for Linux and macOS. Based on these facts, it is very neccessary to recommend Rufus alternatives for making bootable USB installer. Fortunately, there are a lot of options out there for different platforms.
Rufus Alternatives for Windows: Windows USB/DVD Download Tool, Windows Media Creation Tool, UNetbootin and YUMI – Multiboot USB Creator.
Rufus Alternatives for macOS: UUByte ISO Editor and Etcher
Rufus Alternatives for Linux: WoeUSB, dd commands, Startup Disk Creator (Ubuntu), USB Image Writer (Linux Mint) and Gnome Multi-Writer.
Conclusion
This how-to tutorial covers all the aspects about Rufus. It is very simple with a single user interface. However, you may be not familiar with some of the options shown in Rufus. That's why we wrote this tutorial to let you know how to use Rufus to complete different tasks, such as creating bootable USB, downloading Windows ISO and making a portable Windows USB drive. It also mentions possible solutions if you had problem in using Rufus.

Petty is editor in chief at UUByte and writes various topics about Windows and Mac to help people make the most of current technology.