
Windows To Go is a workspace solution to run an instance of Windows without using the internal disks of the host computer. In general, it is used to make the same workspace available on different PCs with varying configurations. This allows it to be used in 'roaming' mode on several PCs.
To create a Windows To Go USB drive, you can use various methods such as Windows Assessment and Deployment Kit (Windows ADK), Microsoft Endpoint Configuration Manager, or DiskPart and the Deployment Image Servicing and Management (DISM) tool.
Unfortunately, the Windows 10 May Update and later versions no longer support Windows To Go creation, which means you will need a disk formatting tool like Rufus. This article explains how to create a Windows To Go USB drive using the latest Rufus version 3.11, which only works on Windows PC. You have to use Rufus alternative if you want to do this on Mac or Linux.
Why Windows To Go?
Windows To Go is more portable especially when installing Windows to a USB drive. You can use it to boot to Windows on any PC without having to use the internal drives. There are also several other reasons to use this method to boot into Windows with the Windows To Go USB:
- Try the latest version of Windows 10 on your current PC without having to update the OS.
- Admins can remove restrictions on Microsoft Store access so apps can be downloaded on all PCs when using Windows To Go option.
- A computer can be provisioned offline with Windows To Go on the first boot and you will see no performance issues on subsequent boots
- Existing infrastructure can be used to manage user settings for Windows To Go USB drives using the Group Policy, just like with regular OS deployments

Preparation
The ability to create a Windows To Go USB was introduced with Rufus 2.0 several years ago, which means you can also use the most recent version 3.11 that was released in June 2020. The process to create the USB drive is fairly straightforward but you will need to follow certain steps, which we have outlined below for your convenience. The preparatory steps have also been shown below.
- A Windows 8/8.1/10 PC.
- Windows To Go certified USB with more than 32 GB capatity.
- Rufus 3.11, which you can download here.
- A Windows 10 ISO file for Education or Enterprise edition.
How to Use Rufus to Create Windows To Go USB Drive
Once you're ready with the above resources, you can proceed to the actual bootable USB drive creation steps:
Step 1: Plug your USB drive into an available port and make sure you have backed up any data it contains. All data will be wiped clean when creating bootable media.
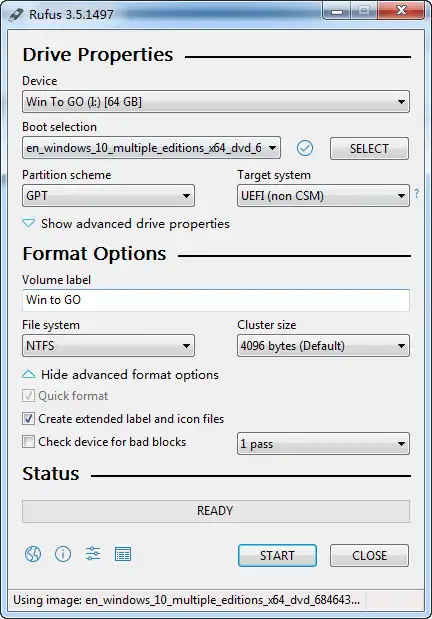
Step 2: Launch Rufus 3.11 and select the correct drive in the Device section.
Step 3: Under Boot Selection, click Select or use the dropdown menu to specify your Windows 10 ISO file.
Step 4: For the Partition scheme section, choose the MBR option if you're unsure about UEFI support. If sure, you can use GPT with UEFI.
Step 5: Select NTFS for the file system.
Step 6: On older Rufus versions, you may also need to select the radio button for Windows To Go rather than Standard Windows Installation, then hit Start and confirm by clicking Yes when the alert pops up and OK to get past the USB erasure warning. After that, Rufus will burn the imported Windows ISO to USB drive.
Depending on your PC, it could take up to 2 hours to create the Windows To Go bootable USB drive. Wait until the entire process is complete and Rufus shows 'Ready' before you eject the drive.
Rufus Alternative for Creating Windows To Go USB Drive
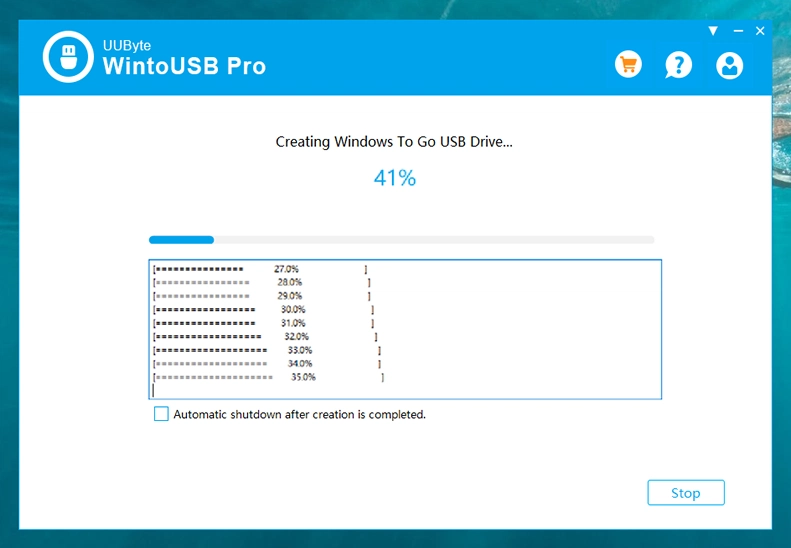
As we stated above, Rufus can only make Windows To GO USB from Windows 10 Enterprise and Education edition. If you want to make a Win To GO USB drive with other Windows versions like Windows 10 or Pro, then you need to use other alternative tools for this task. However, there are only few software that are capable of doing this type of job. Our recommendation is WintoUSB Pro, which has huge advantages over other alternatives.
The best part of using WintoUSB Pro is that you don't need to do any research to get the job done. Once you import the Windows ISO file and plug in the USB drive, the rest of work will be done automatically by WintoUSB Pro. This is the reason why so many people recommend this program for putting Windows 10 on USB drive. In short, it takes less time and has much higher success rate.
Conclusion
For these and other reasons, it's good to have a Windows To Go USB handy at all times. The only recommendation is, as mentioned earlier, to use a USB that's been certified for Windows To Go. This will ensure optimal performance and greater speed than with regular USB drives.

Petty is editor in chief at UUByte and writes various topics about Windows and Mac to help people make the most of current technology.