
Personalization of technology is currently in demand and Microsoft is also in the race. Recently the firm introduced portable Windows 10 which means you can run Windows 10 from a USB stick. This new technology enables the user to install Windows 10 OS on a USB drive. This is more portable and no need to pay extra money for hardware that builds up the PC like CPU, Memory, Motherboard. However, no all USB drivers are eligible for running Windows 10 from USB. Please check the requirement below.
Key Requirements for Installing Windows 10 on USB Drive
- Windows 10 ISO file
- A USB drive with USB 3.0 Port and 64G storage
- Specific software for installing Windows 10 on USB
If you meet all the 3 requirements then you can easily put Windows 10 on USB. However, most of the users fail to meet the third requirement and as a result, their effort goes in vain. But, here you will get 4 efficient methods to accomplish the task.
Part 1: Install Windows 10 to USB with WintoUSB Pro
UUByte WintoUSB Pro is a famous third-party software for creating portable Windows 10 USB so you can directly run Windows 10 from external USB drive. The steps are straightforward and no hassle at all. All the advanced settings are set automatically based on the ISO file you import and the USB drive you plugg in. WintoUSB pro analyzes the image file and hardware specs to choose the most proper options for making a Windows To Go USB drive.
Step 1: Download the latest Windows 10 ISO image from Microsoft website. You can download any version as you like. There is no limitation for WintoUSB Pro.
Step 2: Get a copy of WintoUSB Pro from UUByte official website and install it on a Windows PC. Once it is opened, you will two options on the main screen.
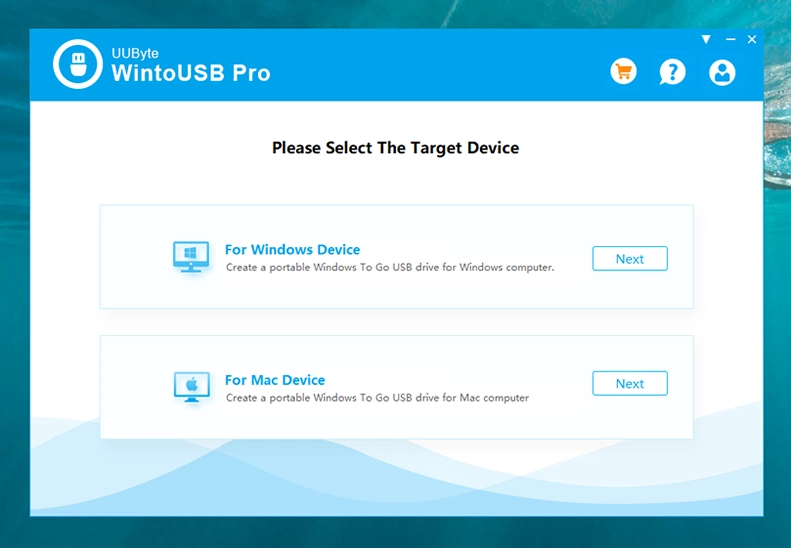
Step 3: Click your preferred choice and proceed to next window. At this time, please select "From Windows Image File" and import the local Windows 10 ISO file into WintoUSB Pro.
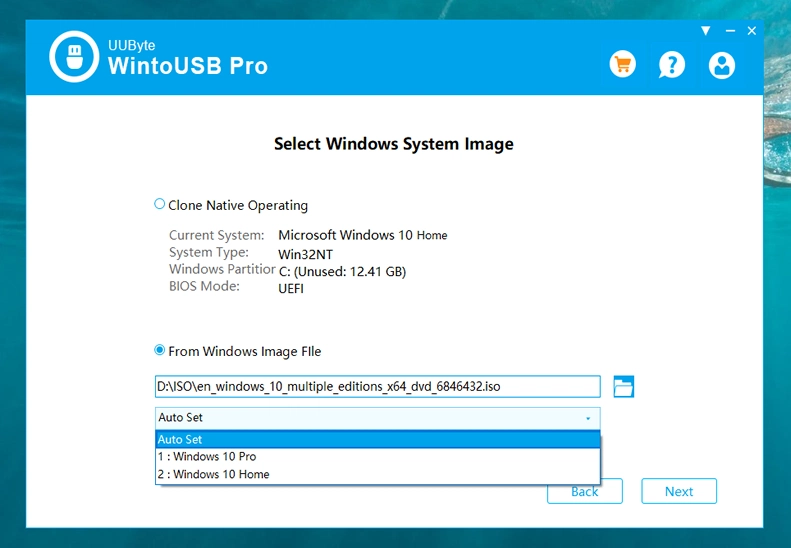
Step 4: Choose the USB drive you want to install Windows 10 on from drop-down list.

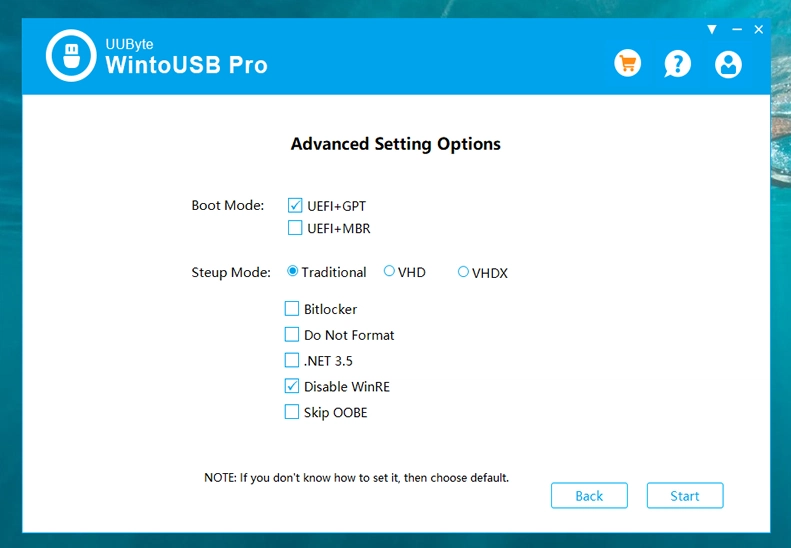
Step 5: You will see a few advanced settings. If you are not familiar with them, just leave it as default.
Step 6: Click the Start button to install Windows 10 on target USB drive. You will be patient as it could take sometime.
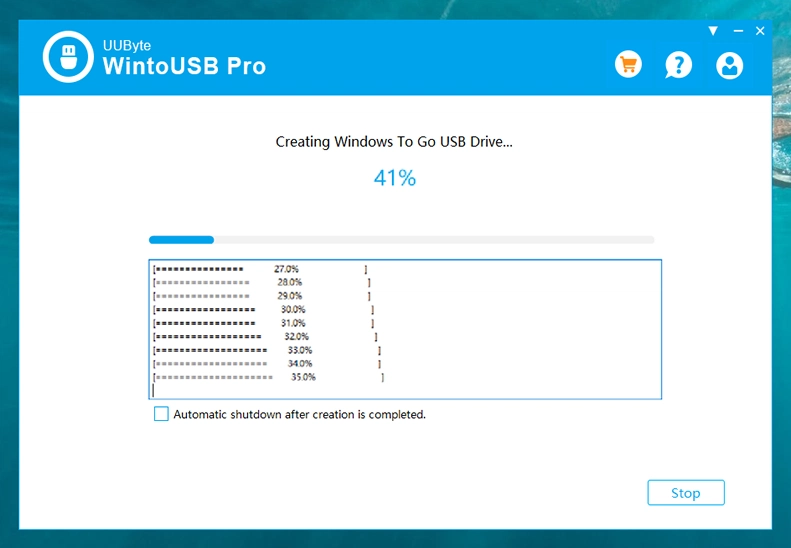
This is one of the best ways for newbies who want to install Windows 10 to USB drive with less effort. The whole process is done within several mouse clicks and the success rate is very high according to our test result and customer feedback.
Part 2: Install Windows 10 to USB via Rufus Tool
Rufus is popular portable software for creating Windows 10 bootable USB installer. It is a free open-source application available on the internet and you can grab it easily. To access the features of Rufus and to install Windows 10 to a USB drive drive, you can follow the steps listed below.
Step 1: Open a browser and visit the official site of Rufus; then navigate for the latest version and then download it. No need to install the application, as it is standalone software. Make sure to insert the USB drive on your computer.
Step 2: On the home page of Rufus, you will get a list of options, move to the device section, and ensure that your USB drive is selected.
Step 3: Move to the 'Partition scheme' section and here you need to select a boot mode. If you wish to go with the Legacy mode, then select 'MBR partition scheme for BIOS or UEFI' from the drop-down menu. However, if you want to go with UEFI mode, then choose 'GPT partition scheme for UEFI' from the list.
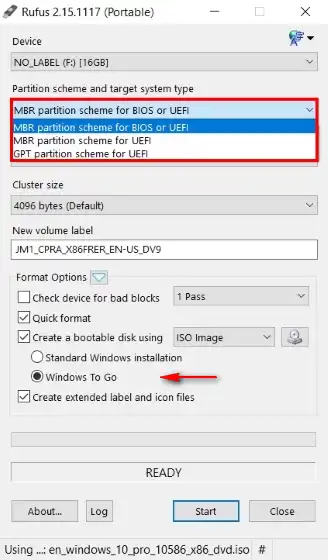
Step 4: Go to 'Format Options' and tick 'Create a bootable disk using' section and parallel to it, select ISO image from the drop-down list and then click on the disk icon to add Windows 10 ISO file. Also, ensure to enable 'Windows To Go' feature and once everything is ready, click on the 'Start' button. The process will take some time and you can monitor the status via progress bar.
Rufus is a simple and easy process to install Windows 10 on a USB drive. However, there are ample options and you need to give extra care amid performing the task. The process will take around 3-4 hours, so you must keep patience while creating a portable Windows 10 drive.
Part 3: Install Windows 10 to USB Using WintoUSB
WinToUSB is a third-party tool that has the potential to run fully-fledged Windows 10 on any external drive including a USB stick. This software performs the task from any image file such as ISO, WIM, VHD, and many more. It is more powerful than Rufus but you have to buy a license ($29.95) to unlock the advanced features.
Step 1: Visit the official site of EasyUEFI, and then download the latest version of WintoUSB.
Step 2: Once the download is completed, install the application and meanwhile, you can insert the USB on your computer.
Step 3: Now, launch the application and you will be directed to the main interface, click on the 'Browse' button listed parallel to an Image file and then upload Windows ISO file.
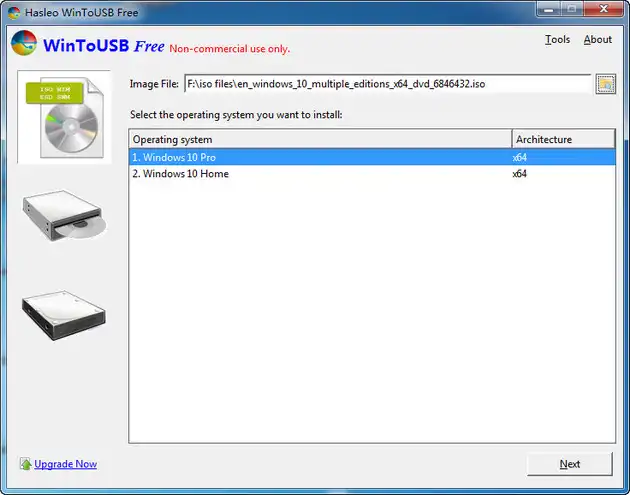
Step 4: After that, select the OS that you want to install on USB and then click on the 'Next' button. Thereafter, select the USB drive from the drop-down menu listed in the destination section.
Step 5: A pop-up window will open showing you the boot mode, select MBR for BIOS and UEFI, and further click on the Yes button. This step will format the USB stick.
Step 6: After the completion of the format process, you will be directed to the main interface, select the installation mode, i.e. VHDX and then click on the 'Next' button.
Step 7: Windows 10 installation to the USB process will start and once it is done, you will get a successful message on the computer screen.
WinToUSB has a smooth interface that will reduce your effort and time. It makes the process very simple and thus enables the mere novice users to perform the task. The best part is that it supports multiple image files.
Part 4: Install Windows 10 to USB with GImageX
GImageX is a free tool that comes with Microsoft Assessment and Deployment Kit. It uses a WIM file to keep Windows OS on USB, not the ISO one. However, a single file of GImageX is also available and you can use the same.
Step 1: Download GImageX from the official site and then extract the zip file using 7-Zip or other extracting tools.
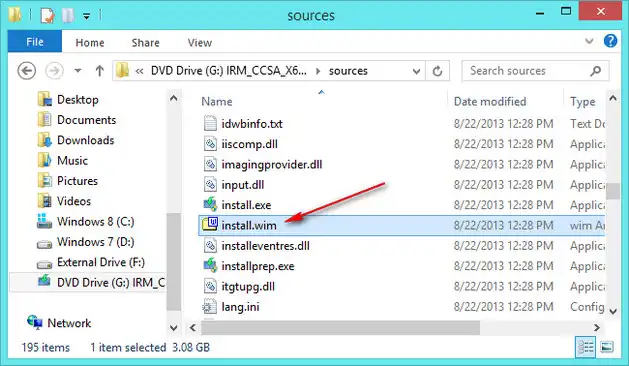
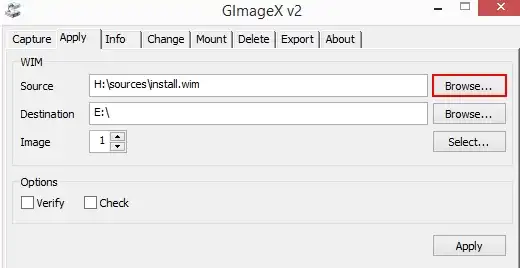
Step 2: Launch the application, click on the 'Apply' tab that is listed at the top of the menu bar. In this section, you will get few options, move to the Source section, click on the 'Browse' button, and then upload Install.wim file that is your installation file. WIM file is different from ISO file, so here ISO file will not work.
Step 3: Move to the 'Destination' section, select your USB by clicking on the 'Browse' button and once the task is done, click on the 'Next' button.
Step 4: Now, minimize the program and open the Disk Management tool and you can do this by entering the same name in the search bar of the Start menu.
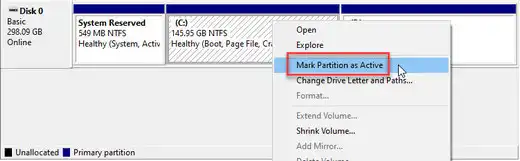
Step 5: In the Disk Management Tool, select your USB drive, right-click on it, and choose an option 'Mark Partition as Active'.
Step 6: Now, close the window and then launch the command prompt in administrator mode as you need to create boot entries on your USB drive through the commands listed below.
Step 7: In the command prompt, you will have to perform the task for USB drive so, select it by entering that particular drive and press the Enter key. Here, A is taken as an example of a USB disk drive.
A:
cd Windows\system32
bcdboot.exe X:\Windows /s X: /f ALL
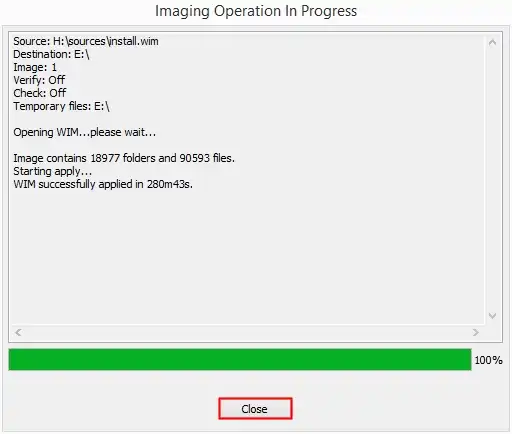
Step 8 : Wait 30 minutes or so and your USB drive is ready with Windows 10 OS.
In this method, you will have to go through multiple phases that may consume a lot of time and effort. However, if you provide wrong inputs in the command prompt phase, then you will be failed. So, you need to focus more while execution the steps.
Part 5: Use Partition Assistant to Install Windows 10 to USB
AOEMI Partition Assistant has simplified the work by introducing advanced features that can complete the task in no time. Amid using this software, make sure to check the USB port of the computer and it should match the version of the USB drive. For example, if your computer supports USB 3.0, then you should choose a USB drive 3.0 for effective output.
Step 1: Download and Install Partition Assistant on your computer that is listed in the official site of AOEMI. Amid the process, also insert the USB drive on your computer.
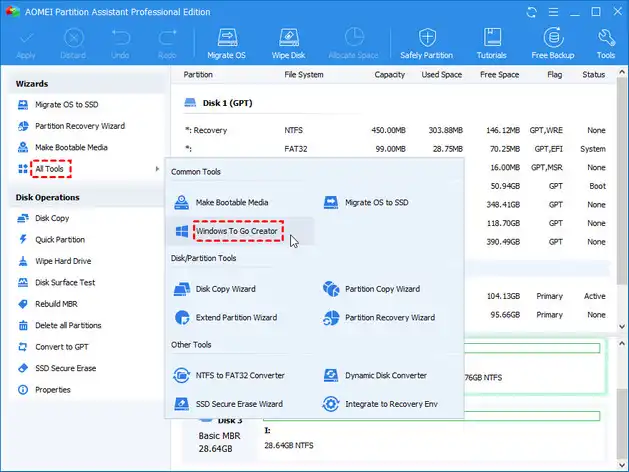
Step 2: Launch the program and on the main interface, you will get 'All Tools' option at the left panel, click on it. Now, select 'Windows To Go Creator' from the featured list.
Step 3: A pop-up window will open on your computer and you need to select 'Create Windows To Go with system disc/ISO' option and further click on the 'Next' button.
Step 4: Select the USB drive and Windows 10 ISO file. After completing the above task, click on the 'Proceed' button.
Step 5: Again a pop- up window will open and this time, it will warn you that the data in the USB drive will be deleted, click on the Yes button to proceed ahead. Soon, the process will start and in no time it will be completed.
AOEMI Partition Assistant is a very useful tool to install Windows 10 to USB drive. The process is entirely automatic and you don’t need to give much manual effort. However, it is not free!
Final Words
These are the 5 efficient methods to install Windows 10 to USB drive. All the methods have equal weightage and you can choose the one as per your convenience. Now, access the features of Windows 10 on multiple computers within a portable USB drive.

Petty is editor in chief at UUByte and writes various topics about Windows and Mac to help people make the most of current technology.