
There are several reasons why you might want to make a bootable USB flash drive, such as installing a new OS on the computer, repairing PC with installation CD. Whatever the reason is, the fact is that there are a number of ways you can learn from in order to burn an ISO file to USB drive. However, if you chose the wrong software, then the burning process would fail. Why? Becasue some of the candidates were not updated for years and doesn't support the latest Windows 10.
So in here, we tested 10+ popular ISO burning software and pick up the best 4 from the list according to the test result. So you don't need to worry about it any more. Please keep reading and find the best one for you.
Updates: We just added a new FAQ section at the end of this post as we are constantly receiving questions from end users.
Part 1: Burn ISO to USB with Windows USB/DVD Download Tool
Windows USB/DVD Download Tool is created by Microsoft when Windows 7 was released publicly. This one is favored by many of the users because of its simplicity and compatibility with older versions of Windows. Mostly importantly, it is free. So if you intended to burn ISO on a Windows 7 or Windows 10 computer, then it is the best choice for burning Windows installation ISO with this tool. For Linux or other ISO file, the success rate is dramatically reduced for no reason.
[Update]:Windows USB/DVD Download Tool was deprecated by Microsoft in 2021. But it still works now. The official download link is no longer available. You have to download it from other software hosting website, like CNET, Softpedia.
Step 1: To begin the process, you must first download the application and install it on your Windows PC. Once you launch the program you must also insert a USB drive with adequate space to save the ISO file. Remember that during the process, some or all of your data saved on the USB drive may be deleted. This is because the drive will need to be formatted before the ISO file can be burned onto it. The advantage of using a USB, however, is that you can burn other data onto it later on, unlike a writable DVD that you can only burn once.
Step 2: When opening the program, you will see a window where you will need to add the ISO file to be burned onto the USB drive.
Step 3: Choose the media type, which will be USB drive in this particular instance.
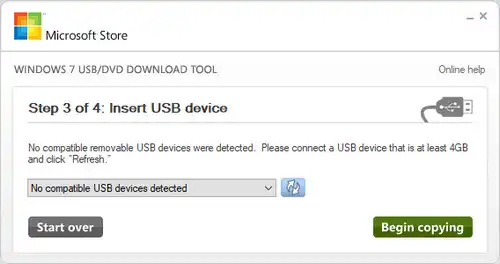
Step 4: Once you have made your selection, you will see an option that says "Start Copying". Click on that to initiate the burning process. At this point, you may receive an alert notifying you that all data on the USB drive will be erased.
This is usually a two-step confirmation which has been implemented to prevent accidental deletion of data from the USB drive. Once you click "Yes" on the final confirmation window. Once the process is over, remove the USB drive and use that for whatever purpose you need to.
Pro:
- Free software.
- Clean and no ads.
- Great for burning Windows ISO.
Cons:
- No longer supported.
- Onlu work for Windows ISO.
- Quite slow file burning speed.
Part 2: How to Burn ISO to USB Bootable via UUByte ISO Editor
Like we said before, Windows USB/DVD Download Tool doesn't always work on all ISO files. We have tested this program on 5 blank DVD disc and USB drives. Only half of them passed the test with Windows USB/DVD Download Tool. So what is to do it it failed? You don't need to worry much about this becasue there are so many alternatives out there. UUByte ISO Editor is one of them.
UUByte ISO Editor is a highly reliable ISO burning utility and it is fairly straightforward to use. The biggest advantage with UUByte is that it supports multiple Windows versions, including Windows 10, Windows 8, Windows 7 and Windows XP. In addition, there are other useful functions for dealing with ISO image. Please check the list below:
Key Features of ISO Editor
- Burn all kinds of ISO files to USB, CD or DVD
- Create ISO image from files and folders.
- Extract files from ISO image file.
- Directly make ISO file from CD or DVD disc.
- Edit ISO files as much as you want.


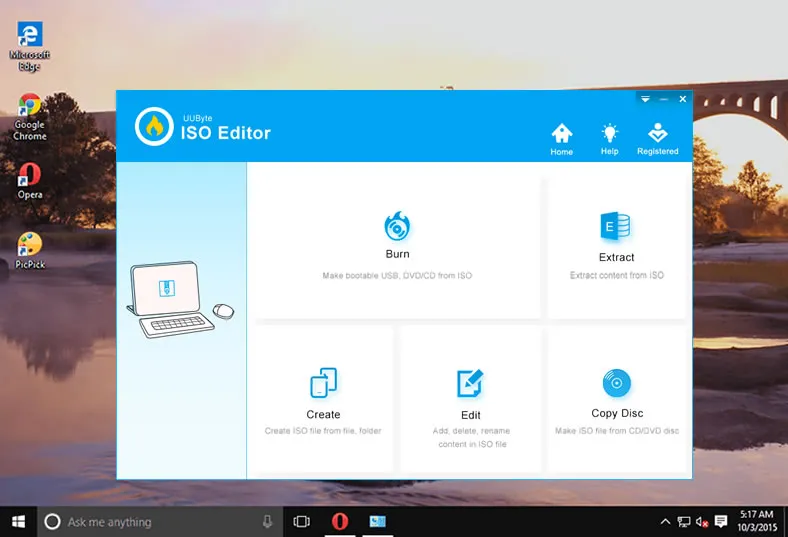
Step 1: Install UUByte ISO Editor on a PC or Mac
Download and install UUByte ISO Burner to a PC or Mac and launch the application after installation. From the main interface, please click "Burn" button. This will go to the ISO burning window..
Step 2: Insert USB Drive and Add ISO File
Now, insert an USB drive into the computer. Then UUByte program will detect the device in a minute and you can find it in drop-down menu. Next, click "Browse" button to add an ISO file from the local drive to the program.
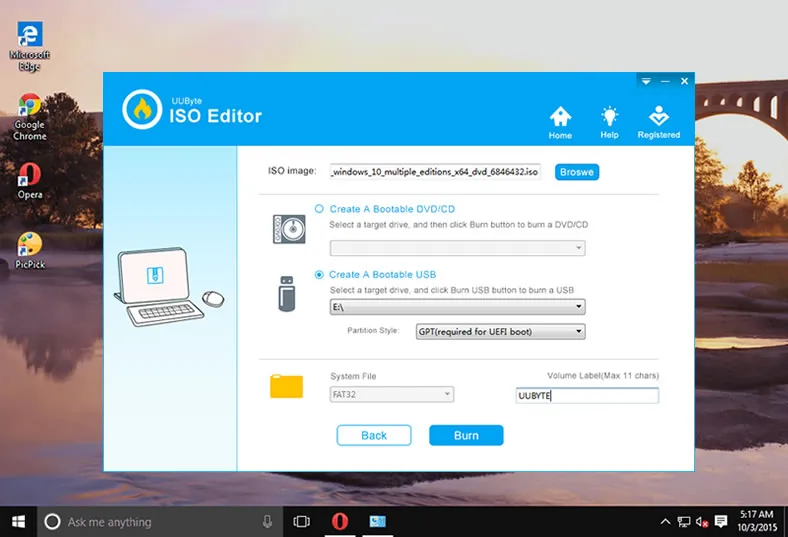
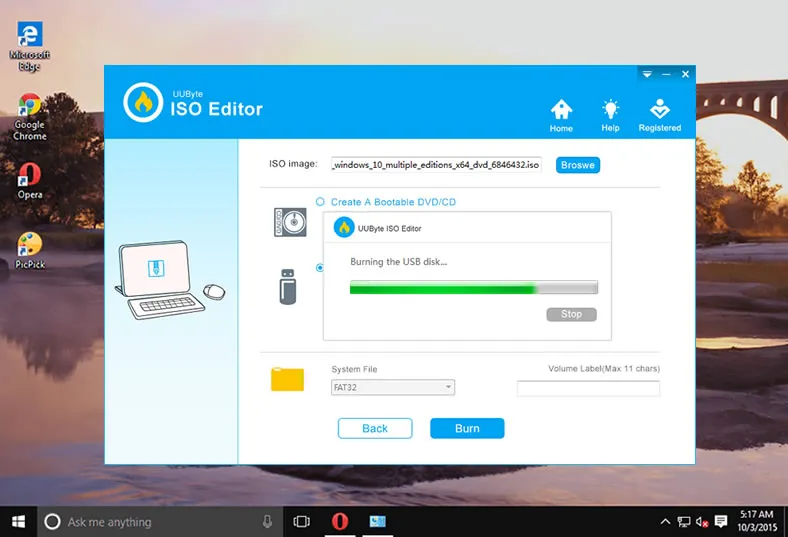
Step 3: Start Burning ISO File to USB Drive
Select the USB name and click "Burn" button at the bottom to start the ISO burning process. You will see a message popping up when it is completed successfully. It usually takes 3-10 minutes to be finished, which is largely dependent on how big the file is.
P.S the steps are the same if you want to burn ISO image to USB on a Mac.
As you can see, UUByte ISO Editor is quite impressive for ISO burning, right? Only a few clicks to help you make a bootable USB sticks so you can use it to fix system issues. It is free for try!
Pro:
- Great for burning Windows OS and Windows PE ISO.
- Create a bootable USB install media in much less time.
- Powered by intuitive user interface.
- Burn ISO to USB or CD/DVD disc.
- Advanced ISO editing features.
- Work on both Windows and macOS.
Cons:
- No support for Linux and Unix ISO image.
- Has problem with old DVD drives during disc copying.
Part 3: YUMI (Free ISO to USB Burning Tool)
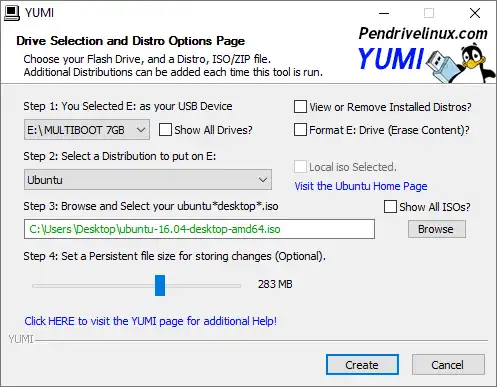
YUMI is another famous ISO burning program but it is a bit different from other tools. YUMI is short Universal Multiboot Installer. As its name implies, the main purpose of this program is creating bootable USB drive from operating system ISO (Windows, Linux, etc.), rescue disk and WinPE. In addition, it is easy to create multiple boot devices with this amazing tool.
Step 1: Download and install YUMI on your computer. Now insert a USB flash drive into the computer.
Step 2: Now, launch the application and select the USB device name at the beginning. Next, you should select distribution name and ISO file to be burned on that USB.
Step 3: Finally, click on "Create" button in order to create your multiboot USB drive. Once it is done, you can boot up the USB drive and select the boot option accordingly.
Pro:
- Free of use.
- Great for burning Linux and Windows 7 ISO.
- No complex settings (only one window).
- Great for burning Linux OS images.
- Able to create multi-boot on a single USB drive.
Cons:
- Has issue with latest Windows 10 ISO.
- UEFI boot not available.
- USB should be formatted to FAT32 or NTFS.
Part 4: UltraISO Premium ISO Burner
UltraISO is the most well-known name when it comes to ISO burning. It had a great repution in the past. However, it is a little bit more complex to use than the previous three utilities. The long list of options might get you confused when using it. That is why it is not recommended in first position. It is still reliable and trusted by thousands of users around the world.
Step 1: As with the other applications, download and install this utility to your PC. Note that you will need to run the application as administrator.
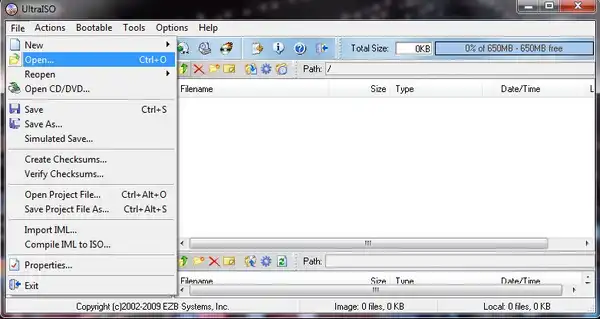
Step 2: Next, go to the 'File' menu and click on "Open" to select the appropriate ISO file. Once the file has been selected, click on the bootable menu and select the option called "Write Disk Image"'.
Step 3: You can now select the USB drive as your 'Write Method', and then click on the "Write" button. Your USB drive will first be formatted. With this software, you will need to click on "Yes" after the formatting is done.
Pro:
- Powerful and reputed ISO burning software since 2002.
- Various functions for dealing with ISO image.
- Great for burning Linux, Windows and Windows PE ISO.
Cons:
- Technical background needed for advanced settings.
- Not free software.
- Lower ISO burning speed.
- Complex user interface.
Part 5: UNetbootin Bootable USB Creator
Recently, we found another useful ISO burning software called UNetbootin by user suggestion. UNetbootin is a very reliable free tool for creating bootable Linux USB drives according to our test. It can directly download ISO image from hundreds of Linux distributions and help you create a live bootable install media afterwards. Mostly, you can use the same app on different platforms for burning ISO image to USB drive, including Windows, Linux and macOS.
Step 1: Download the right edition of UNetbootin from GitHub repository, where hosts the latest version for Windows, Linux and macOS.
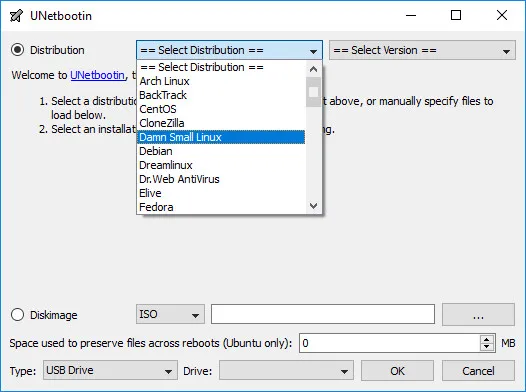
Step 2: Open UNetbootin app from downloaded folder and insert a USB drive into the computer..
Step 3: Check the Diskimage raido box and load ISO image file from local drive by clicking the three-dot button at the right side.
Step 4: Pick up the USB drive letter from Drive drop-down menu. Now, all the settings are done. Finally, click OK button to start burning ISO file to USB. That's it!
Pro:
- Free and open source.
- Great for burning Linux and Windows 7/8 ISO file.
- Compatible with Windows, Linux and macOS.
- Download Linux ISO.
- No complex configuration.
Cons:
- Lack support for Windows 8 and Windows 10 ISO.
- No support for UEFI booting.
- Much slower ISO burning speed.
- Crowded user interface.
Part 5: Frequently Asked Questions
Below is a couple of frequently asked questions during bootable USB creation process. This is a great for those users who failed to create a bootable USB without any luck by using above ISO burning software.
Q: Can I just copy Windows ISO to USB?
No. Windows ISO image is a compressed archive that combines hundreds of Windows 10 installation file into a single file. To make it bootable, Windows bootloader should be written to USB and decompress the ISO image. However, the file copy operation will only copy the file byte by byte without adding boot information and never decompress the ISO image. The USB is not bootable with a copy action.
Q: Is an ISO file bootable?
The fact is that not all ISO files are bootable. Only a handful OS installation ISO files are bootable, such as Windows, Linux and system rescue CDs. The data and program installation ISO file is not bootable for sure.
Q: Are all USB drives bootable?
Yes. USB drive can be seen as a legal booting device (USB-HDD) in BIOS if there is a valid boot sector in it. This can be achieved with the help of ISO burning software.
Q: Can I use 4GB USB drive?
4GB free storage is enough for creating a bootable device, such as Linux, Windows PE and rescuing disk. However, it is not recommended for Windows ISO, especially Windows 10 ISO, which is large than 4GB. For that, it is more practical to use 8GB or larger USB stick.
Q: Should I format my USB drive to FAT32 or NTFS?
It depends. For ISO image file less than 4GB, it is recommended formatting it to FAT32, which has better support for hardware compatibility. Otherwize, format USB drive to NTFS if ISO file is larget than 4GB.
Q: Why my USB drive was not recognized as a bootable device after burning?
This happens mostly on modern computers with UEFI boot, a more secure firmware mechanism than traditional BIOS. If it was the case, you have to turn off Secure Boot in BIOS and switch to Legacy Boot.
In addition, if the ISO burning software does not support UEFI boot, then this error will happen on a computer with UEFI firmware only like Surface Pro device.
Q: How long does it take to make a bootable USB drive?
The common range is 10 - 30 minutes. The larger the ISO image is, more time is taken for ISO burning process. It also has something to do with the ISO burning software. Some of them such as UUByte ISO Editor are much faster because of multi-thread file writing engine.
Q: Where to download Windows 10 ISO for free?
Microsoft does not provide direct download link for Windows 10 ISO any more. Please refer to this step-by-step guide instead.
Q: My computer was stuck on a black screen after selecting USB, why?
This is mostly because you are using the wrong ISO burning software. As stated above, there is no software that could burn all OS images. You should use the right ISO burning software for specific OS images. You will definitely got an error when trying to burn a Linux ISO with Microsoft USB/DVD Download tool for example.
Summary
All of these utilities continue to be used by thousands of users around the world every day. Choosing the right one is often a matter of preference rather than capability since all of these are pretty powerful tools. Another deciding factor is your purpose for creating bootable media. Based on all these parameters, choose the right one to help you burn ISO files to USB.

Petty is editor in chief at UUByte and writes various topics about Windows and Mac to help people make the most of current technology.