
So, you now have a Linux ISO file that you want to burn to a flash drive in order to make a bootable install USB. You also need to boot the machine from it, so you can get a taste of Linux operating system. Unfortunately, the process is not straightforward to some folks.
In reality, creating a bootable Linux USB installer is a different story, as you can not simply copy the ISO file to a USB flash drive and boot from it. Instead, you need to write booting information to USB drive first, which is not able to be done manually. Plus, there is no built-in tool for making this possible on Windows. Windows Media Creation Tool is only working for Windows ISO. Luckily, many cool tools out there are making the burning a Linux ISO file to USB much simpler. In this tutorial, we have compiled a list of the best 5 tools that allow you to create bootable Linux installer in Windows 10.
Burn Linux ISO to USB #1: UNetbootin
UNetbootin has been around for years and marked as the No.1 tool for burning Linux ISO to USB drive. The initial purpose of developer is to create an easy-to-use tool to make bootable Live Linux USB so more people can enjoy playing with Linux with less hurdle. Another great feature comes from UNetbootin is that the program is able to download various Linux ISO within the program.
Step 1: Download and install UNetbootin from here, then launch it on your computer.
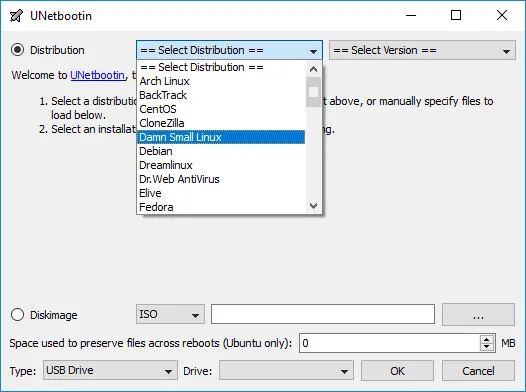
Step 2: Click Diskimage if you already had a copy of Linux ISO. If not, select a distribution from the list and download the ISO file.
Step 3: Check the box next to Diskimage box and then import Linux ISO image file. After that, select USB drive name and hit the OK button to start burning ISO to USB. Wait about 5 minutes and a bootable Linux USB is ready!
However, the tool has its own disadvantages which may ruin your experience. In reality, some of the users have reported that the tool is unstable and crashes on Windows 10.
Burn Linux ISO to USB #2: LiteBoot
We can not gurantee that Unetbootin would work on all Windows machines. So if it failed, then we can give a try on LiteBoot, a complete packege for system installation. One of the notable features is to create Linux boot USB. It supports almost all the popular version of Linux distributions, including Ubuntu, Debian, Fedora, Mint, etc... You can directly verify the disk is bootable or not via the QEMU option without rebooting the computer.
Key Features of LiteBoot
- Create bootable Linux Install USB.
- Create Windows Install USB.
- Backup and restore Windows OS.
- Free up and fix USB issues.
- Emulate booting from Live USB without reboot.
Step 1: Download LiteBoot from this website and open the program after installation.
Step 2: Open UUByte LiteBoot from desktop shortcut and add Linux ISO to the program.
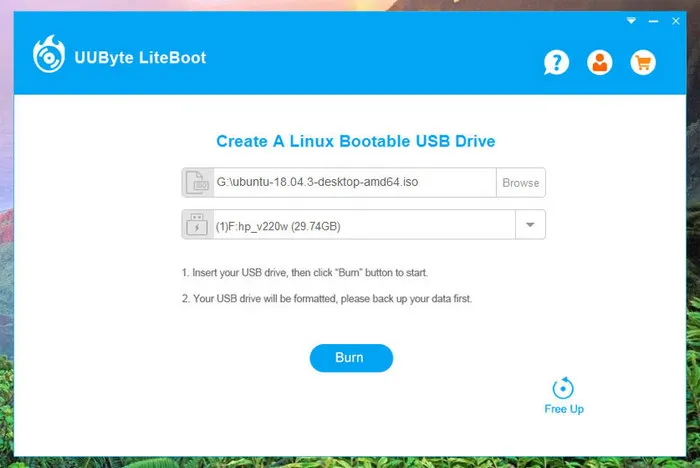
Step 3: Plug an USB drive into the computer and select the drive name from the second option. If multiple USB were connected to the computer, make sure selecting the correct one. The content on USB will be deleted during burning.
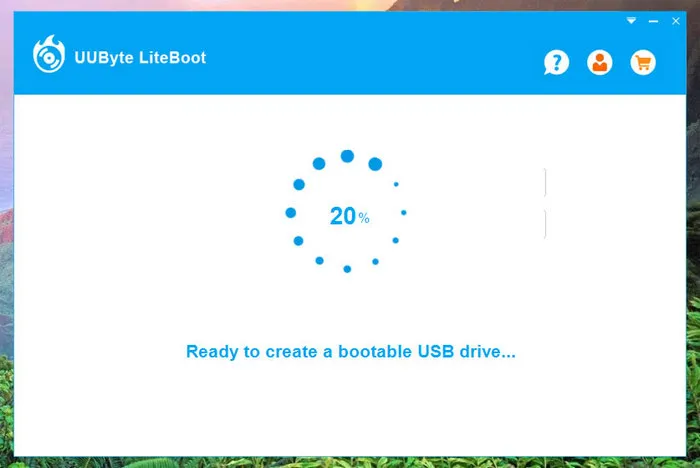
Step 4: Click Burn button to start burning Linux ISO to target USB drive. You can monitor the whole process with the progress bar.
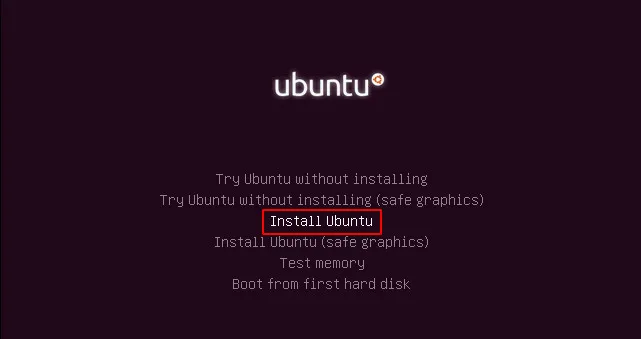
Step 5: Plug the USB into the computer where you want to install Linux OS. And change the boot order in BIOS to set USB drive as the first booting media. Save the settings and you will see installation wizard (Ubutu as example) at that time.
The user interface is clean and the burning speed is 2X faster than UNetbootin according to our test. So it is the second best bootable Linux USB creator on the market.
Burn Linux ISO to USB #3: Universal USB Installer
If the LiteBoot tool won''t work for you, then try Universal USB Installer, which is also considered an solid ISO burner. Basically, it behaves the same as UNetbootin does, but the process is a little bit confusing to some users. With that in mind, we are here to help.
Step 1: Download Universal USB Installer. Like Rufus, Universal USB Installer does not require an installation on Windows 10.
Step 2: Launch Universal USB installer on Windows 10 computer and insert the USB flash drive.
Step 3: Select the downloaded ISO file and then choose USB drive that's currently plugged into the computer.
Step 4: Click Create button and wait for the process to complete (it may take several minutes). Once done, restart computer and you can boot computer from the bootable USB drive.
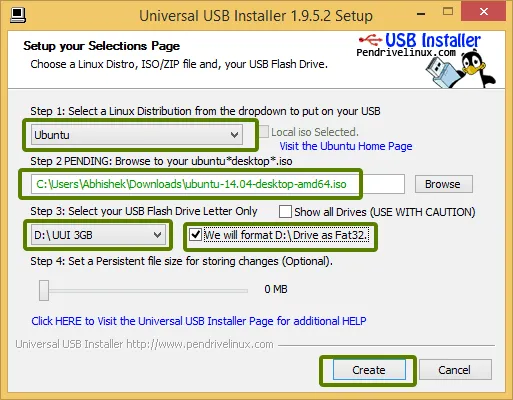
In short, Universal USB Installer is a handy tool for both regular and professional users. However, one major drawback is that it sometimes fails to work or crashes in Windows 10. If you are in such situation, then restart the computer and repeat the process.
Burn Linux ISO to USB #4: Rufus
Rufus is one of the best free tools that allow you to create a bootable Linux USB flash drive. It is fast, reliable, and has a good customer support. The best part is that the tool does not require an installation on your PC, as all you need to do is to download it from official website and then it automatically runs on Windows 10 machine.
Step 1: Connect a USB drive to Windows 10 PC; then select the Device box in Rufus and select the USB flash drive.
Note: The tool will format the USB drive before moving ahead, so make sure you've already made a backup of your important files.
Step 2: Click Select button at the right side of Boot Selection and import Linux ISO into it.
Step 3: Next up, click the Target System box and then select FAT32 from the drop-down menu.
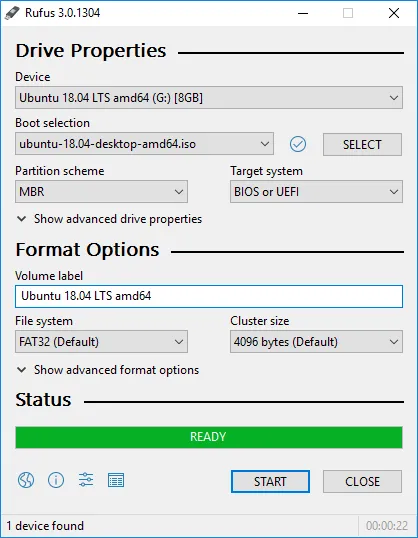
Step 4: Once everything is ready, hit the Start button. If you are asked to download two additional files, click Yes to continue.
Step 5: You will be prompted to select the mode that you want to use to write this image. Select the recommended option (Write in ISO Image Mode) and hit OK.
As mentioned earlier, all data on your USB drive will be erased. If you have not backed up your data, then click Cancel, the back up your data and repeat the process. Rufus will start creating the bootable USB drive (the process may take several minutes). Once done, hit the Close button and restart your computer.
Burn Linux ISO to USB #5: Etcher
Etcher is another great option that allows you to burn ISO image file to USB on Mac and Windows 10. Like Rufus, Etcher is completely free and serves as an open-source utility for both regular users and developers. The best part is that the tool supports all platforms out there, including Windows, macOS, and Linux.
Step 1: Go got Etcher's download page and download the latest version of Etcher to Windows 10 PC.
Note: Etcher has a portable version that does not require an installation. However, it is a striped-down version of Etcher and lacks some important features.
Step 2: Once you have Etcher installed on your computer, insert the USB drive into your computer and then launch Etcher.
Step 3: Click on the select image button from the main UI and select the Linux ISO image file you downloaded earlier.
Step 4: Hit the Flash button to start burning Linux ISO file to USB drive. The process may take more time as the burning speed is pretty slow.
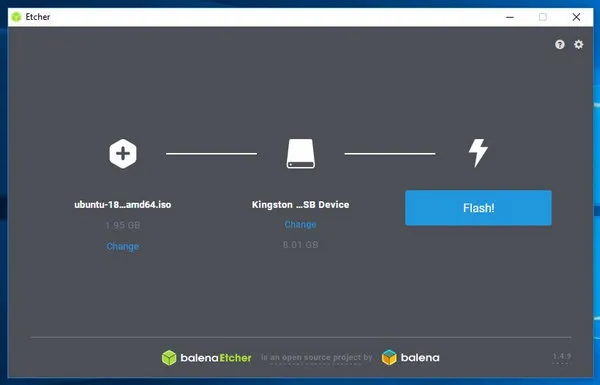
If you are new to Linux world, then you can try Etcher to create a bootable installer, as it is free and support multiple platforms. However, it may get stuck on burning process at sometimes.
Summary
All of these methods involve some level of risk if you are an inexperienced user when trying to burn Linux ISO to USB. Proceed with caution, or look for reliable third-party software that will do the job for you. You can also explore command line executions to burn ISO to a USB drive to create a bootable Linux USB. But this is so complicated!

Petty is editor in chief at UUByte and writes various topics about Windows and Mac to help people make the most of current technology.