
Looking for the best ISO to USB burner for Mac? It's possible, but ISO is not native file type in Mac OS X or macOS environment, so you need to use workaround methods or employ a third-party ISO burning utility for Mac to get this done. This article covers three ways to burn ISO to USB stick on a Mac computer, powered by macOS Catalina, Mojave, High Serria and earier Mac OS X systems.
The first thing you need to know is that you can't use an ISO disk image file on a Mac, since Apple primarily uses the DMG format. However, if you merely want to burn ISO to a USB stick, that's definitely possible. The only thing you can't do is run an ISO file on an Apple computer. Let's look at the various ways to burn ISO to USB on a Mac machine.
[Notice]: There are different types of ISO images (Windows, Linux, Raspbian OS, etc.) and they apply different booting schemes. So basically, there is not a perfect software out there that can burn all ISO images successfully. You should try another suggestion if one failed.
[Update 1]: If you have any question during ISO burning process, please check out the FAQ Part at the end of this article.
[Update 2]: New version of UUByte ISO Editor for Mac now supports large Windows 10 ISO image (over 5GB) and macOS Sonoma . Also add support for Apple M1 and M2 Mac.
Part 1: How to Burn ISO to USB on Mac with Terminal Software
Terminal is Apple's command line equivalent of Command Prompt in Windows and Terminal in Linux. Using this command line utility, you can burn an ISO file to an external DVD or USB disk. If you did not t have any experience with text command, then this is not recommended because it is too risky to damage the local disk with wrong input. Terminal allows you to do several system-level operations, so don't input anything other than the commands specified in the process outline shown below:
Step 1: Click Terminal icon from the Dock. Or Go to the Applications folder on Mac and find the Terminal app in Utilities folder.
Step 2: Copy the ISO file in a convenient location so your command doesn't have to be too long. Saving it to desktop or downloads folder is usually a good idea. Make sure you remember the name of the ISO file because it will be used in the command.
Step 3: If your ISO file is in your Desktop, then run the following command (press Enter after typing the command): cd desktop

Step 4: Now run the following command (hit Enter after typing): hdiutil burn filename.iso
Step 5: Once you run the command, your ISO file will be burned to the USB drive in your default optical drive. If you haven't inserted a disk, you will be prompted to do so. There is no need to run the command again after inserting the USB.
Pro:
- No need to install third-party app or package.
- Completely free of charge.
- More flexible burning options.
Cons:
- Dangerous and not safe for beginners.
- Sharp learning curve.
- Bad support for USB 2.0 device.
- Lower success rate.
If you want to avoid any kind of command line work and if you're running one of the newer versions of macOS, then it's better to use a third-party software like the one described in Part 2 below.
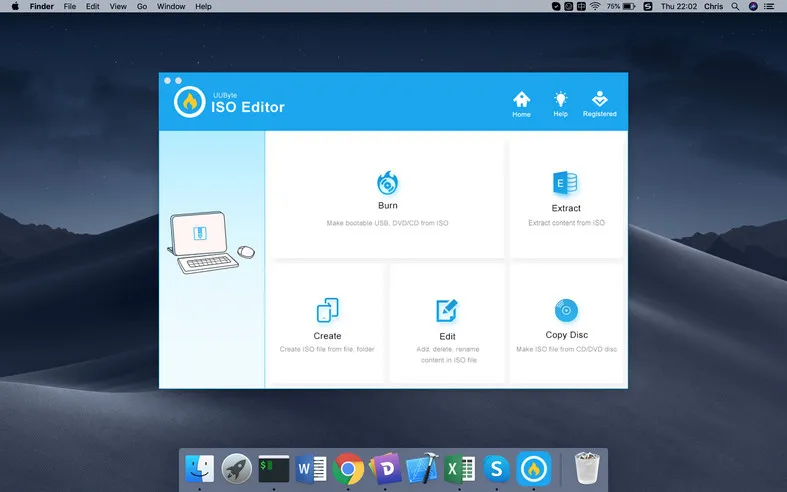
Part 2: Easily Burn ISO to USB on Mac via UUByte ISO Editor (Bootable USB Creator)
Sofware being powered by a graphics user interface are always welcomed because of user friendly operation. So the second suggestion in here is UUByte ISO burner software called ISO Editor for Mac. It is popularly regarded as the best ISO burning software for Mac. It allows you to burn, extract, edit, copy and create ISO almost as if it was a native file format on Mac. The utility has been fully tested on a wide range of storage media brands as well as all versions of macOS and Mac OS X.
The biggest advantage is that you do not need any technical expertise whatsoever to use this software. It is highly intuitive, and in a matter of minutes you can burn your ISO to USB or DVD. More importantly, the USB is bootable in default. This flexibility makes it the most user-friendly Mac app for handling ISO disk images in a number of ways. The next section shows you how to easily and quickly burn any ISO file to a disk or drive to create bootable USB on your Mac.
Key Features of ISO Editor for Mac
- Designed by great UI.
- Powerful Burning options.
- Able to make bootable USB or DVD.
- Support the latest macOS Big Sur and Catalina.
- Support new version of Windows 10 ISO (20H2).
- Include other useful ISO tools such as edit, extract and create.


Step 1: Download UUByte ISO Burner for Mac
Download and install ISO Editor for Mac to your computer and launch the program. Click on the Burn module on the first page, which will take you to the ISO burning utility.
Step 2: Insert USB Drive on Mac and Import ISO Image
Insert a USB flash drive into your Mac. Select the ISO file to be burned to the media. If you want a different partition style or file system, make those changes on this page. If you don't know what they mean, leave them in default mode.
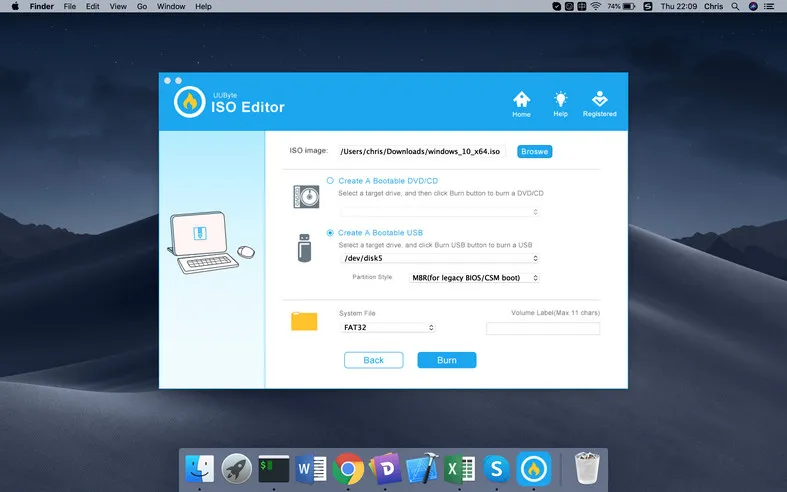
Step 3: Start Burning ISO to USB on Mac
Click Burn and the ISO file will be burned to USB drive in around 5 minutes. Please wait and be patient. Make sure the computer not going into sleep mode during the burning process.

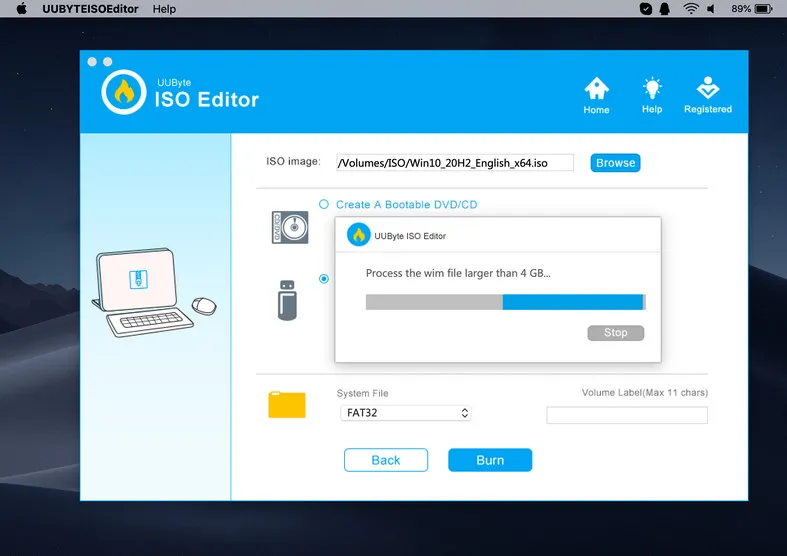
[Update]: If the Windows ISO image file is too large (Over 5GB), you will see the following screenshot. This process will cut install.wim file into small parts so it can be copied to FAT32 partition. You have to wait a few minutes for the task to be done.
UUByte ISO Editor for Mac is the best app for making Windows bootable USB on Mac and it has overall of 95% success rate, so no wasted disks or wasted time when you use this software. The software's reliability, flexibility and speed have made this the go-to Mac application for handling ISO disk image files.
Pros:
- Powerful ISO management.
- Extremely fast ISO writing speed.
- Support all Windows ISO files, including latest Windows 10.
- Pretty cool user interface with on-screen instructions.
- Support Legacy BIOS and UEFI boot.
- Work on all macOS versions, including macOS Big Sur.
Cons:
- Have problem in running on old OS X computers.
- Unable to burn Linux ISO images.
Part 3: Disk Utility - The Default ISO to USB Buner (Solid for Old Macs)
Disk Utility is a built-in tool that comes with Mac OS X and macOS. Using this function, you can easily burn your ISO to a disk after mounting it. Disk Utility is primarily meant to view and repair hard drives and other drives, but also has added functionality. Follow the process below to get your ISO burned to a writable DVD or CD.
Step 1: Go to the Applications folder using Finder or by clicking the shortcut on the bottom right of your screen. From there, go into the Utilities folder and click on Disk Utility to launch the app.
Step 2: Open your ISO file and mount it as a virtual drive. This is done automatically when you click on File > Open Disk Image… in the top menu.
Step 3: When you see your ISO file in the left panel, that means it was mounted properly. You can now insert an USB and click on the Burn option to burn the target ISO file to the USB drive.
This method is only meant for OS X 10.10 and earlier versions. With Mac OS X 10.11 El Capitan, Apple removed the ability to burn ISO to a USB. If you have one of these higher versions, you can try the above methods.
Pros:
- Stock app with macOS.
- Simple to use.
Cons:
- Burning feature not available in modern macOS.
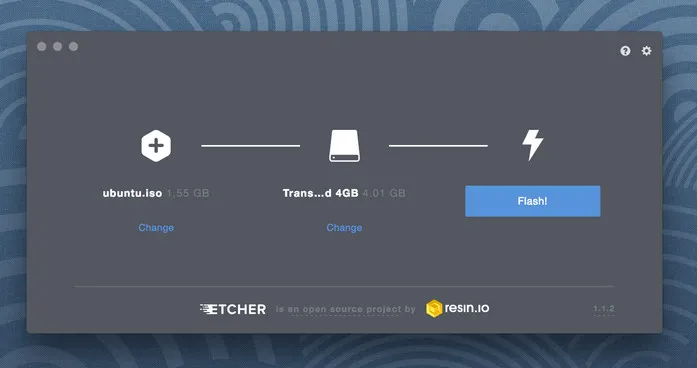
Part 4: Use Etcher App to Burn ISO to USB on Mac (Updated)
Recently, we found another great free app that works perfectly on macOS when it comes to burn Linux-based ISO files. The name is balenaEtcher, a full-featured cross-platform application that supports Windows, macOS and Linux. It approves one of the best software for flashing ISO image files to USB pendrives or SD cards, ideally for Linux, Unix and Raspberry Pi OS.
Step 1: Prepare for a USB flash drive and download balenaEtcher from its official website.
Step 2: Double click the file to get the app installed on your computer.
Step 3: Open Etcher utility and select OS image file from local hard drive.
Step 4: Now, choose the USB drive you just inserted and click Flash button to start writing ISO image to USB drive. Wait for a couple of minutes. That's all!
Pros:
- Easy to use.
- Model UI design.
- Fast ISO burning speed.
- Free.
- Support different operating systems.
Cons:
- Require high-profile hardware to get it running smoothly.
- Only support a limited range of OS images.
- Lack support for UEFI booting scheme.
Part 5: Frequently Asked Questions
Q: Why file copying process failed?
The USB will be formatted to FAT32 in order to create a working Windows partition on Mac. This means you can not copy a file larger than 4GB. This is one of the biggest issue with FAT32 file system. We noticed that the latest Windows 10 ISO downloaded from Microsoft.com will over 5GB and the install.wim file is obviously larger than 4GB. That's why file copying process faile during burning process. The solution is to download an old version of Windows 10 from other sources.
Q: Why my USB drive is not bootable by using hdiutil command?
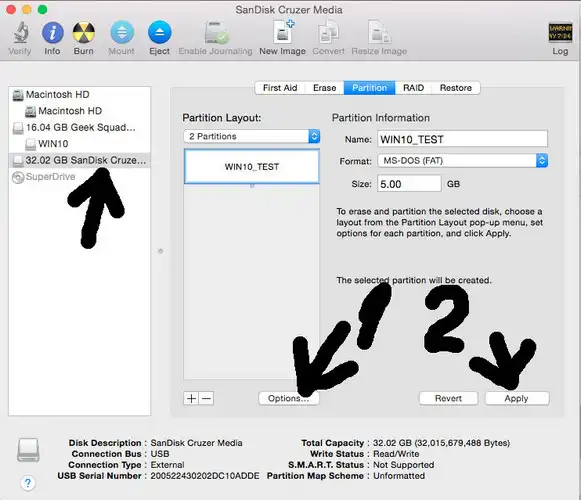
It is a common case for Windows ISO image because this command does not write Windows bootloader to USB drive. You have to format the drive to FAT32 first in Disk Utility.
Q: Can not select USB drive in UUByte ISO Editor?
If the USB drive could be recognized by Mac but not in UUByte ISO Editor, then it is highly possible that your Mac is in Dark Mode. To fix this, please switch to Light mode instead.
Q: Should I format USB stick to NTFS?
No. Mac can only see USB drive formatted with exFAT or MS-FAT. NTFS is not supported by Mac in default. So you can not write ISO image to NTFS USB on Mac. FAT32 is more recommended!
Q: How much time it takes for burning ISO to USB?
For high-speed USB drive (3.0 or 3.1), it can be done within 10 minutes. For low-speed USB drive, it takes much longers (more than 20 minutes).
Q: Can I use UNetbootin for burning Windows 10 ISO?
No. USB will not be bootable if you are using UNetbootin to burn ISO to USB on Mac.
Q: Can I use Etcher for burning Windows ISO?
No. You will receive 'Partition table missing' error when importing Windows ISO into Etcher app on Mac.
Summary
To be honest, Burning ISO to USB was not challenging at all on Mac in the past. But the situation was changed since the release of macOS. Many apps was not supported or updated to Catalina, Mojave or High Serria. So for the new Mac computer, UUByte ISO Editor is the best option out there in 2020.

Petty is editor in chief at UUByte and writes various topics about Windows and Mac to help people make the most of current technology.