Table of Contents
Can I create a Windows 10 bootable USB on M1 or M2 Mac?
In simple words, the answer is Yes. Apple M1 or M2 Mac is powered by ARM core, which is totally different from the traditional x86 architecture. In this post, we will share a couple of methods that can be applied to create Windows 10 bootable USB on M1/M2 Mac.
Tip: The methods introduced in below are also working on Intel Macs. Please be noted!
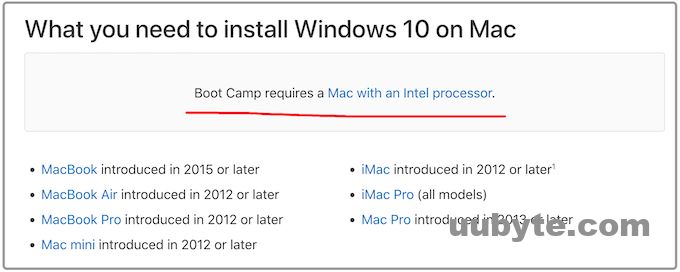
In the past, making Windows 10 bootable USB on Mac was a simple task with the help of Boot Camp Assistant app, the stock app shipped with macOS. But it is no longer supported by Apple Silicon Macs, including M1 and M2.
Another solution we can try out without third-party app is the built-in Terminal utility, the most popular one recommended by tech bloggers because it is a native app that comes with OS X and macOS. But this could not be pleasant experience for normal users when working pure text command in Terminal. We will suggest all possible solutions (including easy ones) in the following sections if you could like to create a Windows 10 bootable USB on M1 or M2 chip Mac.
What is a Bootable USB Used for?
A bootable USB is a form of the external hard drive in which the files are stored in the form of a flash memory card and uses either software or hardware-based method to read from and write to this external device. This means that once you have inserted the bootable USB into your system, it will automatically load all required files into memory without any action from the user except plugging in the device. This gives users complete control over their system, allowing them to perform any task they wish on their computer without actually having to access the hard drive directly.
The most important feature of a bootable USB is for installing operating systems. A DIY PC usually does not have OS on it. We need a bootable USB to install OS on it so the device can be used to handle daily tasks. It also comes in great help when the PC could not boot into desktop due to blue death of screen, black screen or suffered virus attack.
If you want to use more than one operating systems on your computer at once, then having different operating systems installed on different partitions may be necessary; this is where a bootable USB comes in handy as it allows you to run multiple operating systems simultaneously without having to reinstall each partition manually every time you want to switch between them (which can take up quite some time).
Why Choosing Windows 10?
Choosing the right desktop operating system is one of the most important decisions you’ll make. But you’re not alone: Windows 10 has been downloaded over 500 million times, making it the fastest-growing version of Windows ever. That’s a lot of desktops, and many people are deciding to upgrade from their current version of Windows.
There are plenty of reasons to choose Windows 10 over Windows 7 or 8: it’s more secure than previous versions, it gives users more control over their PC experience, and it offers great new features like Cortana — Microsoft’s digital assistant that can help with everything from finding a recipe to searching the web to set reminders. In addition, the UI is more polish and up-to-date.
Why not Windows 11? According to Microsoft document, Windows 11 has much more sticker requirements for hardware, such as TPM 2.0, Secure Boot. Only new PCs are eligible to run Windows 11. Windows 10 is more hardware friendly. You can install Windows on Ill PCs.
Challenges to Create Windows 10 Bootable USB on Mac
In my experience, it is not hard to create a Windows 10 bootable USB on Mac as I am a fluent users for command line. Even though the file system, interface, and the whole environment are different from windows. But there are similarities between both the operating system. In windows we have CMD, and in Mac, we have a terminal. Both of them can be used to create a bootable USB. Since both the operating system are differently built, for a new user it is really hard to create a bootable USB in Mac.
Although, I admit that in windows even using CMD you can’t create a macOS portable USB. For that, you have to use a third-party application such as UUByte DMG Editor.
In the end, there are some points that you must be aware of:
- Popular windows software (Media Creation tool, Rufus, Ventoy) that can be used to create a bootable USB for Windows won’t run in macOS.
- The native method that can be used to create a Windows 10 bootable USB in Mac was Boot Camp Assistant, Which, unfortunately, was removed since macOS Big Sur.
- Most of the usual methods do not work under the M1 & M2 Mac.
So, what is the right solution to create a Windows 10 bootable USB in macOS? There are a couple of methods that can be used to do the job.
- UUByte ISO Editor: This is the best solution to create Windows 10 bootable USB on Mac for average users. You don’t need to type any command to finish the task as it has a superb user interface. It is a good ISO management application, with an easy-to-use interface, both available for Windows and Mac. However, you need to pay a few bucks for this feature.
- Terminal: Terminal is by far the most powerful technique that can be used to do almost anything. Creating a Windows 10 bootable USB is not hard at all if you know how to interact with text commands. If not, go with UUByte ISO Editor.
- Virtualization: Create a Windows virtual machine and simply use the windows native application to create a bootable USB. There are many open source virtualization software that you can use on your Mac such as UTM, VirtualBox, and a paid version parallel desktop. However, it is not easy to set up a Windows 10 virtual machine on a Mac.
- Bootcamp: It is still one of the best tools for making Windows 10 bootable USB on Mac or installing Windows directly on Mac. Unfortunately, it is only working on Intel Mac and deprecated on M1 and M2 Mac. The catch in here is to create a Catalina or Mojave virtual machine on your Mac and run Bootcamp app to create a Windows 10 bootable USB.
How to Create a Windows 10 Bootable USB on M1 or M2 Mac
It is totally possible to create a Windows 10 bootable USB on M1 or M2 Mac. We are going to share four different approaches to make a Windows 10 bootable USB on Apple Silicon Macs.
Note: Before beginning to create a windows 10 bootable USB on your Mac, please make sure you have a Windows 10 ISO image at hand. If not, please download Windows 10 from Microsoft.com.
UUByte ISO Editor: Best Solution to Make Windows 10 Bootable USB on Mac
Windows 10 is one of the most popular operating systems in the world, but it doesn’t come as a default option on Mac. If you are looking for a solution to make Windows 10 bootable USB on Mac, then UUByte ISO Editor is the best choice. With this bootable USB creation software, you can easily create a bootable USB drive or DVD with Windows 10 ISO file that can be used to install and run the operating system from a flash drive.
How UUByte ISO Editor Work?
The main function of this tool is to make Bootable USB Drive from Windows 10 ISO file. It supports all versions of Windows 10, including the home edition and Pro version. In addition, it also supports making bootable DVDs from any version of Windows 7/8/10 ISO file. All you have to do is click on the “Create” button and follow simple steps that will take less than 5 minutes to complete the process. After that, you can use this created drive for installing or running your favorite OS on Mac without any issues.
Pro:
- Fully support M1 and M2 chip as well as Intel chip.
- Compatible with macOS Ventura, Monterey, Big Sur, Catalina and Mojave.
- Take less time to create bootable USB.
- Split install.wim file by default.
- Easy-to-navigate UI.
Cons:
- Free trial app.
- Linux ISO is not supported.
Steps to Create a Windows 10 Bootable USB on Mac Using UUbyte ISO Editor:
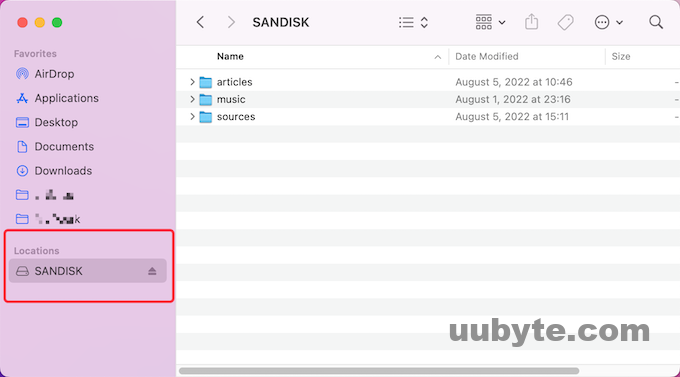
You need to connect a USB flash drive to the computer and make sure you can see the drive name in Finder app.
In the next step, download the latest version of UUbyte ISO Editor. open the dmg file and drag the app icon into the Applications directory as usual.


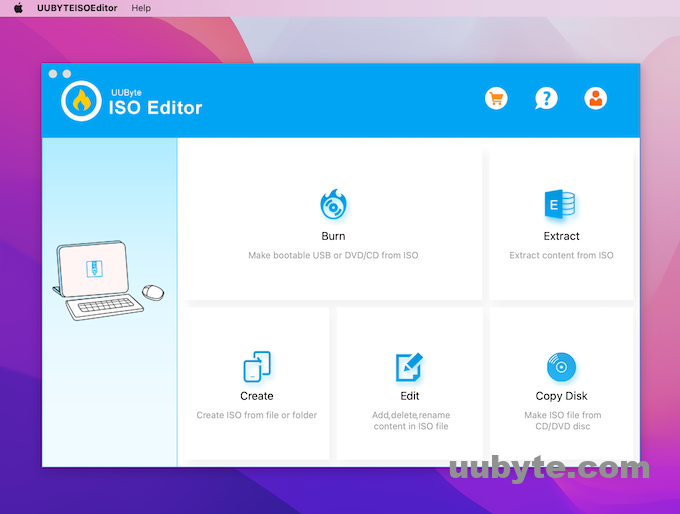
Now, launch the UUByte ISO Editor from the Launchpad and click the Burn tab at the home screen.
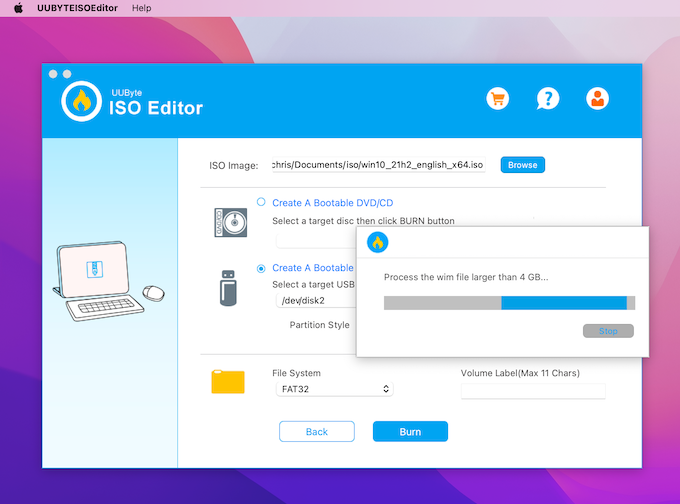
Once it is launched, you need to select the USB flash drive, then click on the browser and locate the Windows 10 ISO.
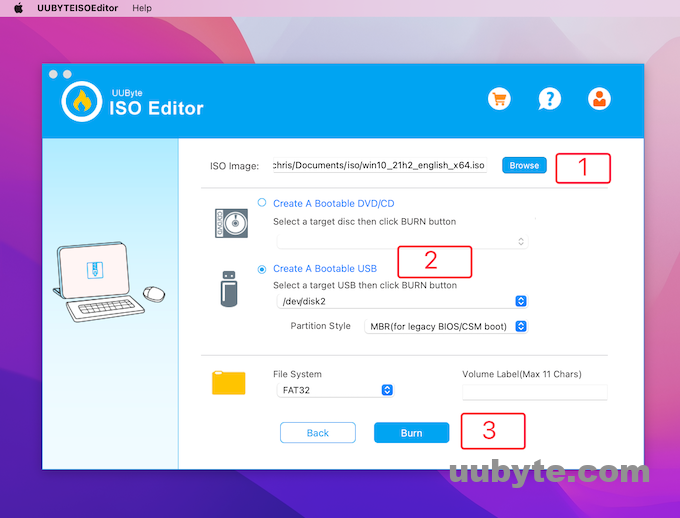
Once configuring the settings are done, click on the Burn. This will format USB and decompress Windows 10 ISO file.
For the next step, you have to wait until the files from ISO should be copied into the USB. In addition, this app will split install.wim file if the file was larger than 4GB.
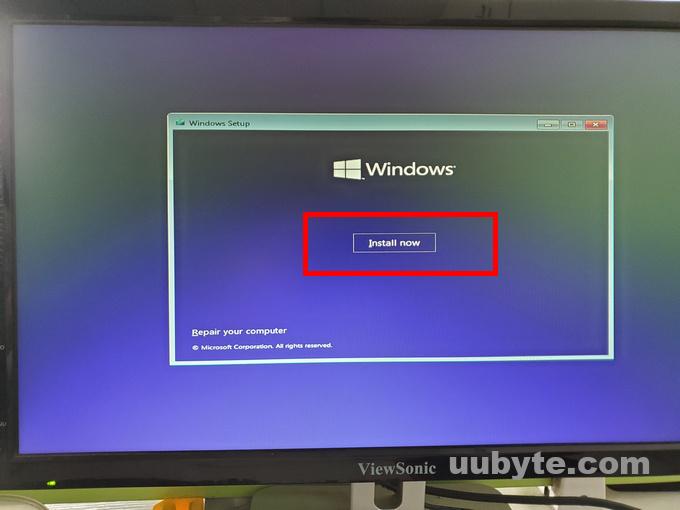
When the whole process is completed, you can use this bootable USB to install Windows 10 on a PC or Mac. In our example, Windows 10 will be installed on my DIY PC.
We also made a video tutorial on YouTube and you can check it out:
Terminal: Free Utility to Create Windows 10 Bootable USB on Mac
The terminal is a free app for Mac OS X that allows you to create and modify USB drives, as well as bootable USBs. It also has an integrated command line terminal window, which allows you to run commands and scripts on your system.
If you are tired of the restrictions imposed by your Mac and want to use it with a PC, you can use Terminal to create a bootable Windows 10 USB drive.
Steps to create a Windows 10 bootable USB on Mac using Terminal:
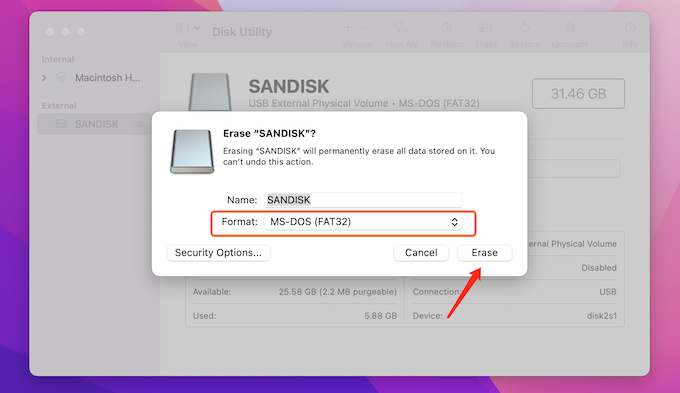
Insert the USB to the computer and open Disk Utility. Select the USB flash drive, click on Erase and name it whatever you want. But you have to keep in mind that the Format Must be MS-DOS (FAT) and the scheme must be Master Boot Drive. After that click Erase to format the USB drive.
Double click on the Windows 10 file to mount it as a virtual volume on your Mac. You can see the name from Finder app’s left sidebar. In our case, the volume name is CCCOMA_X64FRE_EN-US_DV9.
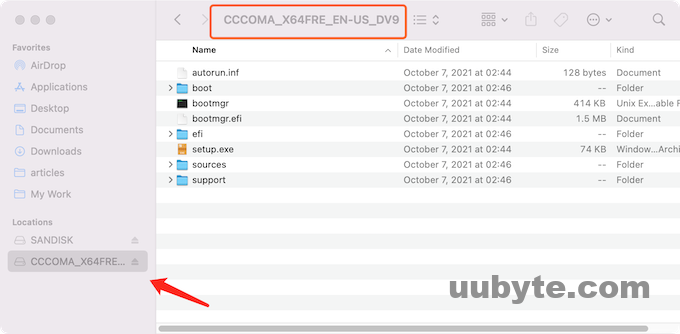
Open the mounted Windows 10 ISO and copy all of them except for the install.wim which is located inside the source’s directory. After that, paste all the files and folders that you copied and paste them inside the USB.
Now, open Terminal app and install Homebrew package manager by executing the below commands line by line:
/bin/bash -c "$(curl -fsSL https://raw.githubusercontent.com/Homebrew/install/HEAD/install.sh)"
brew install wimlib
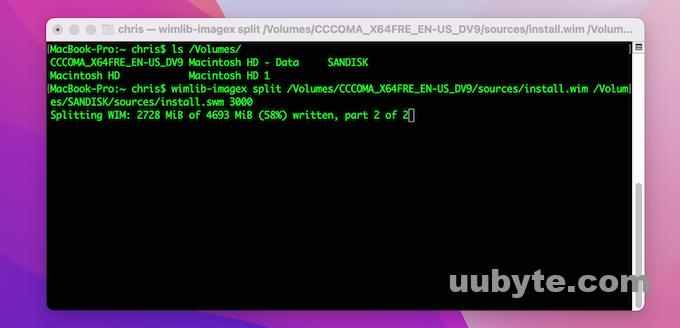
In the below command make sure to replace the name of "CCCOMA_X64FRE_EN-US_DV9" with the name of the mounted Windows 10 ISO.
wimlib-imagex split /Volumes/CCCOMA_X64FRE_EN-US_DV9/sources/install.wim /Volumes/SANDISK/sources/install.swm 3000
- CCCOMA_X64FRE_EN-GB_DV9 is the volume name of mounted Windows 10 ISO.
- SANDISK is the volume name of USB drive.
- 3000 is the file size of split install.wim file. The unit s MB by default.
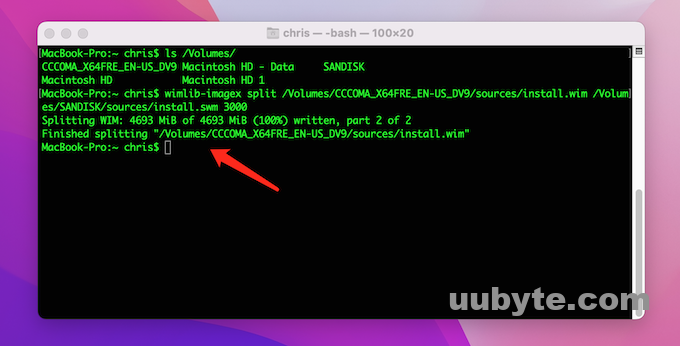
You will see the following prompt when the split is completed.
As a reference, you can also check out this video tutorial:
Parallels Desktop: Creating a Windows 10 Bootable USB on Mac in a Windows Virtual Machine
Parallels Desktop is a cross-platform virtualization solution that allows you to run Windows, Mac OS X, and Linux applications simultaneously on your Mac. The latest version (Parallels Desktop 18 for Mac) has added support for Apple M series Mac.
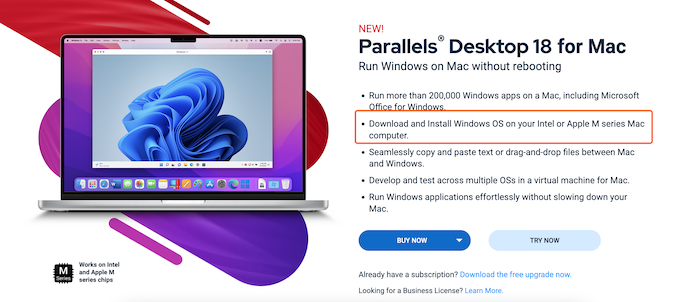
Parallels Desktop enables you to run Windows applications on your Mac as if they were running locally while maintaining the hardware resources of your Mac and protecting them from being used by Windows. You’ll be able to use your favorite desktop applications with all their features, in addition to the full range of capabilities available for running natively on the Mac (including App Container support).
Parallels Desktop works with the most popular Windows programs. It supports popular applications such as Microsoft Office, Adobe Photoshop, and many more. Parallels Desktop also includes a virtual disk manager that makes it easy to manage multiple disks with different operating systems.
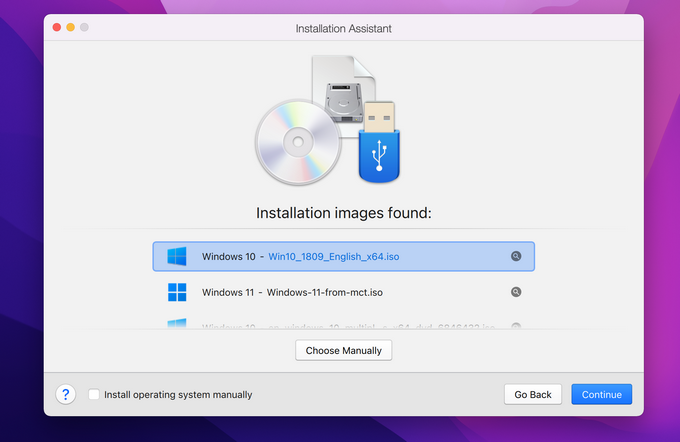
The moment you install windows on the parallel desktop on your Mac, it is as if you are using Windows itself. It means right now you can use the windows native applications to create a Windows 10 bootable USB easily. So, there are multiple apps or third-party applications that can be used to create a Windows 10 bootable USB. But the most common and popular application is Rufus.
Before beginning, you need to get the Windows 10 ISO image, following that you have to get the Rufus from their official website. Then attach the USB to the computer, launch Rufus, select the USB in the Rufus, then select the ISO, configure the BIOS settings such as UEFI and legacy and once you are done click start and it will do the job.

Bootcamp: Perfect App to Create Windows 10 Bootable USB on Intel Mac
There is a utility called boot camp assistant in your Mac that can be used to develop both macOS and windows side-by-side. The Boot Camp system is allowing you to dual boot on a single hard drive on your Mac, and during the creation of Bootcamp, it is also going to provide the necessary drivers for Windows to work properly. Except it is in the past because this feature is only available with Intel processors. Among the other features of BootCamp, you can use it to create a bootable USB of Windows 10 too.
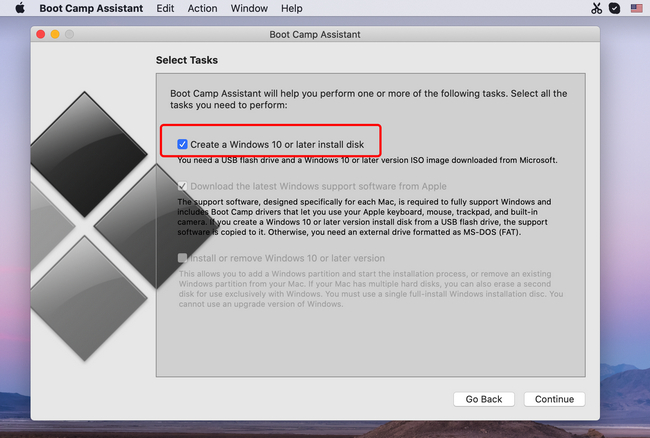
These steps are to create a Windows 10 bootable USB using boot camp or simple. Unit to insert the USB into the USB port of your Mac fully stop then you have to open the boot camp through the spotlight or you can use the launchpad as you desire. The moment boot camp assistant is launched, you have to click continue until you are on the tasks window. Where you have multiple options. Among them, you will see the option to create a Windows 10 or later install disk. You need to select that.
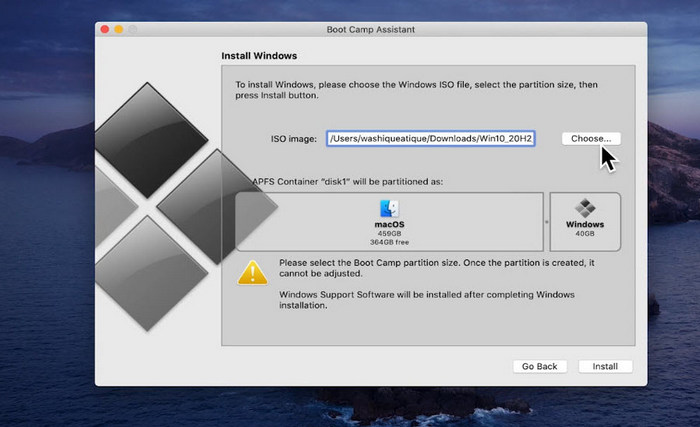
You need to look at the Windows 10 ISO image and open it into the boot camp assistant. After that, you must select the USB flash drive that you added earlier to the computer. Following that you have to click continue and wait for it to be formatted and then it’s going to partition, after that it’s going to download the required files and it will be done after that.
Frequently Ask Questions
How do I make a bootable Windows 10 USB for Mac 2022?
The apps that are capable of creating a bootable Windows 10 USB on Mac in 2022 include Terminal, UUByte ISO Editor and Bootcamp Assistant.
Can you create a bootable USB on Mac?
Yes. However, there are less apps for doing this on Mac. You can find the right solution in above parts.
Can you create Windows installation media on Mac??
UUByte ISO Editor is the perfect solution to create Windows installation media on Mac, including M1 and M2 Mac. For Intel Mac, Bootcamp Assistant is the second choice.
How do I make a Windows USB stick on a Mac?
Terminal and UUByte ISO Editor can help you make a Windows USB stick on Mac without any problem.
Does Rufus work on Mac?
Rufus does not work on Mac, unless you install a Windows virtual machine on your Mac and run Rufus from virtual machine. The popular virtual machine software on Mac includes UTM, VirtualBox, VMware Fusion, and Parallel Desktop.
Can I use Bootcamp on M1 Mac
Unfortunately, Boot Camp Assistant was removed from Macs powered by Apple Silicon. Hence, Bootcamp is not a valid solution to create Windows 10 bootable USB on M1 or M2 Mac.
Missing media driver when installing Windows 10
It is an error during the installation of windows you are facing sometimes. This happens mostly because of incomplete install.wim file. You need to cut the install.wim file into small pieces to make it work on a MS-DOS FAT partition.
Why is Bootcamp not able to create Windows bootable USB anymore?
Apple removed that feature from macOS Big Sur. This means Intel Macs with Big Sur, Monterey or Ventura won’t be able to use Bootcamp app to create bootable USB. However, you can still use this app to install Windows on a Mac as dual boot.
Conclusion
Windows 10 is still dominating the desktop operating system. I am sure there are thousands of users like me who own a Windows 10 PC as well as a Mac at work. One awkward case we could meet is that the Windows 10 PC suddenly refused to work. This is quite common during a Windows 10 auto update. To fix the issue, we need a bootable Windows 10 USB.
Unfortunately, creating a Windows 10 bootable USB on Mac seems to be much harder due to Mac software and hardware upgrade. As we know, Bootcamp app has been discontinued for Apple Silicon Macs, powered by M1 and Mac. Currently, Terminal is the only built-in app that can be used to create a bootable USB entirely on Mac. It is a command-line based interfaces and not everyone is familiar with it. Please don’t freak out. We can try other alternatives suggested in above sections.