
A lot of new features were added to Windows 10 by Microsoft team in recent years. Now, the size of Windows 10 ISO goes from 3.8 GB (1507) to 4.6 GB (1909). The increasement in file size brings up a new issue when creating bootable USB from Windows 10 ISO, especially on Mac. The reason is that FAT32 partition is unable to store a single file larger than 4GB. This is one of the biggest pitfalls of FAT32 file system. Unfortunately, Mac and some old computers can only detect a bootable USB drive formatted to FAT32 during starup in BIOS.

From above screenshot, you can see install.wim file is bigger than 4GB from unpacked folder of Windows 10 ISO image file. This means the burning process would fail for sure on a Mac because of the file size limitation of FAT32 and Mac can not read NTFS file system by default. You have to split the install.wim file into small pieces and burn it to USB after that.

In this post, we will introduce two different ways to split and burn Windows 10 ISO on a Mac or PC for new Windows 10 ISO downloaded from Microsoft website.
How to Split and Burn Windows 10 ISO on Mac
As you are familiar with the burning issue because FAT32 does not support the file greater than 4GB. Also, you can't skip the FAT32 format feature because it is quite essential for a drive to install Windows 10. Now, the only possibility left, is the splitting of install.wim file (Windows Imaging Format). It is the file that contains the Windows setup files in a compressed form and splitting can be done easily on Mac as well as on Windows OS.
There are several tools and even inbuilt utilities are presented on Mac that helps you to create a Windows 10 bootable USB from ISO file. If the file size is within the limit, then you can erase the USB drive and can easily copy all the contents of Windows ISO to USB drive manually. But here the case is different because one of the files install.wim is greater than 4GB and this is the biggest challenge. To overcome the same, you have to split install.wim into small parts with a free tool called wimib, which is a cross-platform library for editing and managing Windows Image (.wim).
Step 1: To begin the task, you will have to get the dribe name of correct USB drive inserted on your Mac so that you can erase it. Please launch Terminal and list all connected drives on Mac by typing thiss command.
diskutil list
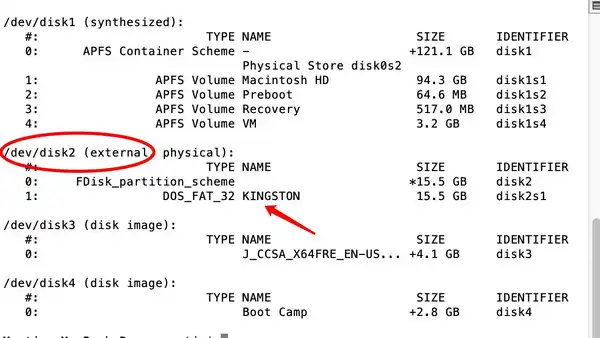
Step 2: In the above example, disk2 is the drive name of inserted USB drive and you need to mark it. Your next move is to format the USB drive through the following command:
diskutil eraseDisk MS-DOS "WINDOWS10" MBR disk#
Note: Here, disk# represents the name of the USB drive. Enter the disk name as per the list that you found earlier in the step.
Step 3: Next, mount Windows 10 ISO file on your Mac through the command. You should change the folder to the location where Windows 10 ISO file sits in.
hdiutil mount ~/Downloads/Win10_1903_V1_English_x64.iso
Step 4: After that, copy Windows 10 ISO files except install.wim as you need to split it. CCCOMA_X64FRE_EN-US_DV9 is the mounted point of Windows 10 ISO image. WINDOWS10 is the mounted point of USB drive.
rsync -avh --progress --exclude=sources/install.wim /Volumes/CCCOMA_X64FRE_EN-US_DV9/ /Volumes/WINDOWS10
Step 5: Now, the real game start as you need to split Windows 10 ISO file and for that you need wimlib. It comes with the package known as Homebrew, a famous package management tool on Mac. You'd better install it first on your Mac before using wimlib.
/bin/bash -c "$(curl -fsSL https://raw.githubusercontent.com/Homebrew/install/master/install.sh)"
Step 6: Now, install wimlib using Homebrew through the command.
brew install wimlib
Step 7: Now split Windows 10 ISO file through the command. After that copy the splitted files to your USB drive in Finder app.
wimlib-imagex split /Volumes/CCCOMA_X64FRE_EN-US_DV9/sources/install.wim /Volumes/WINDOWS10/sources/install.swm 3800
That's it; your bootable USB drive is ready to use. However, the split process will take a longer time and you need to keep patience. Once the task is done, you can easily grab the new features of Windows 10 on your computer.
2. How to Split and Burn Windows 10 ISO File on a Windows PC
In this method, you are going to run multiple applications to split and burn Windows 10 ISO file on a USB drive. You will have to mount Windows 10 ISO file as a virtual disk first. And also, you need to use Command Prompt utility to split install.wim file. Now, let's see the entire procedure in a detailed form.
Step 1: Go to the folder where Windows 10 ISO file is located. Double click the file name to mount the ISO file as a virtual disk on Windows 10. Now, open another window, create a new folder and then copy all files and folders in virtual disk to it.
Step 2: Run Command Prompt as an administrator and then enter the following command. Make sure to press Enter key after the completion of each command.
Dism /Split-Image /ImageFile:C:\folder_name\sources\install.wim /SWMFile:C:\folder_name\sources\install.swm /FileSize:3800
Note: Here, the folder name should be the one that you created in Step 1. It is that folder where you have copied all the contents from Windows 10 ISO file.
Step 3: Once the command prompt task is done, go to the source folder, navigate for install.swm and install2.swm. If you found these files, it means the split process is successfully done.
Step 4: Now you can remove the original install.wim file from the source folder. Next, insert the USB drive on your computer and then copy all the contents of the source folder and further paste them into the USB drive.
Note: To perform the same task, you can also use any trusted ISO burning tools like UUByte ISO Editor.
Step 5: Once the above task is done, a bootable Windows USB drive is ready to use.
This is about splitting and burning Windows 10 ISO files that is larger than 4 GB on a Windows PC. However, if you are a Mac user and need to perform the same task, then the process will be completely different. Here, you are going to use Terminal app and wimlib to achieve the goal.
Conclusion
Windows 10 ISO can be mounted automatically on Mac and Windows 10 computer. You'd better mount the file first and check if install.wim file is larger than 4GB or not. If yes, then you should burn ISO image file and split install.wim file into small parts. If not, then you can burn it with any ISO burning software on Mac or PC.
The entire process is done through text commands. So, make sure to input the right command and try to avoid any mistake. Please note, the method will work for Windows 10 ISO file ranging from version 1809 to 2004.

Petty is editor in chief at UUByte and writes various topics about Windows and Mac to help people make the most of current technology.