How to Burn DMG to USB on Mac and Windows


A DMG file is essentially Apple's format for mountable disk images in Mac OS X (macOS) computers. When opened, it mounts a virtual disk on the computer, and is normally used for installing new applications. DMG file is usually encrypted and compressed, unlike ISO, which is an uncompressed disk image format.

While DMG files are usually downloaded from the Mac App Store, they can also be burned to a USB disk when you want to install a utility on another machine. In such cases, you will need to create a bootable macOS disk or burn it to a USB flash drive so it can be used on another system for OS installation. This article shows you four different ways to burn .dmg file on Windows PC or Mac.

P.S if you did not download the macOS dmg file, here are a few useful links to download Big Sur, Catalina Mojave and High Serria.

Part 1: How to Burn DMG to USB on Mac for Free (Disk Utility)

The native disk image utility on Mac is ideal for burning a DMG to a USB drive. Once you burn the file to the drive, this drive can be used to install the associated application on any other Mac system. The process may vary slightly depending on which version of Mac OS X your computer is running, but the steps below will give you a fair idea of how the process should be carried out.

Step 1: Go to Applications >> Utilities >> Disk Utility and click on it to launch the program.

Step 2: On the left, you'll see all the available drives. Insert the USB drive and watch as it appears on that list.

Step 3: Now open a Finder window and locate your DMG file. Drag and drop it under the drive names in the Disk Utility app.

Burn to USB with Disk Utility


Step 4: Select the file, and then click on "Burn" in the same window. In the popup that appears, select your destination drive, which is the USB flash drive you want to burn the DMG file to. Click "Burn" in the popup window.

Once the process is complete, remove the USB stick and use it to install the application associated with that DMG on any other Mac computer.

Pros:


Cons:

Part 2: How to Burn DMG to USB on Windows PC & Mac (Bootable)

UUByte DMG Editor is a versatile application that can help you burn DMG files to a USB drive on Windows PC and Mac. The interface is very simple, and all you need to do is click a few times and the job is done for you. DMG Editor gives you the option of creating macOS bootable USB drive for installation, and is the perfect tool for transporting your DMG files in their ISO avatar. Assuming you have a USB drive with enough capacity, it can hold several programs.

DMG Editor doesn't require any technical expertise because it is specifically designed for new users who may not be comfortable handling disk images. All the hard work is done behind the scenes, and the layout is intuitive enough for any novice to figure out what to do. For first-time users, here's a small guide for using it to burn .dmg file to a USB drive.

Key Features of DMG Editor

  • Make USB bootable after burning to USB.
  • Able to edit DMG file and recreate it.
  • Also support burning to CD or DVD disc.
  • Easily extract files from DMG file.


Step 1: Install UUByte DMG Editor

Install DMG Editor after downloading it from the official site. Insert your USB drive into a free port.

UUByte DMG Editor


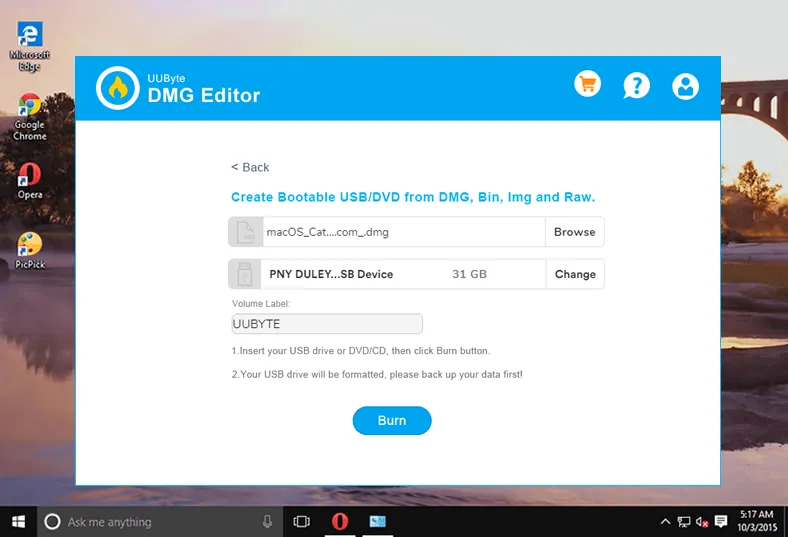
Step 2: Insert USB Drive and Import DMG File

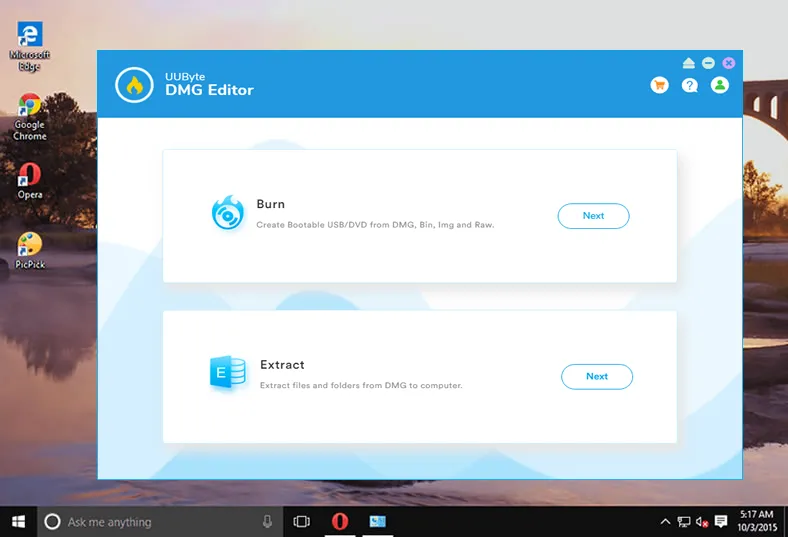
Launch DMG Editor and select the "Burn" option, which will take you to a new window.

UUByte DMG Editor


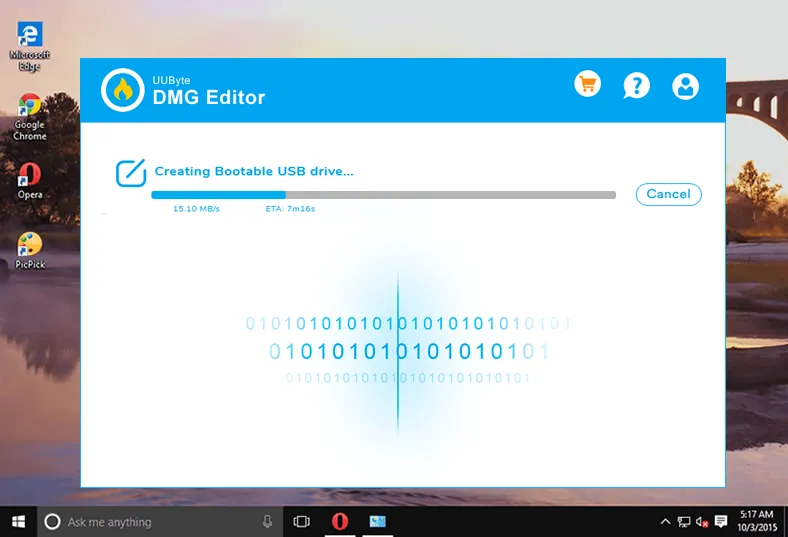
Step 3: Start Burning DMG to USB

Select the DMG file and specify the destination, which is your USB drive. Click on Burn. That's it! In a few moments your USB drive containing the DMG file will be ready.

UUByte DMG Editor


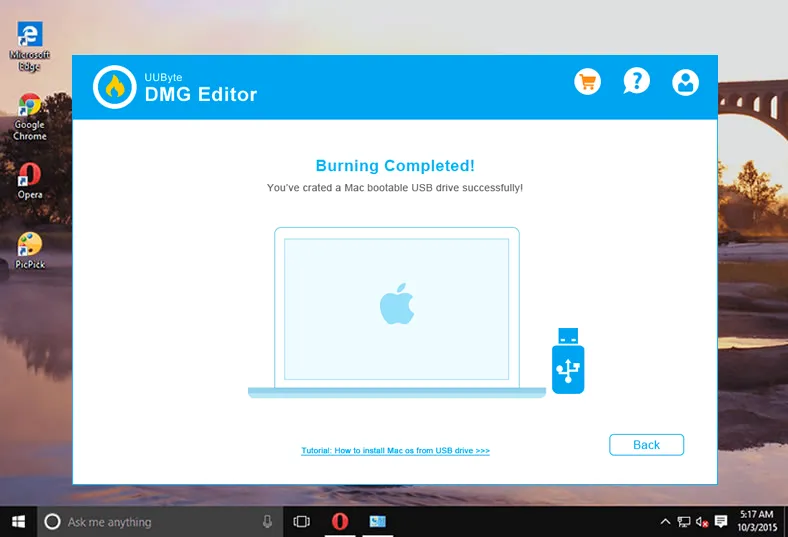
Step 4: Install macOS from USB

When the burning process is completed, you will get to the following screen. Please open the foot link and take a full read, which tells you how to install macOS from external USB drive.

UUByte DMG Editor

Using DMG Editor to create macOS bootable USB is an easy task because there is no command involved and the user interface is intuitive. That's why it is favored by thousands of users across the world.

Pros:


Cons:


Part 3: Convert DMG to ISO and Burn ISO to USB

In certain instances, you may want to use a Windows computer instead of a Mac, which means you won't have the disk utility. Besides, Windows can't natively handle DMG files, so you will need to convert it into an ISO disk image that Windows can work with. Follow the steps below to do this.

Step 1: Download the DMG file and then convert it to ISO using a free online conversion service like YouConvertIt.

Step 2: Once you do this, you can use another utility like ISO Editor to burn the ISO file to a USB drive.

Convert DMG to ISO

Remember, even if you convert the DMG to ISO, it's still Mac-compatible only, so you can't use it to install the program on a Windows system. However, it's helpful when your own system is a Windows PC and you want to burn the DMG file to a USB drive. In this case, you will need to convert it back to the DMG format for the installation.

Pros:

Cons:

Part 4: How to Burn DMG to USB on Windows 10/8/7

If you're on a Windows PC, another way to burn a DMG file to a USB drive is to use TransMac. This is very useful if your Mac has become unbootable and you only have a Windows alternative. In such cases, you can use TransMac to burn the DMG file for Mac OS X (whatever version you want to install on your broken Mac) to a USB drive and do the installation that way.

To install Mac OS X, you're going to need a USB with at least 16 GB of free space. Also, it's better to take a backup of existing data so you don't lose it during the burn process. Follow the steps below to use TransMac:

Step 1: Download an original copy of TransMac to a Windows PC. The 14-day trial will let you execute the process we're going to describe, so go ahead and install it.

Step 2: Download the DMG file for the version of Mac OS X that you want to install. Now launch TransMac, but make sure to run it as the Administrator. Click on "Run" once the application is launched, and insert the USB flash drive.

Step 3: The next step can be a little confusing because, normally, you would select the DMG or ISO file first before selecting the destination drive. Here, it's the other way around. In the main window, right-click on the USB drive in the left-side panel, then select "Restore with Disk Image".

Step 4: You'll get a warning popup. Select "Yes" if you've backed up the contents of the USB drive, or else click "No", backup the drive and then resume the process at Step 3.

Step 5: This is where you select the disk image, so go ahead and choose your Mac OS X .DMG file and click "Ok"'. The DMG file will now be burned to the drive you specified.


Transmac DMG Burning


Pros:

Cons:

Summary

All of these methods work well, so it's just a matter of preference and convenience, and depends on whether you have a Mac or a Windows PC. On a Mac, Disk Utility may show you some errors when burning a DMG file to a drive. Similarly, when you use a Windows system, converting DMG to ISO could corrupt the file, making it unusable once you convert it back to DMG. That's why we recommended YouConvertIt for that. Based on all these factors, choose the method that will work best for your specific situation.