
Big Sur is the next generation of Apple macOS. it has tremendous imporvements over Catalina. When working on with Big Sur, you might need to complete advanced tasks such as creating bootable Windows 10 USB installer. So if you are hunting for the solutions to make Windows 10 bootable USB on macOS Big Sur, then you have landed on the right place. We will share 3 best ways to accomplish the task and all of them are tested on a MacBook Pro running the latest macOS Big Sur. You can choose one of methods according to your own taste. So, let's dive into the details.
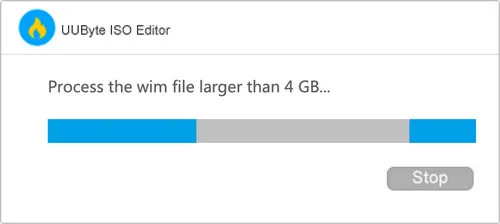
[2024 Update]: UUByte ISO Editor supports burning Windows 10 ISO image file that is larger than 5GB. The recent upgraded version has a built-in feature to split large install.wim file (>4GB) into small ones during the copying process.
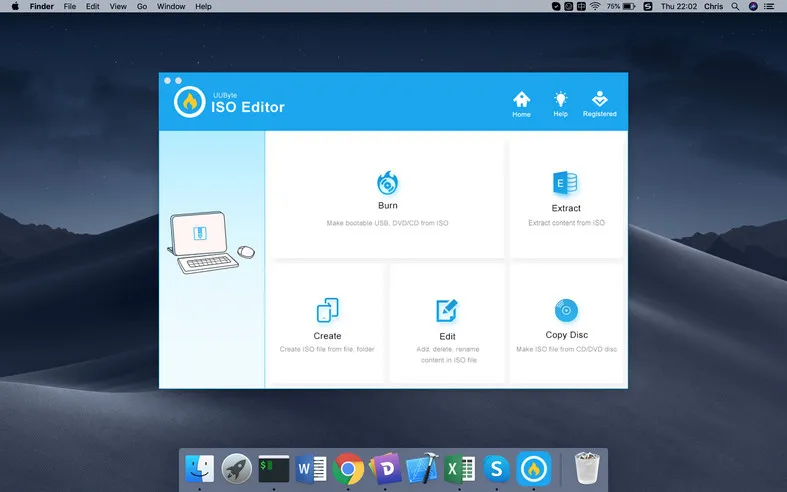
Make Windows 10 Bootable USB on Mac Big Sur via UUByte App (Easy and Recommended)
Frankly speaking, most of the average users dislike Terminal because of text commands. Most of them prefer completing the same task in a graphics user interface. So the following two secions we will introduce two GUI based apps for creating bootable Windows 10 installer.
Our first recommendation is UUByte ISO Editor for Mac. It is a smart app that manages ISO files efficiently on mac and the core function is creating bootable USB from Windows ISO image. It even allows the users to edit the ISO file. The features embedded in this software are outstanding and the best part is the interface, it is very smooth and user-friendly that helps the users to achieve the goal smoothly.


Step 1: Install UUByte ISO Editor on Mac and Insert USB Drive
Download and Install UUByte ISO Editor on macOS Big Sur. Next, you need to download Windows 10 ISO file and then insert the USB drive on your Mac.
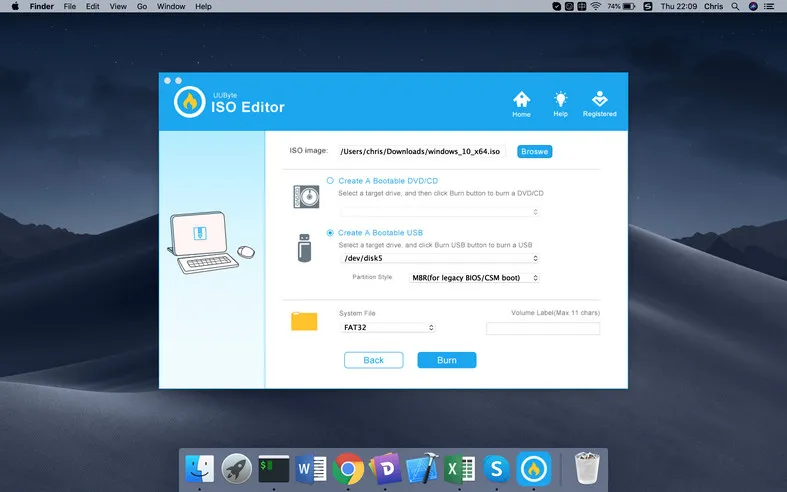
Step 2: Import Windows 10 ISO
On UUByte main interface, you will get several options, click 'Burn' tab and then upload Windows 10 ISO file via 'Browse' button. Now click on the USB icon and choose the USB drive name from drop-download list. Make sure to select FAT32 in the System Files section.
Step 3: Start Making Windows 10 Bootable USB on Mac
Click 'Button' button at the bottom to initialize the ISO burning process. Wait about 10 minutes and you will receive a successful message on the screen after it is finished. That's it; a Windows 10 bootable USB is ready for usage.

For latest Windows 10 ISO file, UUByte ISO Editor needs one more step to make the USB bootable. The extra step is to cut down install.wim file into small ones. It is done automatically and you should see this screenshot at the end of process. And you have to wait a couple of minutes additionally.
UUByte ISO Editor delivers more accurate and fast result and also reduces the effort given by the users because the entire process is completely automatic. So, grab this tool now and create a bootable USB on macOS Big Sur.
Make Windows 10 Bootable USB on Mac Big Sur via Terminal App
Terminal is a built-in app on macOS you might never heard of because our daily work does not need it at most of time. However, it is a powerful tool for advanced and complex task. And it is a great replacement of Disk Utility, a GUI-based free app for which you can use in the past to make bootable USB directly. In this part, we will use Terminal app to create Windows 10 bootable USB on macOS Big Sur.
Step 1: Download a free copy of Windows 10 ISO image first and insert the USB drive on your mac machine.
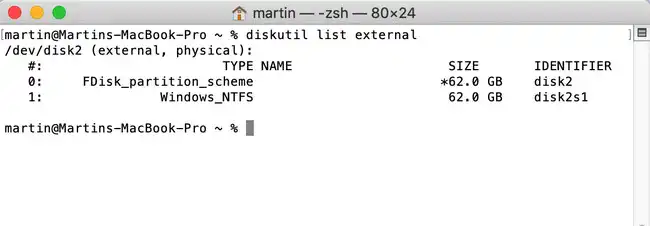
Step 2: Type 'ter' in search field of Launchpad and open Terminal app from result. After that, type the below command to get the list of external disks attached to this Mac.
diskutil list externalStep 3: The returned output of above command is shown in below. In this example, disk2 is the name of USB drive you just plugged in. And it is the only external device attached to Mac. So it is easy to identify. For multiple USB devices, you can locate the device by size.
Step 4: Format the USB drive to MS-DOS, making its capable of storing Windows OS in this partition. The command is given below:
diskutil eraseDisk MS-DOS "WINDOWS10" GPT disk2Step 5: 'WINDOWS10' is now the label name of USB drive. You can change to other names but all the letters must be capitalized.
Step 6: Find the path of downloaded Windows 10 ISO image and mount the file through the command provided below.
hdiutil mount ~/Downloads/your_windows_10_image.iso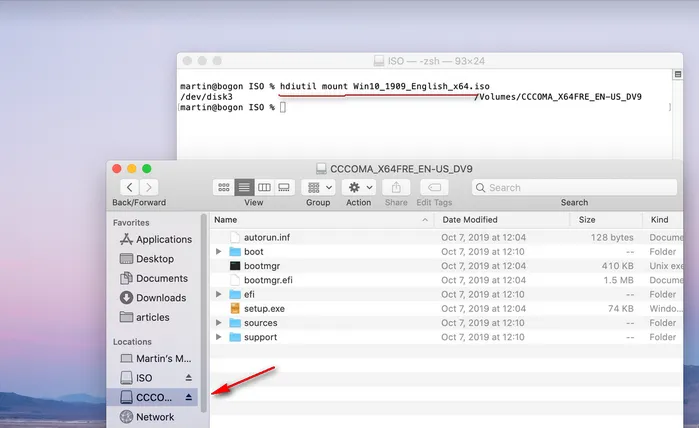
Step 7: Finally, copy all the installation files from mounted ISO image to the target USB drive by running the following command:
cp -rp /Volumes/COCOMA_X64FRE_EN-US_DV9/* /Volumes/WINDOWS10/Here, COCOMA_X64FRE_EN-US_DV9 is the mounted name of Windows 10 ISO. WINDOWS 10 is the name of USB drive. If you have the different location of the mounted image, then replace it in above command. The above task will take some time and once it is done. Now, the USB drive becomes a Windows 10 bootable USB installer.
This method is an efficient one and gives good results. But most of the users, fail to get the result due to incorrect inputs. So, here you must focus on the commands and try to avoid mistakes. However, if you want to use an application that can reduce your stress, then go through the next method.
Make Windows 10 Bootable USB on macOS Big Sur via UNetbootin
UNetbootin is a free and open-source application that enables you to create Windows 10 bootable USB on Windows, Linux and Mac. The core functions are developed on QT and it gets updated regularly. Currently, you can run this app on macOS Big Sur without any issue. The method is straightforward and the detailed steps are listed below.
Step 1: Insert a USB drive on your Mac and unplug other attached portable device from Mac.
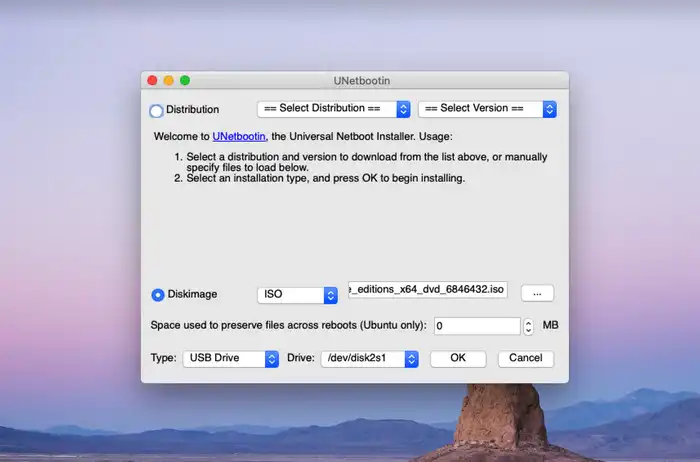
Step 2: Download UNetbootin Mac version from here and launch UNetbootin and on the home page, you will get several options, but the priority ones are Disk Image, Drive, and location of ISO image.
Step 3: Click the radio circle near Disk Image to enable it and after that, click on the three-dot button to add the Windows 10 ISO file to it.
Step 4: Move to the Type section, click the blank space at the right side of Drive to select the USB drive, and make sure to match the device name that you had noted down earlier.
Step 5: After completing the settings, click on the OK button. UNetbootin starts burning ISO to USB immediately and the process will take some time for file copying.
UNetbootin is one of the best free tools for bootable USB creation. This method is pretty easy, but the bootable process takes a lot of time. Apart from that, the rest features are good. The interface of UNetbootin is ultra simple and only essential options are listed that are necessary to complete the job.
Create Windows 10 Bootable USB on Mac Big Sur via Boot Camp
In the past, Boot Camp or Boot Camp Assistant was the most recomemnded way for creating Windows 10 bootable USB as it is a built-in system app developed by Apple. It comes with a feature called Create a Windows or later install disk. It allows the user making a bootable USB from Windows 10 ISO in a simple way.
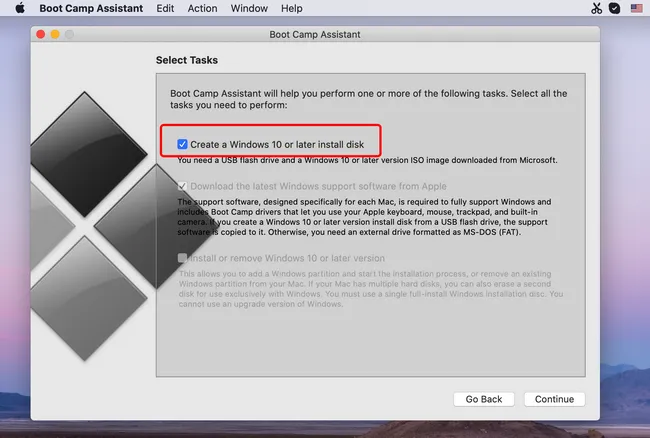
However, this function was removed from Boot Camp app since macOS Big Sur. Now, the only feature in Boot Camp is for creating a Windows dual boot with macOS. You are asked to remove all USB devices after launching this app. If not, Boot Camp won't proceed to next step.

Please don't waste time with Boot Camp if your Mac is shipped with macOS Big Sur.
Conclusion:
These are the best 4 ways to make Windows 10 bootable USB on macOS Big Sur. If you have good hands-on commands, then you can use the Terminal app. However, if you want to do it in easy steps, then better go with UUByte ISO Editor or UNetbootin.

Petty is editor in chief at UUByte and writes various topics about Windows and Mac to help people make the most of current technology.