
Balena is a computing infrastructure provider for building all kinds of connected Linux devices. The Balena OS is the at the core of the entire ecosystem. To get more people using this amazing OS for embeded devices, Balena finally lanuched its own tool Etcher to flash OS image to SD card or USB drive as the currently ISO burning failed to make a bootable disk for Balena OS.
Initially, Etcher was only a dedicated tool for burning Balena OS (based on Linux) to SD card. But now, Balena Etcher becomes a complete toolset for ISO burning, and not limited to Balena OS. You can burn all kinds of .img and .iso files to SD Card or USB with the latest build. Currently, it has over 40+ contributors who are making improvements to Etcher from time to time. Unfortunately, Windows ISO is not still not supported by Etcher.
Part 1: Balena Etcher vs Rufus
Rufus is the most popular option to burn ISO to USB and Rufus project was started in 2003. So Rufus usually comes with the first choice when it comes to ISO burning. Before getting started with using Etcher to burn Linux ISO file, we will start with a small comparison between Etcher and Rufus.
When comparing Etcher and Rufus, the community recommends Rufus as the first option. When searching for the question "Which software is for creating a bootable USB?" Rufus is always ranked first while the runner up is Etcher. However, it does not mean Etcher is not as excellent as Rufus.
Balena Etcher Pros
- Better support for OS image, including img, iso, zip and many more.
- Write image file to USB drive as well as SD card.
- Simple and clean user interface.
- Available on Windows, Linux and Mac.
Rufus Pro
- Higher successful rate with USB drive.
- 2X faster burning speed.
- More advanced configurations.
- Support UEFI booting.
- Able to download Windows ISO.
- Lightweight program with less computing resources.
Part 2: Etcher Download Link for Windows, Linux and Mac
For secure reason, it is alway recommended to download Etcher from its official website. When you visit Etcher product page (www.balena.io/etcher) , a download link is generated automatically based the browser user agent you are using. Click the green button to download Ether tool on your computer. If the detection was wrong, then don't worry. Scoll down the page a little bit and you will find download link for Windows, Linux and macOS. For quick access, here is direct download link for each platform.
Ether Download Link for Windows: https://github.com/balena-io/etcher/releases/download/v1.5.70/balenaEtcher-Setup-1.5.70.exe
Etcher Download Link for macOS: https://github.com/balena-io/etcher/releases/download/v1.5.70/balenaEtcher-1.5.70.dmg
Etcher Download Link for Linux: https://github.com/balena-io/etcher/releases/download/v1.5.70/balena-etcher-electron-1.5.70-linux-x64.zip
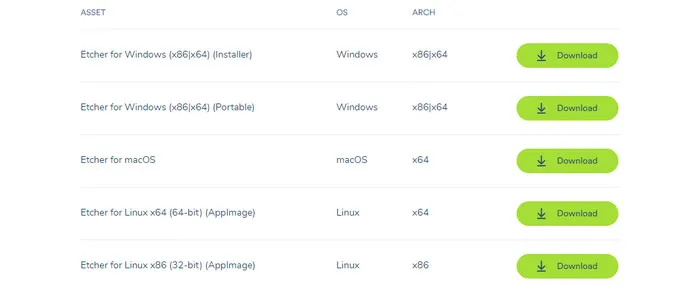
The file size is around 130MB, which is much bigger than Rufus. So you need to wait a few minutes to fully download Etcher. However, if the download speed from above link is too slow, you can find the alternative download link from MajorGeeks, Softnic or Techspot.
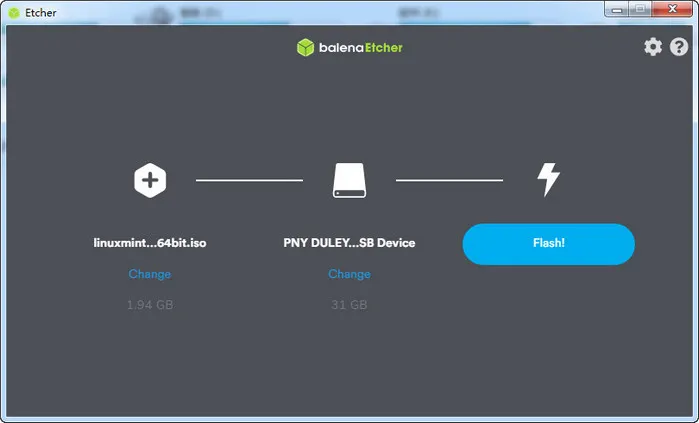
Part 3: How to Use Etcher to Burn Linux ISO to USB (on Windows 10 PC)
One of the best features from Etcher is burning ISO image to SD card or USB Pen drive. Here is how to Etcher for creating a bootable USB or SD card from OS image. It also supports creating bootable USB from other sources, including img, bin, zip. bz2, dmg and gz. However, only Linux ISO file is supported currently according to our testing result. All the process is explained in three 3 simple steps.
Step 1: Select your image file. All common file formats the utility supports is img, zip and other popular ones. You just drag and drop to the software or you can use the file picker to select the ISO file.
Step 2: The second step is to select your target drive. You should distinguish your USBs and other peripheral devices from your hard disks without wiping them. Simply insert your USB drive. If there is only a USB connected your computer, it will show up as follows. Otherwise, there will be an option, allowing you to choose the available devices.
Step 3: A Flash button will be highlighted. Click on it and Etcher will start writing the ISO file on your USB. There will be an Authentication dialog appearing to indicate an authorized user that can Flash a USB. Wait for a few minutes, and your live USB will be ready to use.
Part 4: Etcher Troubleshooting
There are less issues when burning img file to SD card, which was the first function built within the tool. However, burning OS image to USB is not always successful and there are three main issues you might encounter.
Problem # 1: Stuck forever on flashing process
Answer: We had this issue two times when burning Windows ISO image files. A good fix is to find a computer with higher hardware specs, Intel i5 Process along with 4G RAM is preferrable.
Problem # 2: USB not bootable after burning
Answer: This mostly happens on a modern computer with UEFI boot enable. You have to switch to legacy boot and turn off secure boot in BIOS.
Problem # 3: USB drive not detected
Answer: There is no such an issue on Windows as the USB driver is automatically installed when being connected. However, this is a major issue on Mac and Linux. The solution is either changing another USB or moving to Windows PC to complete the task.
Problem # 4: Can not Burn Windows ISO
Answer: Etcher is not able to process Windows ISO in recent versions because it needs special processing to make a bootable Windows USB drive. You have to use Etcher alternative as we suggest in Part 5.

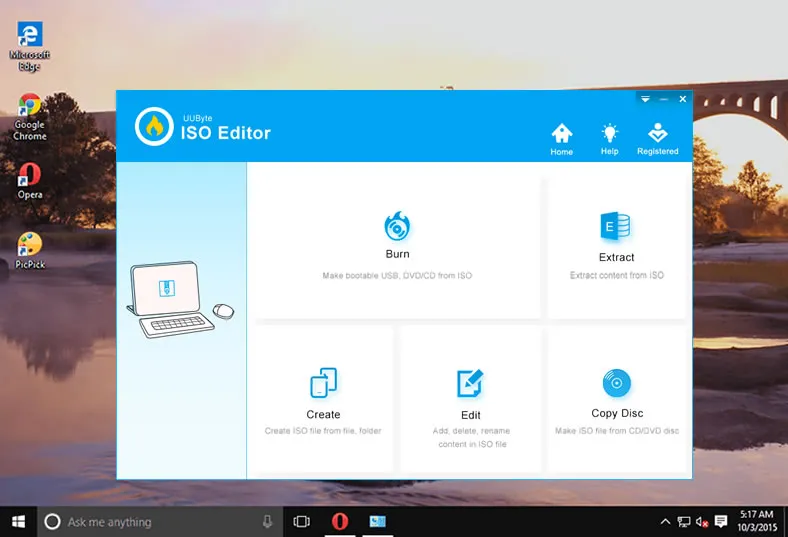
Part 5: Etcher Best Alternative on Windows and Mac
Although we have provided a few fixes to the problems when using Etcher, there are still some people who could not bypass the issue. Hence, we need to find a good alternative to Balena Etcher.UUByte ISO Editor is already a well-known software when coming to powerful features for users in terms of burning an ISO image.

When using it, creating a bootable USB flash drive will be an easy task. All you need is to install the software on your computer. What's more, it works on both MacOS and Windows computers. Once you know features of UUByte, you just follow these steps to make a bootable USB drive from an ISO file on a computer.


Step 1: Download and install UUByte ISO Editor software on your computer. It has both free trial and Pro version. Since you are trying to make a bootable USB flash drive, the free trial version is already enough for you.
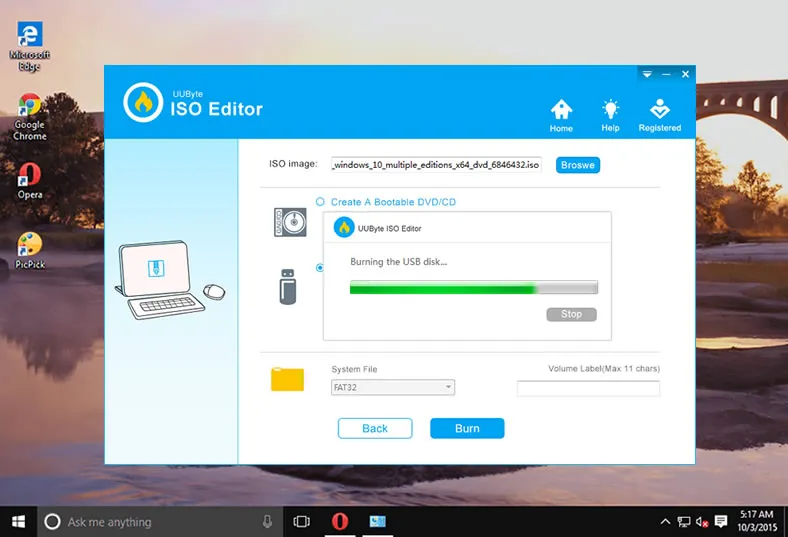
Step 2: After the app is installed on your computer, just click on it open it and select the "Burn" option. Then, browse to the folder of ISO file. Remember to connect your USB or insert the DVD disc into the computer, wait for a few seconds so that the UUByte can load all your drives.
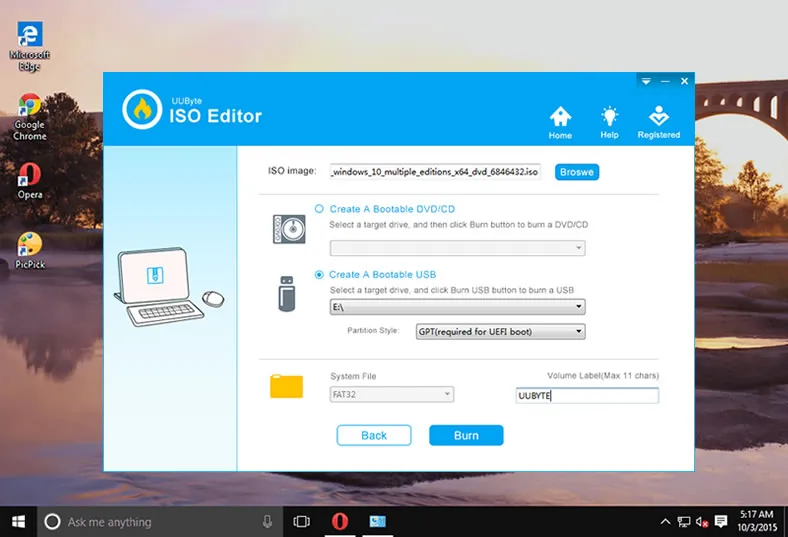
Step 3: Now, select the "Create A Bootable USB" option in the given menu. Set NTFS as the main format, give a name in Volume Label and click on "Burn" option.
Step 4: Wait for the software to complete extracting ISO file. After 15-20 minutes, there will be a message prompting that has successfully copied ISO file to your USB drive and you can now use it to install on other computers.
Conclusion
Etcher is a great utility that allows you to create bootable Linux USB drive or mount ISO files on other drives, but UUByte ISO Editor is also a great alternative. It's not doubt when Etcher is a perfect tool in unmounting an ISO file into a USB drive, the UUByte is also a strong competitor. Which one do you feel better? Let's know your thought in the comment below.