
According to the latest stat from NetMarketShare, Windows 7 is still ranked second in desktop operating system. There are 23 percent desktop computers still running Windows 7 as the primary OS. However, Windows 10 is shipped with Surface devices and new laptops in default, leaving the room for Windows 7 much harder to survive. The truth is that some of the apps are not running or performing well on Windows 10 so there are still strong demands for running Windows 7. The question is to buy a new computer and install Windows 7 on it or just create a portable Windows 7 USB drive for occasional use.
1. Introduction to Portable Windows 7
What is a portable Windows 7 USB drive? Essentially, it's a way to run Windows OS from external USB drive without having to install it on a computer. You may have heard of Windows To Go (WTG), but this process is different because Windows 7 is not supported by WTG, which can be only used for creating portable Windows 10 USB drive. Here, we show you how to create a USB drive with a Windows 7 installation so you can use it on any Windows computer without worrying about a fresh installation.

There are a few important things you should know about using a portable version of Windows 7.
1. You will not be able to access local drive (HDD and SSD) of host computer.
2. There's no recovery possible for that USB drive if something goes wrong.
3. If you want to run a different version of Windows 7, you'll need to create a new USB for that.
2. Advantages of Creating Windows 7 Portable USB Drive
Creating a portable Windows 7 USB drive can be useful in many situations, such as the following scenarios:
1. Testing out a Windows 7 version on a computer with a different version installed.
2. Carrying your custom app collection wherever you go.
3. Making sure you don't leave any traces of using a computer once you're done with it.
4. It's a lot more affordable than doing the installation on an external hard drive.
5. It is highly portable - just slip it into your pocket and take it wherever you go.
6. Unlike WTG, you don't need a WTG certified USB drive - any pen drive with enough memory space will suffice.
Now, we'll look at two popular methods to create a portable version of Windows 7 on USB drive.
3. How to Create a Portable Windows 7 USB Drive
WTG is a complicate technoloy and it is much harder tham making a bootable Windows 7 USB drive. There are many additional steps involved and less tools are capable of implementing the task. Before moving to the steps, it is crucial to know the importance of physical USB drive.
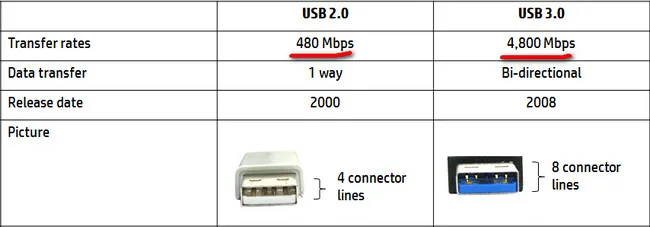
We highly recommend using a USB 3.0 or 3.1 high speed drive or portable SSD with USB port if you have enough budget. It has nothing to do for creating portable Windows 7 USB. But it plays an important role to decide the overall performance of running Windows 7 app from USB. No one want to build a laggy version of Windows 7 on USB drive, right?
Method 1: Create Portable Windows 7 USB via Command Prompt
CMD (Command Prompt) is a free command line tool on all Windows OS. It can be used to create a Windows To Go USB, and you will be using a utility called diskpart for the initial portion of the process. In short, it will format the USB drive, after which you can copy Windows 7 ISO file to the root location of portable USB stick.
Step 1: Get the ISO file for Windows 7 ready - if you don't have it already, you can download it here from Microsoft's servers
Step 2: Prepare for a USB drive with at least 8GB capacity.
Step 3: Insert the drive into the computer and open CMD as an administrator (search for CMD, right-click the result and choose 'Run as Administator'.
Step 4: Type the following commands in the sequence shown, followed by Enter after each command:
diskpart
list disk
select disk[name of the USB as listed after the previous command]
clean
create partition primary
select partition 1
format fs=ntfs quick
active
exit
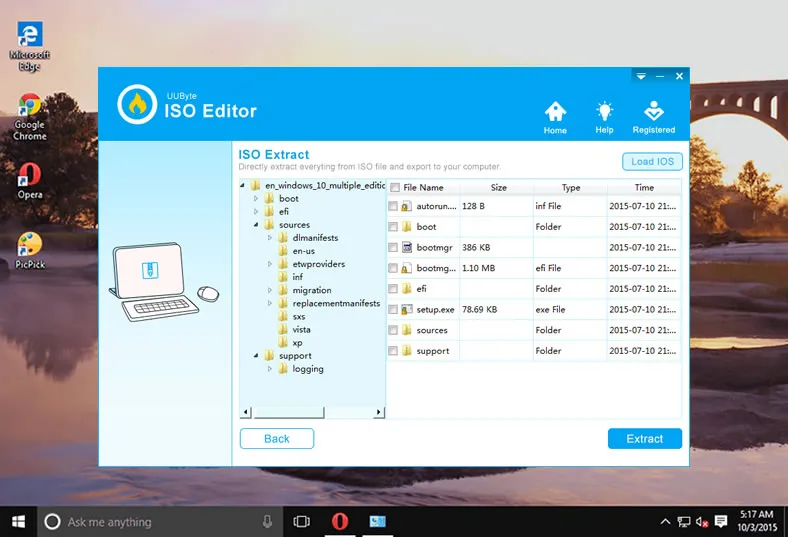
Step 5: Double click the Windows 7 ISO file to mount it automatically on Windows 10 or Windows 8. For Windows 7 and old version, please use ISO Editor to extract the files to local drive.
Step 6: You can now copy and paste the extracted files and folders from Windows 7 ISO file to the root of USB Drive.
Cons of Command Prompt Method:
- More risky with text commands.
- Require additional tools to unpack the ISO image.
- Bad support for none officially verified USB drive.
- Much lower success rate.
Although this method is fairly simple, you might not be comfortable working with CMD, especially when it's running with administrator privileges. Any mistakes you make here might affect the system. As an alternative, you can follow this next method.
Method 2: Create Portable Windows 7 USB via WintoUSB Pro
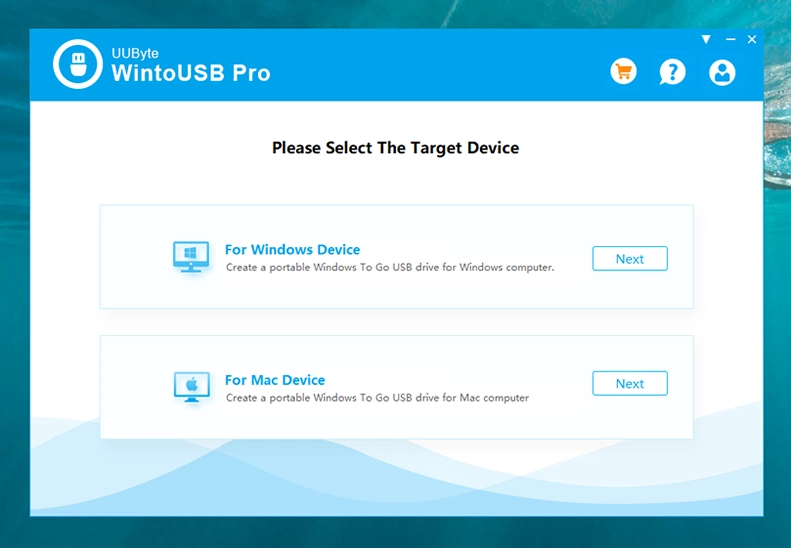
Unlike Command Prompt, WintoUSB Pro is a versatile third-party utility that offers a slick GUI (graphic user interface, as opposed to the text-only interface) that new users will feel more comfortable with. It has well-designed prompt in each step so the users clearly know what is to do. And they only need to make a few mouse clicks in order to create a portable Windows 7 USB drive. Don't worry if the USB drive you have is not WTG certified because this process, similar to the CMD method, works differently and has less limitations. Here's what to do:
Step 1: Download UUByte WintoUSB Pro from this webpage, install it and launch the program on a Windows PC.
Step 2: Insert the USB drive using a USB 3.0 port on Windows 10 and USB 2.0 on Windows 7. That's because Windows 7 doesn't support USB 3.0.
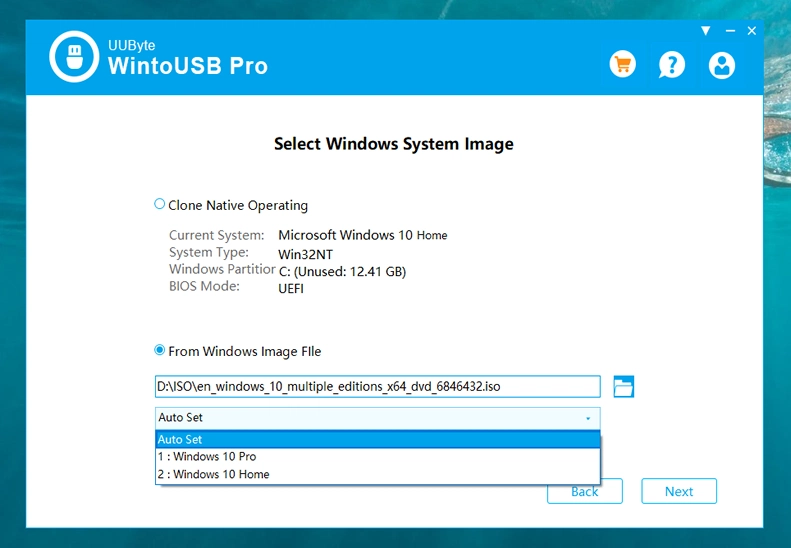
Step 3: In the software, select one option on welcome window and choose creating Windows 7 portable USB from Windows image file. Now, you need to import Windows 7 ISO image from local drive and pick up a Windows 7 version from drop-down menu.
Step 4: In the next window, you will be asked to choose the USB drive you have inserted. Please don't make wrong choice this time as the USB drive will be formatted very soon.

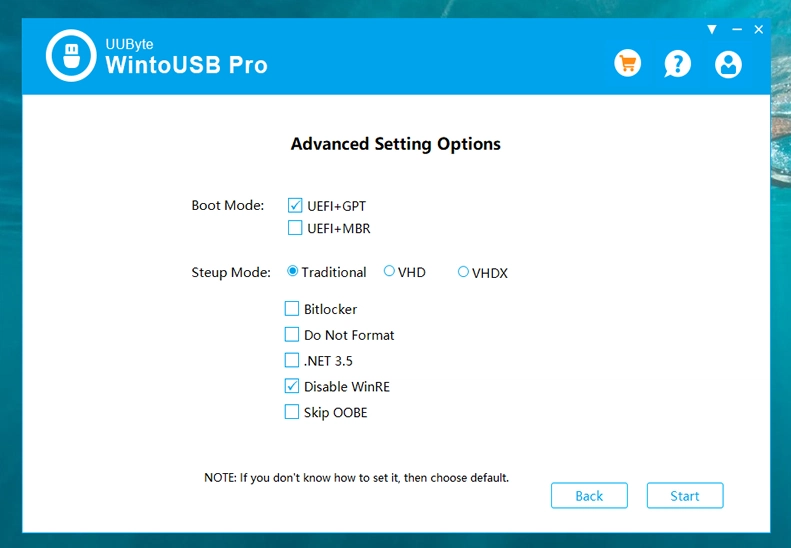
Step 5: Leave Boot Mode and Setup Mode in default in Advanced Settings Options
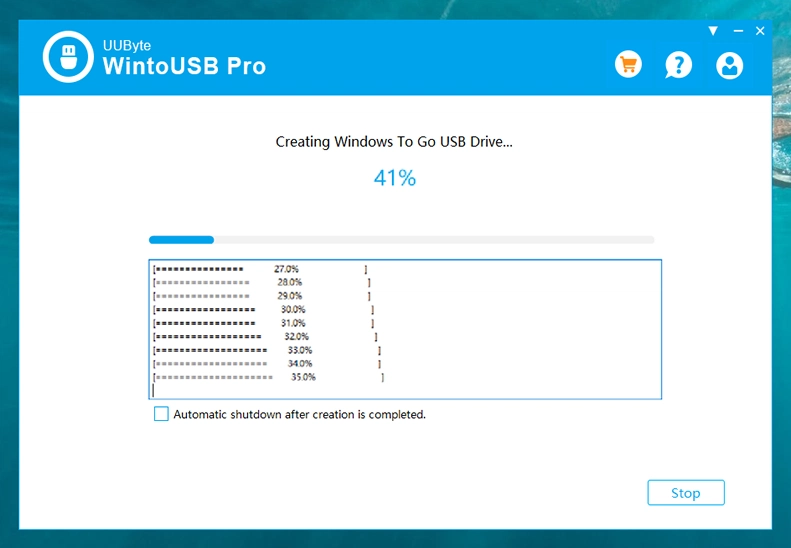
Step 6: Click Start button to create a portable Windows 7 USB stick. For USB 3.0 USB, it takes 15 minutes or so. For USB 2.0, it may take 45 minutes to finish the task.
Now that you've successfully created a portable Windows 7 live USB, you can use it on any computer running a different Windows version. This instance of Windows 7 will run independently and will contain all the programs you've installed along with the OS. The only problems, as we mentioned, are that no recovery is possible and you can't use local memory resources. However, the benefits are important as well, so it's actually a good trade-off.
4. How to Run Portable Windows 7 from USB Drive
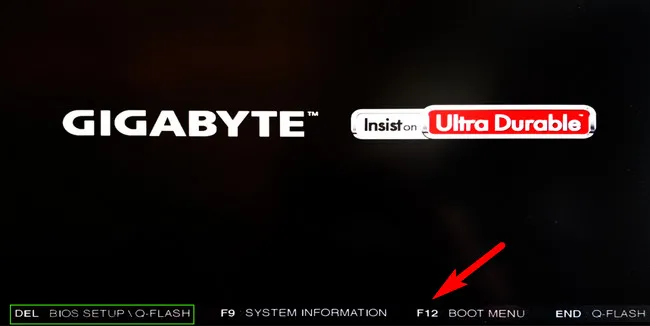
To run this Windows 7 Live USB on any Windows system, insert the drive, start up the PC, and hit the special key to open up Boot Menu. And this key is based on the device manufacturer's settings.) When the boot manager is loaded, select the USB drive that has Windows 7 installation file to boot from. This time, the host computer will boot from USB instead of hard drive.
After booting from USB drive, you will get to Windows 7 install screen. Just follow the screen prompt to install Windows 7 on that USB drive. This may take up to one hour depending on what kind of USB you are using. After that, you has to install proper drivers before fully using that portable Windows 7 USB.
Final Words
Now that you've created a bootable Windows 7 Live USB, you can use it on any computer running a different Windows version. This instance of Windows will run independently and will contain all the programs you've installed along with the OS. The only problems, as we mentioned, are that no recovery is possible and you can't use local memory resources. However, the benefits are important as well, so it's actually a good trade-off.

Petty is editor in chief at UUByte and writes various topics about Windows and Mac to help people make the most of current technology.