
Microsoft released Windows To Go feature in Windows 10 that enables the users to run Windows 10 directly through USB. It means, you can have a portable version of Windows 10 on a USB drive, so you can access all the features on multiple computers without installing it on your device. It is more portable and convenient.
Now, you may be wondering how to put Windows 10 on USB drive, which is much different from creating Windows 10 bootable USB. Don't worry, as here we have provided the 4 ultimate methods to help you put Windows 10 on USB drive.
Method 1: Put Windows 10 on USB by GImageX
This is the traditional method to put Windows 10 on USB, where you will have to go through commands and need to install GImageX tool. The application GImageX comes with the Windows Assessment and Deployment Kit, but instead of getting the kit, you can download only the required GImage tool.
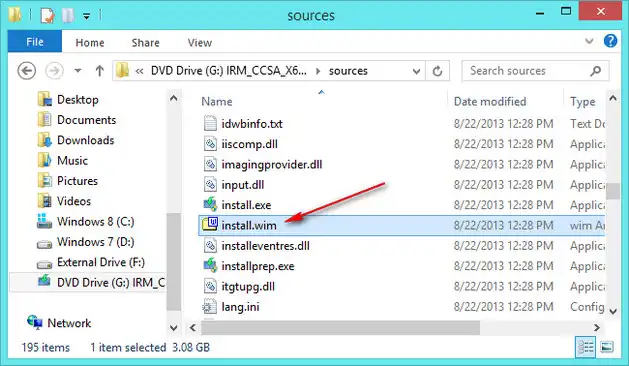
Step 1: Mount Windows 10 ISO file and extract the contents from it. After that, locate install.wim file in Sources folder.
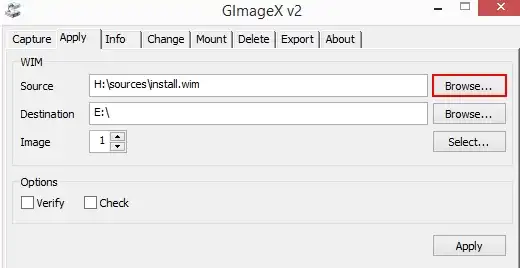
Step 2: Now, launch the GImageX tool and here you will get several options at the menu bar, click on the Apply button.
Step 3: Move to the Source section and then add install.wim file that you got in the former step.
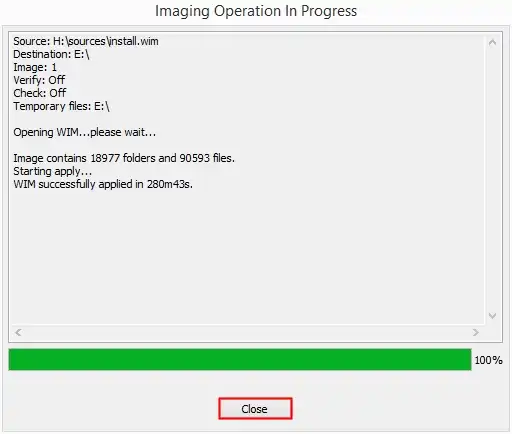
Step 4: Move to the Destination section and select your USB drive. After completing the above step, click on the Apply button to image the install.wim file on USB. You need to wait for a while as the process will take some time.
Step 5: After the completion of the process, open Disk Management and then select the USB, right-click on it and choose Mark Partition as Active.
Step 6: Now, you need to create the boot entries on Windows To Go using the command prompt. So launch it and type the commands listed below:
A:
cd Windows\system32
Here, A denotes the USB drive letter, you need to enter the one that specifies your USB drive letter. Also, ensure to press the Enter key after completing each command. Now, type the command again that is provided below.
bcdboot.exe X:\Windows /s X: /f ALL
The above command will create the boot entries on a USB drive that will support UEFI or BIOS-based computers.
That's it; your job is done, now your USB drive contains a portable version of Windows 10.
Method 2: Put Windows 10 to USB Drive via WintoUSB Pro
GImageX is the free solution for creating Windows To Go USB drive. However, the process is much complicated because of command involved. If you don't feel comfortable with it, then you can use UUByte WintoUSB Pro instead, which has a smooth user interface and much easy to go with. After a couple of mouse clicks, you will get a portable Windows 10 USB drive in short time. Currently, this is the most user friendly solution on earth.
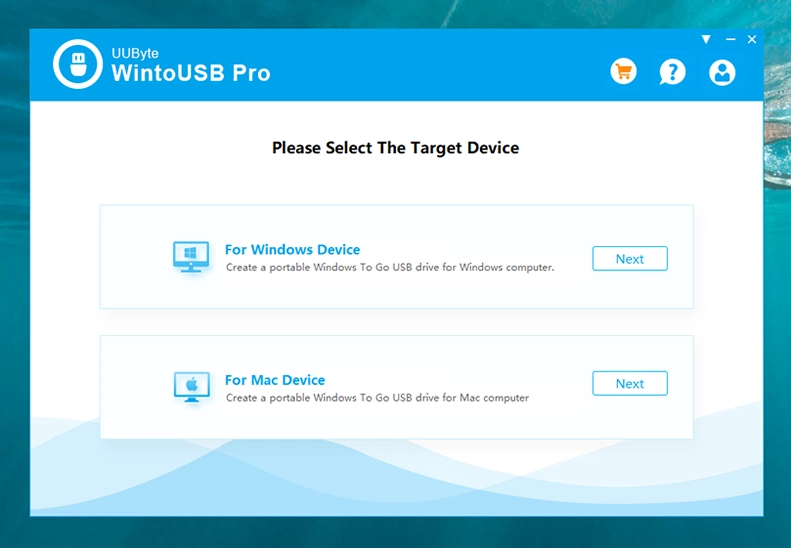
Step 1: Install and run UUByte WintoUSB Pro on a PC or laptop. From the welcome screen, choose the target device for creating Windows To Go USB.
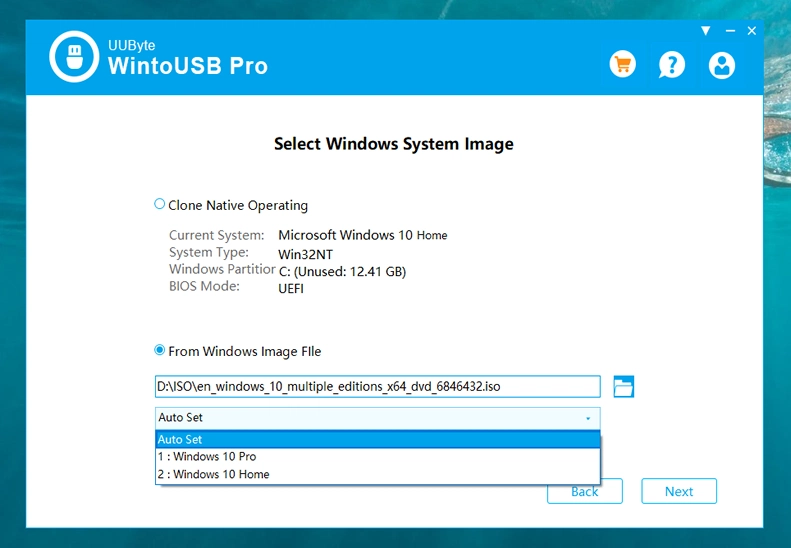
Step 2: On the new window, click the radio button at left side of "From Windows Imge File" label and add your Windows 10 ISO file to WintoUSB Pro software.
Step 3: Click "Next" and pick up the USB drive you just inserted.

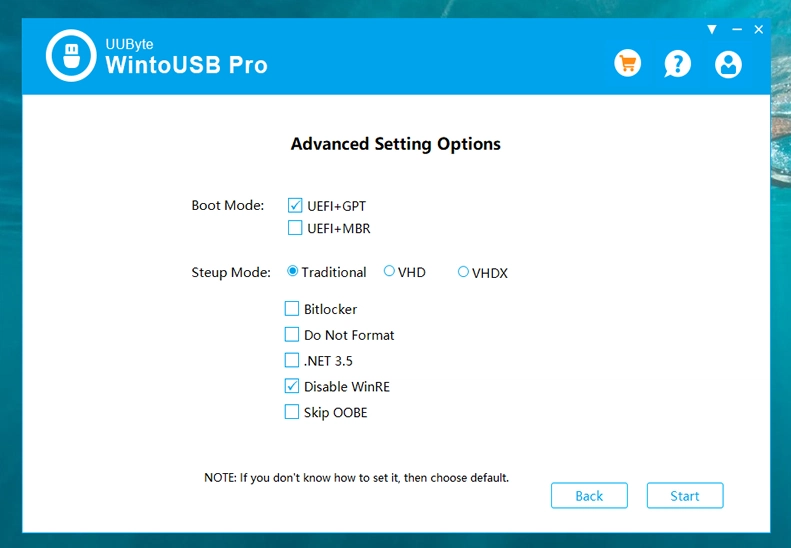
Step 4: You need to choose Boot Mode and Setup mode in Advanced Setting Options. In default, WintoUSB Pro will set boot mode to UEFI + MBR and setup mode to Trandition Mode.
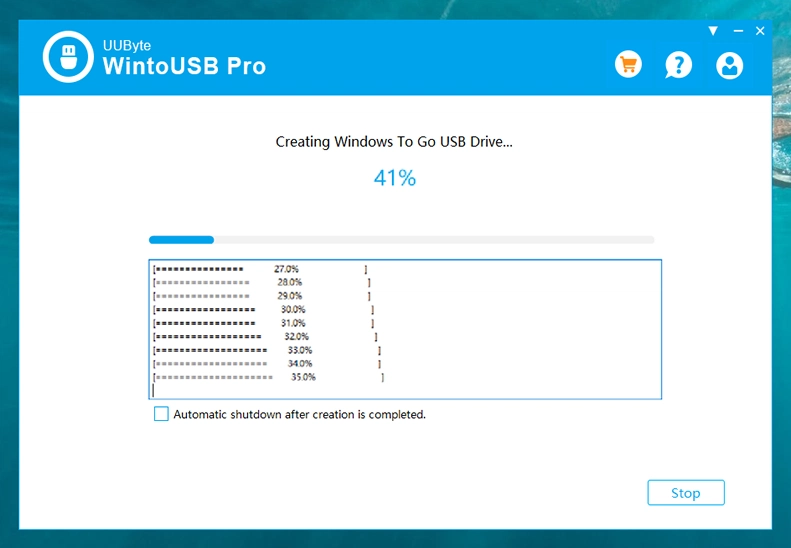
Step 5: Once you finish the settings, click "Start" button at the bottom of the same window to start installing Windows 10 to USB drive. You should wait about 30 minutes for this task.
Putting Windows 10 on USB drive with UUByte WintoUSB Pro is quite simple. You can see there is no much trouble during the entire process. The most challenging parts are done in background by this professional software. That's why we recommend it in second place.
Method 3: Put Windows 10 on USB Using Rufus Tool
Initially, Rufus is a Windows application that easily creates bootable USB from ISO image. Now, it becomes a more powerful tool that can download Windows 10 ISO and create Windows To Go devices. All the tasks are wrapped in one single Window, making it much easier to use. Plus, it is 100% free and gets updated regularly by professional developers across the world.
Step 1: Download and Install Rufus on your computer and make sure to get the same from the official site.
Step 2: Connect USB on the computer and then launch the Rufus application.
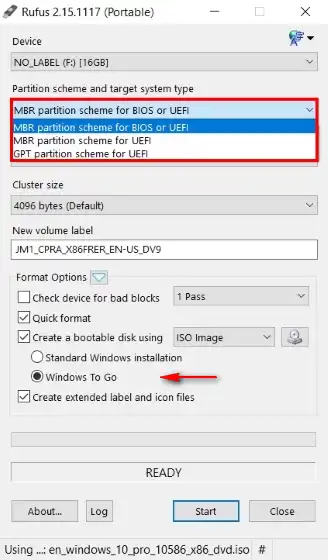
Step 3: On the home page, you will get multiple sections and most of they are set at default values, you can check the same and if you want to make any changes, then do it and click on the Start button.
Step 4: Rufus will offer the list of Windows versions and you need to select the one that you want to use, select Windows 10 and click on the OK button.
Step 5: Now, Rufus will start writing Windows 10 ISO to USB and it will show the successful message upon the completion of the process. Remove the USB drive as it is ready to use.
Rufus has multiple advantages and it is high in demand due to its features. It has a simple interface and recognized as easy to use the tool. But there are some other utilities too that can perform the task faster than Rufus.
Method 4: Put Windows 10 to USB with Hasleo WinToUSB
WindowsToUSB is a famous Windows To Go creator that comes from Hasleo software. It provides ample features for creating portable Windows USB. You can use this tool to create Windows To Go devcie from ISO, WIM, VHD, VHDX and CD/DVD, whereas other similar tools only support Windows ISO image or WIM file. Besides, it can also clone Windows OS from local hard drive to a portable USB drive directly with UEFI support. To put Win 10 on USB, you will need a USB drive of 16GB or higher. For details, follow the steps listed below:
Step 1: Download WinToUSB on your computer and then run the installation file.
Step 2: Now launch the application connect a USB device to your computer.
Step 3: On the home page, you will get the Image file filed, click on the fold icon at right side to import Windows ISO file. Once, the uploading process is done, you will have to click on the Next button.
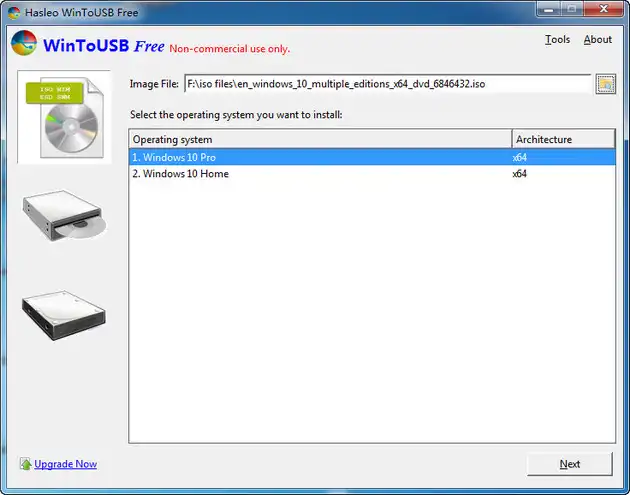
Step 4: Now, provide the path of the USB drive on the destination disk section that is located at the top of the window and further click on the Next button.
Step 5: Thereafter, a pop-up window will appear on the screen, select GPT for UEFI, and then click on the Yes button. This step will format your USB drive and delete all data on it.
Step 6: Move to the Installation Mode section and click on the radio button stating Legacy. Further, click on the Next button and the tool will start putting Windows 10 on USB. The process will take some time and show a confirmation message on the screen. Now, your USB drive is all set with Windows 10 operating system.
WinToUSB is a great tool that simplifies the work of putting Windows 10 on USB drive and it is also capable of creating Windows USB installer within the tool. However, many advanced features are only available in Premium version ($29.95). In addition, Windows To Go is new technology and and there are some technical glitches too that may occur anytime such as "Copy file failed" error. That means you have to use legit Windows 10 ISO file and Windows To Go Certified USB drive. You can also try the following alternatives if the issue could not be fixed.
Method 5: Put Windows 10 on USB via AOMEI Partition Assistant
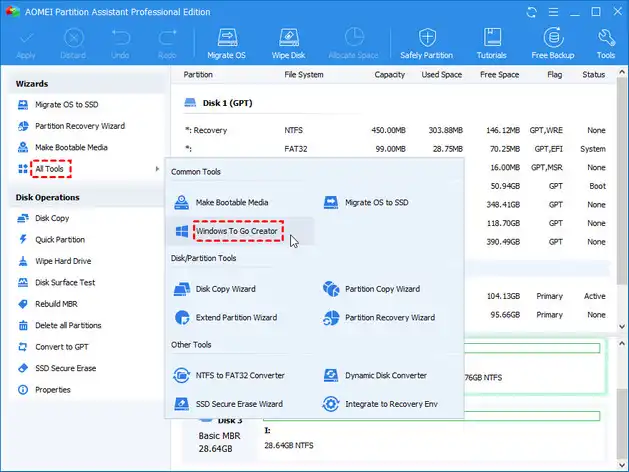
AOMEI Partition Assistant ($49.95) is a full disk management toolkit that has a smooth interface and unique features to help you to put Windows 10 on USB. You can see a dozen of useful functions presented at the welcome window, such as Migrate OS to SSD, Make Bootable Media, Disk Copy, Disk Partition, etc. To put Windows 10 on USB using AOMEI Partition Assistant, You should go with Windows To Go Creator option within All Tools tab. The process is very simple and the steps for the same are provided below.
Step 1: Download and Install AOEMI Partition Assistant Professional Editor form the official site on your computer. The direct download link is also provided here to save your time.
Step 2: Insert USB on your computer and then launch the AOEMI Partition Assistant program.
Step 3: On the home page, you will get several options, click on All Tools tab that is located at the left pane, and then click on Windows To Go Creator.
Step 4: You will be directed to a new window and here you need to click on the radio button stating Creating Windows To Go for personal computer and further click on the Next button.
Step 5: Now, you need to select the source file, click on the Browse button and load the Windows ISO file. Also, ensure to turn ON the radio button labelled Create Windows To Go with system disc/ISO.
Step 6: After that, select the USB drive and click on the Proceed button. That's it; now wait for a while and soon you will get the result.
Well, your job is done and AOEMI Partition Assistant has offered you Windows 10 on USB. Its various features are loved by the users, but the concerning factor is the price of the tool as it is available free only for demo mode. To explore more, you will need to go with the premium version.
Final Words
Putting Windows 10 on USB is no longer a tricky task thanks to the developers. The above four tools are the popular solution to make a potable Windows 10 USB. If you felt OK with the commands, then you can choose the GImageX tool, but if you want to save the time and effort, then you can use tools with a GUI wrapper.

Petty is editor in chief at UUByte and writes various topics about Windows and Mac to help people make the most of current technology.