
Opening an ISO file in Windows 10 or a macOS computer requires mounting the file on a virtual drive first. Fortunately, this capability is present natively in both Windows 10 and Mac OS. The Windows function doesn't always work. For this reason, we will show you two different ways to mount disk images on Windows, as well as one method to do the same thing on a Mac computer.
ISO File (Disk Image): What Are They?
An ISO file or disk image is an uncompressed file format containing all the contents of an optical disc or drive. In certain cases, these files may be bootable, meaning you can boot up a computer using them. Bootable disk images can help you fix system errors or install entire operating systems. In other cases, ISO files may simply contain movies or other media. In both types of situations, it's not always possible to simply double-click the file to open and view its content. You either need native OS support or a special software application in order to mount the file as a virtual drive ir order to read the content.
Part 1: How to Mount ISO Files in Windows 10 (Native Method)
In Microsoft's latest operating system, native support is built in for mounting ISO files. You need to follow some simple steps, and you can easily mount the disk image on a virtual drive, which is similar to an actual drive but is created virtually by Windows 10. Here are the steps to follow:
Step 1 : Once you have the ISO file in your local drive, you can use File Explorer to mount it and access or extract the contents. One way is to double-click the file, after which you will see a virtual drive being created with your ISO file and all its content. You can also right-click on the file within Explorer and select the Mount option from the floating menu, or select the file and then go to the "Manage" tab, after which you will see the "Mount" and "Burn" options in the top toolbar.
Step 2: Once you have finished viewing or extracting the contents, you need to unmount the file. Do this by right-clicking on the virtual drive and then selecting "Eject".
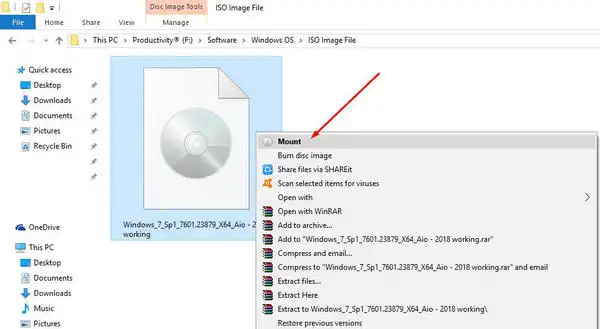
This is the easiest way to mount and unmount an ISO file in Windows 10. However, this method might not work in certain cases, such as when ISO files are associated with another program. There could also be problems creating the virtual drive or mounting the file itself. In such cases, you'll need some third-party software, which we've showcased below.
Part 2 : Use WinCDEmu to Mount ISO Image in Windows 7 and 8
This open-source utility is essentially an emulator for disks. In case you need to mount an ISO file just to view it or to extract content without burning it to a disk, this is the right tool for it. It's a light-weight tool of only 2 MB, and does not require a reboot of the system after it's installed.
Step 1: Download and install WinCDEmu first. You can also download the portable version, which can run off a USB flash drive so it requires no installation.
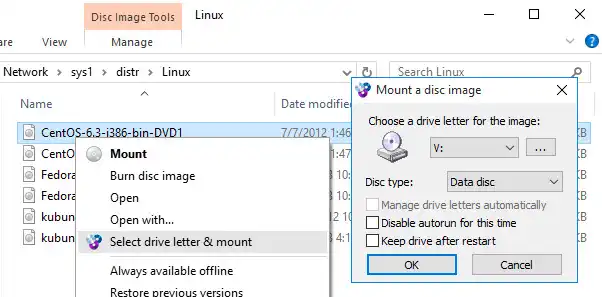
Step 2: Open the application and right click the ISO file you want to mount. From the pop-up menu, selec "Select drive letter & mount " and choose a local drive letter for that image file.
Step 3: Once you're done, you can see the virtual drive name from file explorer. Then you can install or edit the files in it.
If your native Windows 10 support for ISO image mounting doesn't work, then WinCDEmu will come to the rescue.
Part 3: How to Mount .iso File on Mac OS X and macOS
Mac OS X, now simply known as macOS, has had ISO disk mounting capabilities for nearly two decades now. While Windows systems struggled with ISO tools until the latest versions came along, Mac users have long had this support. In older versions there's a tool called DiskImageMounter used for the same purpose.
On a computer running macOS, Open Launchpad and find the folder called "Other". Inside of it , you'll see the Disk Utility app, a robust tool for handling ISO files and several other purposes such as partitioning, erasing and restoring from local drives. Let's take a look at how to mount and unmount an ISO file on a Mac:
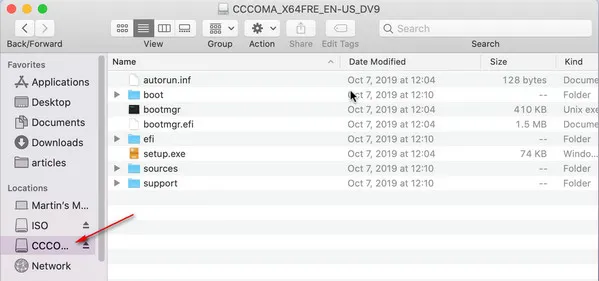
Step 1: Open the Disk Utility as described above, then select the ISO file after clicking on the File menu and "Open disk image…"'. You can also select the "Mount" option in the same menu.
Step 2: After you've viewed or extracted the files you need, simply reverse the process by selecting "Unmount" and the job's done.
You don't really need third-party software for handling disk images on a Mac. The Disk Utility is more than enough to handle tasks like mounting ISO files to view or extract content. In any case, if you have trouble opening and viewing ISO files on either operating system, there are several downloadable applications that can help you with mounting or even creating ISO files from a disk or a set of files and folders.
Conclusion:
Mounting ISO file becomes much easier than before. The latest OS usually comes with a default feature to mount ISO file so no third-party tools needed. This will be a great benefit for users. However, you have to find alternative solutions if the default method failed to work. That's why we still recommend WinCDEmu in here.

Petty is editor in chief at UUByte and writes various topics about Windows and Mac to help people make the most of current technology.