
Some of the operating system installtion image comes in an archived file because it contains raw files and folders. And the supported compressed file formats of an operating system are zip, iso, img, bin, and many more. The ISO formats are commonly used by Microsoft and the ZIP format is mostly used by Linux. So, if you have any image file of zip format and need to access it on Windows or macOS, then you need to write Zip to USB with image burning tools.
Simple extraction of compressed files and folders and then transferring them to the USB drive is not a solution to make a bootable USB from such an image file. You are just making the zip file in a proper order on a USB drive for OS booting and installation..
Now, let's see the best 5 ways to burn .zip to a USB drive.
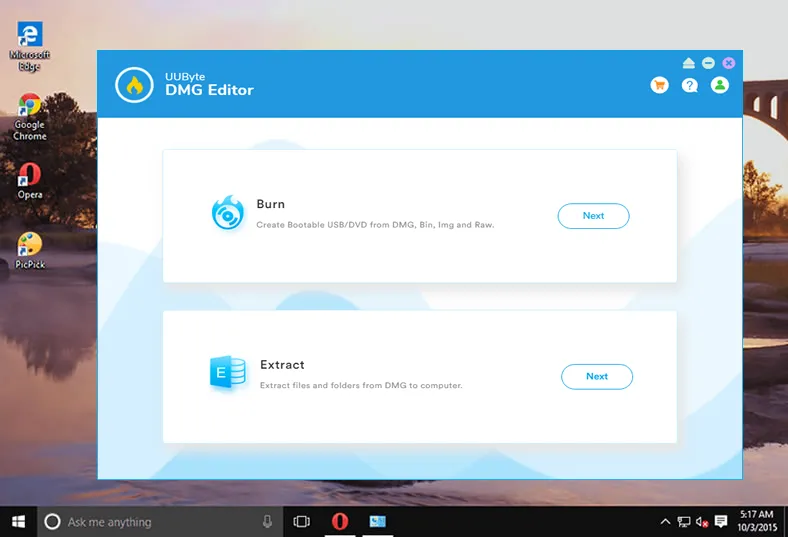
#1 UUByte DMG Editor
UUByte DMG Editor is an advanced and powerful image burning software that enables the users to burn, edit, and extract the image files irrespective of any file formats. This program is designed in a way to bring all the OS users under one roof including Mac and Windows users. Both the users can create a bootable USB drive of any image file. The interface is quite simple and to perform the task, no mentor is required. Now, let's check the steps needed to burn ZIP to USB.


Step 1: Download and Installation
Visit the official website of UUByte DMG Editor and on the home page, you will get the download link for Windows and Mac OS, click on the one as per the OS you are using. Next, insert the USB drive on your computer and then launch UUByte DMG Editor.
Step 2: Load .zip File from Local Drive
On the main interface of UUByte DMG Editor, you will get few options, first upload the zip image file and for that, click on the Browse button and then select your zip image file. Next, select your USB drive from the featured list.
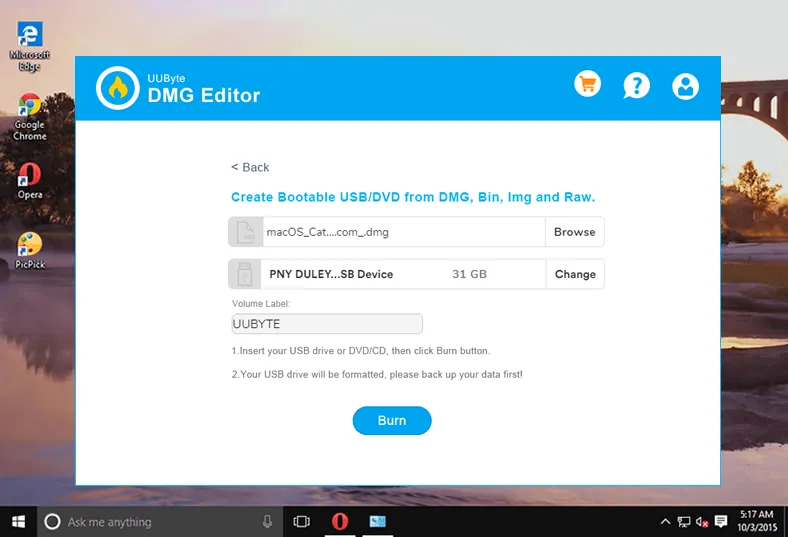
Step 3: Burn ZIP to USB Drive
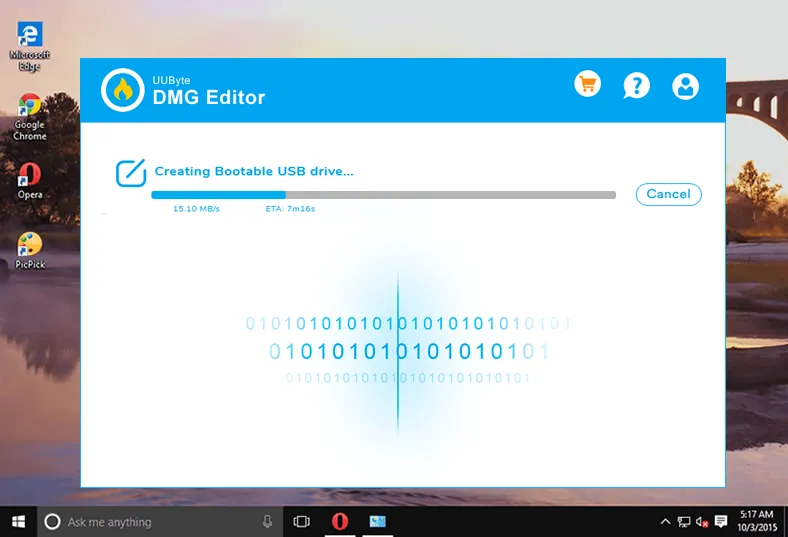
Once you complete both the task, then click on the Burn button. The process is commenced and within no time it will be completed. Now, you can access the bootable USB drive on your computer efficiently.
In the digital world, there is only a few software that supports so many disk images such as iso, bin, zip, gz, and many more. And UUByte DMG Editor is among them. This software is made for Windows, Mac, Linux, and, other users so that they can smoothly burn the image files. The features are unique because edit and extract options are available that will help you to make any changes in the zip formatted image file.
#2 Rufus
Rufus is a freeware tool that has built-in support for burning the zip file to a USB drive. It supports the Windows platform and the file size is very small that will make your job much easier. Through this tool, you can create a Live USB by creating a bootable USB via image files and can access Windows, Linux, or DOS on your computer.
Step 1: Download and Install Rufus on your computer and make sure to get it from the official website.
Step 2: Launch Rufus and also connect your USB drive to the computer.
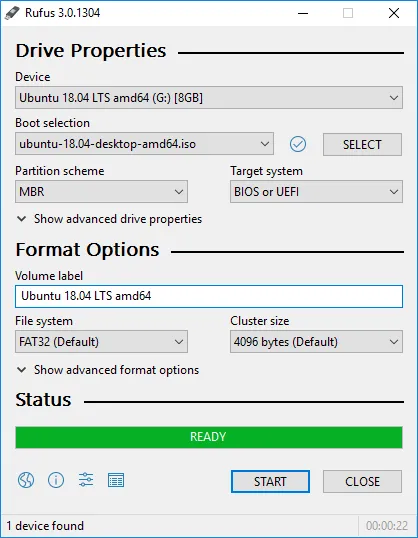
Step 3: On the main interface, you will get Drive properties and beneath the same, few options are listed. So, first, click on the Devices and then select your USB drive.
Step 4: After that, move to the Boot section and then click on the Select button to upload the zip image file.
Step 5: Now, leave the Format options and then click on the Start button zip image file to USB. The process is started and it will take some time to complete. Once it is done, you will get a successful burning message on your computer.
Rufus is running in the market for a longer time and is applauded by many users. But it does not support macOS and Linux. For Windows users, only Windows 7 onwards users can access Rufus. In short, Rufus does not support Windows XP, 2000 and, other older versions. The burning time is a bit longer and takes around half an hour.
#3 Balena Etcher
Balena Etcher is a well-known cross-platform software that enables to flash the OS to SD Card, USB drive,, and other storage devices. The interface is quite user-friendly and the performance is more accurate that gives the result in a short time. Moreover, it supports even the SD Card which means the users can burn the zip image file on the SD card smoothly.
Step 1: To access Etcher, you need to visit its official site, scroll down the page, and move to the download section. Here, you will get various links, move to the respective OS section, and then click on the download button.
Step 2: Once the installation is completed, launch Etcher.
Step 3: Now, you need to upload the zip image file and then select your USB drive.
Step 4: Thereafter, click on the Flash button. Now, wait for some time as the burning process is in progress and when it is completed, you will get a successful message on your computer screen.

Balena Etcher is an application for all those users who want to flash the zip image file to a USB drive. The process is very smooth and with three simple clicks, you will get the result. The supported OS is Mac, Windows, and, Linux.
#4 UNetbootin
UNetbootin was initially designed for Linux users only. But with time the developers made it available for Windows and Mac users. It enables you to create a Live USB effectively and also in a short time. It is not a flash tool but some flash features are available that burn the zip image file to a USB drive.
Step 1: Download and Install UNetbootin on your computer.
Step 2: Connect your USB drive with the computer and then launch the software.
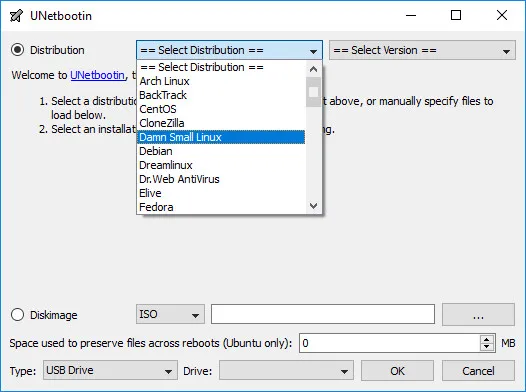
Step 3: On the home page of UNetbootin, you will get several options, move to the DiskImage section, and then select zip from the drop-down menu. ve.
Step 4: After that, upload your zip file and then select your USB drive from the Type option.
Step 5: Once you complete the above task, click on the OK button. Now, you need to wait for a while as the process will take some time.
UNetbootin has some restrictions just because of distribution-specific rules and the boot algorithm. Due to such restrictions, might be some image files of different file types may not support.
#5 YUMI
YUMI is also known as Your Universal Multiboot Installer is a fast flash tool that quickly burns the zip image file to a USB drive. Primarily, it was brought for Linux users and after the success, Windows and Mac platform was also added to the OS list of YUMI. Moreover, this tool can be used to repair the PC.
Step 1: Download, Install and then launch the YUMI utility on your computer.
Step 2: Now, go to the main interface, you will get a few options, move to the Device section, and then select your USB drive.
Step 3: After that, select the OS from the drop-down menu.
Step 4: Now, upload the zip image file by clicking on the Browse button.
Step 5: Once you complete the above task, click on the Create button.
Step 6: Your task is done and now the burning process is commenced.
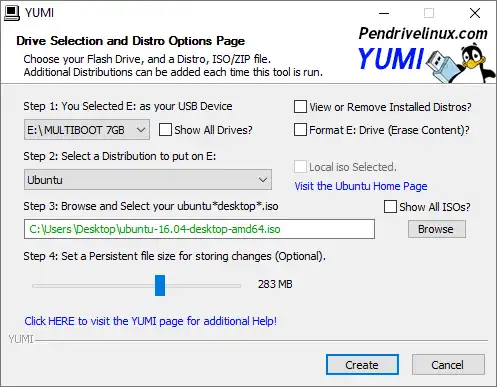
YUMI is a powerful tool that behaves like a Universal Installer and using the same, you can create the bootable drive of any OS of any image file format. In this tool, distributions features are present and that may make your job a little complex.
These are the best 5 ways to burn zip to a USB drive. All the methods give the utmost result and in a short time except Rufus, YUMI, and UNetbootin. However, if you want to accomplish the goal without giving much effort, then UUByte DMG Editor is good for you because the process is completely automatic and you need to perform a few tasks only. Last but not the least, the choice is yours but select the one as per your requirement and convenience.

Petty is editor in chief at UUByte and writes various topics about Windows and Mac to help people make the most of current technology.