
When you have completed the task for building a new PC or the old PC was infected by virus, it is recommended to create a Windows bootable USB for system reinstallation. This is the most effective way to fix above issues. However, this could be not an easy task when you only have a Mac at hand. Instead, there are many free ISO burning tools available on Windows for making bootable USB.
In this guide, we are going to create a Windows 10 bootable USB on Mac with Terminal app by using a set of commands. Windows 10 is more suitable as it has many new and advanced features over Windows 8 and Windows 7. To be honestly, this approach is safe and won't require installing any third-party app. However, the process might be a little bit confusing to some folks if she or he had no prior experience to work with text commands.
What We Need:
- Windows 10 ISO image.
- 8 GB or above USB flash drive.
- A Mac computer running macOS or OS X.
- Homebrew package Manager (Optional).
Tutorial: Create Windows 10 Bootable USB on Mac with Terminal
To create a Windows 10 bootable USB on Mac in Terminal, you have to work with several commands to get the job done, such as diskutil, hdutil, dd. The Most important one is dd command.
dd stands for disk duplication, serving as a command line-based utility that allows you copying and converting file. It is a built-in command that comes with Linux, Unix and macOS. So you don't need to install additional package to make it working.
Please read the following steps carefully and make sure you have fully understood the whole process. It is not a simple task and needs more patient. After that, you can get started to create a bootable Windows 10 USB on Mac with Terminal.
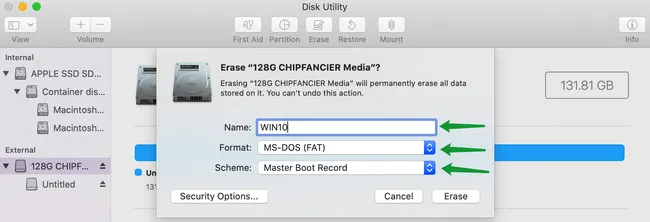
Step 1: Connect a USB pen drive to Mac and then erase the drive to MS-DOS FAT by with Master Boot Record by using Disk Utility app on your Mac. This is a crucial step to create Windows 10 bootable USB on Mac. As a sidenote, Mac does not support NTFS by default.
Step 2: Open Terminal app on your Mac and run this command: diskutil list external. This step is to identify the external USB drive. You should find it from the list. The drive name should be something like /dev/diskX. In the following example, the usb drive is seen as /dev/disk2. And this is the path name to your USB drive.

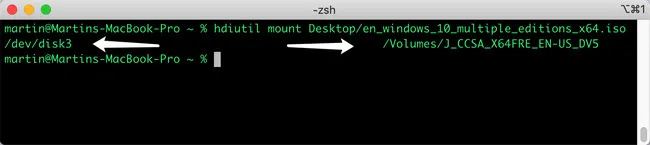
Step 3: Now, you need to mount the Windows 10 folder to make it ready for transfer. Assuming the ISO file is saved in Desktop. To do this, you can run this command:
hdiutil mount Desktop/en_Windows_10_multiple_editions_x64.iso
/Volumes/J_CCSA_X64FRE_EN_US_DV5 is the path name to that ISO image, which also appears Finder Sidebar. You will use it in later step.
Step 4: When it is done, unmounts your drive and you should see the message that says "Unmount of all volumes on disk2 was successful".
diskutil unmountDisk /dev/disk2
Step 5: Now, copy the Windows 10 ISO over to your USB drive. To do this, you can use this command:
sudo dd if=/path/to/windows_10.iso of=/dev/disk2 bs=1m
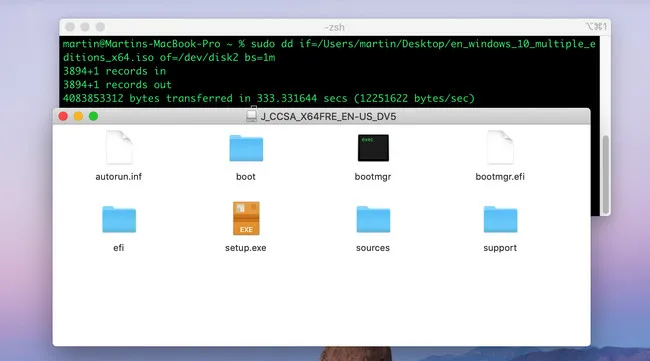
Step 6: You will be asked to enter your Mac password. Once you do that, the process should begin and it takes a while to complete so be patient. When the copying task is finished, eject the USB drive from your Mac.
[Updates]: If Windows 10 ISO file was downloaded from Microsoft recently or large than 4.5 GB, then the above file copying process will fail because the install.wim file is too large to fit on a FAT32 partition.

You have to mount ISO image and split install.wim into small parts. After that copy them to destination USB drive. You can do by following those command in order:
1. Install Homebrew package manager:
/bin/bash -c "$(curl -fsSL https://raw.githubusercontent.com/Homebrew/install/HEAD/install.sh)"
2. Install wimlib library for splitting install.wim file: brew install wimlib
3. Copy all files and folder in Windows 10 ISO but exclue install.wim file:
rsync -avh --progress --exclude=sources/install.wim /Volumes/J_CCSA_X64FRE_EN_US_DV5/ /Volumes/WIN10
J_CCSA_X64FRE_EN_US_DV5 is the mounted name of Windows 10 ISO. WIN10 is the drive name of USB drive.
4. Split install.wim and copy to USB drive:
wimlib-imagex split /Volumes/J_CCSA_X64FRE_EN_US_DV5/sources/install.wim /Volumes/WIN10/sources/install.swm 3200
In short, this is a complete free way to create Windows 10 bootable USB on Mac with Terminal. However, if you are not a big fan of command line, then take a look at the alternative solutions we suggested in next section.
Cons of Terminal:
- All done in plain text commands.
- Has to find the correct file path of your own case.
- Too many steps for large Windows 10 ISO image.
- Could possibly erase your Mac internal disk by accident.
Bonus: How to Create Windows 10 Bootable USB on Mac without Terminal
It took me several hours to create a bootable Winows 10 USB on Mac successfully. You have to make changes in certain commands based on the users settings of your Mac. This is extremely hard and time consuming when it is the first time you touch the commands.
If you did not have good luck with Terminal, then check out the GUI app we suggested in this part, which works nicely according to our test.
UUByte ISO Editor for Mac
UUByte ISO Editor is a reliable and cross-platform software when it comes to making Windows 10 bootable USB. It also serves as a great alternative to macOS command line-based method. If you are new to macOS and do not have any intertest to try out the complex commands in Terminal, then this is undoubtedly a better option. Here is how.
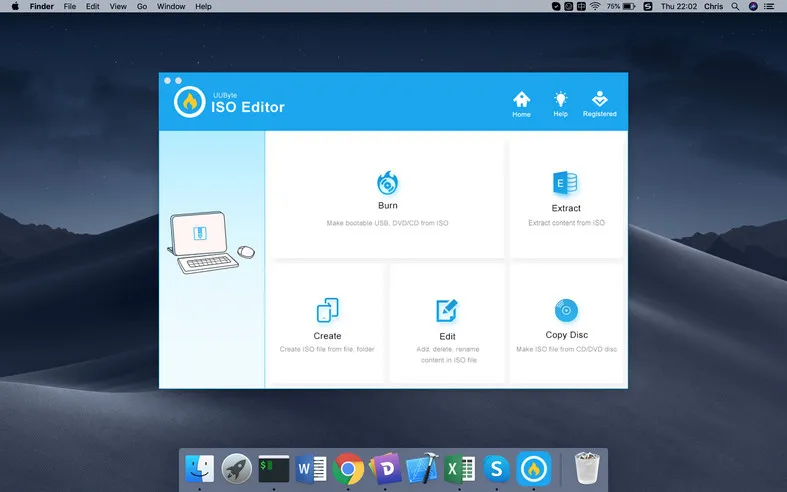
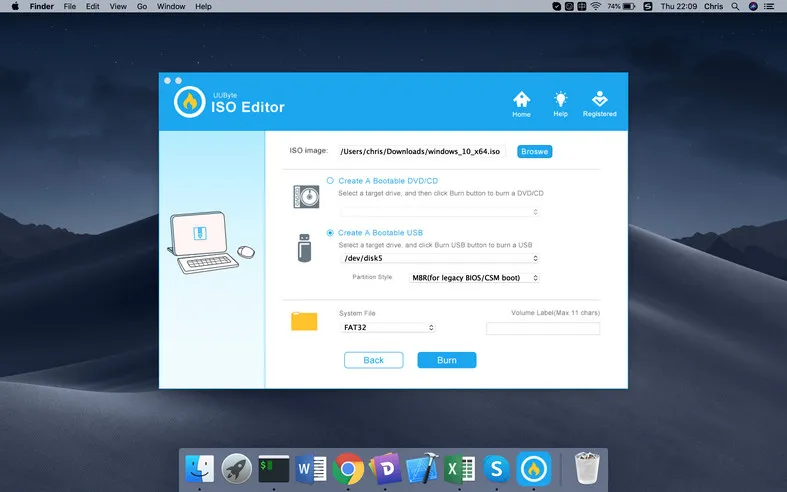
First off, download UUByte ISO Editor on your Mac. You can download the free trial to try out its features before paying for it. Now plug USB drive into Mac machine and launch UUByte ISO Editor. From the UUByte's main user interface, you will be presented with multiple options, including Burn, Extract, Create, Edit, and Copy Disc. In this case, click on Burn to proceed.
Once you are in, browse Windows 10 ISO file on your computer and hit the Burn button. The process should begin and takes less than 5 minutes, which is much faster when compared to Terminal app in above
Currently, UUByte is the best user-friendly app available on macOS when it comes to creating Windows bootable USB. The interface is simple and no complex staff get involved at all!
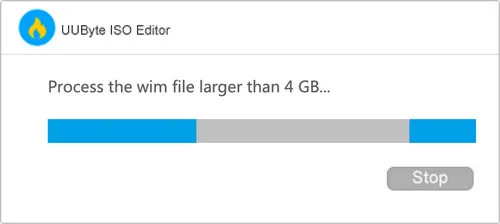
[Upates]: The new version of UUByte ISO Editor is able to handle large Windows 10 ISO by default. If the install.wim file was more than 4GB, it will cut it into small pieces automatically. This is the only GUI application on Mac for doing this. Here is the screenshot for this operation:
UNetbootin for Mac
UNetbootin is another popular program for creating bootable USB from ISO images. Initially, it is only capable of burning Linux ISO to USB. Later, it added support for Windows ISO. One major benefit with UNetbootin is that you can use the same app on Windows, macOS and Linux. And the steps are also very simple. A bootable USB will be created successfully within several clicks.
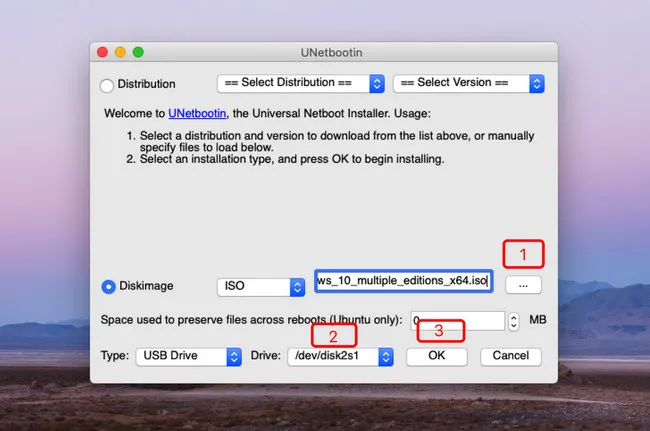
First, download macOS version installation file from here. Unpack the dmg file and drag the app icon to Application folder so you can directly open it in Launchpad. After that, plug in USB flash drive into Mac.
Now, run UNetbootin app on Mac and load Windows 10 ISO into the app by clicking the three-dot menu. Next, click the drop-down menu at the right side of Drive tab to select the USB drive name. Finally, click OK button to start burning ISO to USB on Mac and wait about 20 minutes.
Some of the users may be wonderin why we don't recommend Boot Camp Assistant in here? Because this stock app has too many errors and we failed with a couple of attemps on different Mac devices. Basically, it is a wast of time when trying on latest Big Sur.
[Notice]: Apple disabled the feature (Create Windows 10 bootable USB for later install) on macOS Big Sur and you are forced to eject all storage devices while working with Boot Camp Assistant app. Now, you can only create a Windows Boot Camp partition with this app. The following screenshot is taken from a Mac that is running macOS Big Sur:

Honestly, creating bootable Windows 10 USB on Mac with Terminal is a remarkable solution. It is completely free and no additional software installation. However, you should be comfortable with text commands. If it was not your case, UUByte ISO Editor and UNetbootin are good alternatives to create Windows 10 bootable USB on Mac under graphics user interface.

Petty is editor in chief at UUByte and writes various topics about Windows and Mac to help people make the most of current technology.