
Boot Camp Assistant (Boot Camp) is a free app that is shipped with Mac OS X and macOS. The main purpose is to to allow users installing Windows on their Mac computers. Using this multi-boot utility, you can easily create a dual boot (Windows and macOS) by following the steps shown at the end of this article. First, let's look at when Boot Camp Assistant was introduced and some interesting facts about its history.
A Brief History of Boot Camp Assistant
The first release of Boot Camp Assistant was with Mac OS X 10.4 Tiger but it was a beta version. It eventually came as a official release for Mac OS X 10.5 Leopard and has gone through several upgrades since then. While the older versions supported the installation of Windows XP and Vista, Boot Camp 4.0 only supported Windows 7. After that came Boot Camp 5.0, which supported both Windows 7 and Windows 8 but only the 64-bit versions. The latest stable version, Boot Camp 6.1.0, supports latest Windows 10 but hasn't received an update since it was released in 2016.
Some interesting facts about Boot Camp Assistant:
● Boot Camp Assistant doesn't support systems with GPUs connected via Thunderbolt 3 hardware even though Mac hardware was transitioned to Thunderbolt 3 about four years ago.
● You can not install Linux on Mac using Boot Camp; for this, you'll need a compatible EFI-based boot manager like rEFInd and you'll have to partition your disk manually, which most users aren't comfortable doing.
● Contrary to popular belief, Boot Camp Assistant is NOT the best way to run Windows on Mac. Today, there are more capable applications like the Parallels Desktop utility and others.
Key Features of Boot Camp Assistant
Boot Camp's latest version brings a few new features to the game in the form of added support. Here are a few of the latest features that come as updates in new versions of macOS like Mojave and Catalina.
● In newer versions of macOS, Boot Camp doesn't require you to use a USB to hold the Windows 10 ISO file. All installation files and drivers will be stored on the internal drive but older Mac computers will still need a USB for the process.
● New versions of Boot Camp Assistant only support 64-bit Windows 7 and higher.
● On new Macs, Boot Camp Assistant will designate your hard drive as a GPT to support UEFI for Windows 10.
● Unless you access the boot manager by using the Option key at start-up, your Mac will always boot to the last-used OS.
How to Install Windows 10 on Mac using Boot Camp Assistant
First, make sure the following requirements are met:
● Your Mac hardware should be from 2012 or later.
● You have 64GB of free space on your startup disk, which is usually your main hard drive.
● 16GB USB flash drive, in case your Mac is running a version before macOS 10.11.
Once you're ready, follow the instructions shown below:
Step 1: If you were the first time using Boot Camp Assistant, we highly recommended backing up your important files. If it was done in a wrong way, the whole disk would be formatted and the data will be deleted.
Step 2: Insert USB drive into Mac and format it to MS-DOS FAT with Disk Utility app. This is mandatory for Windows installation.

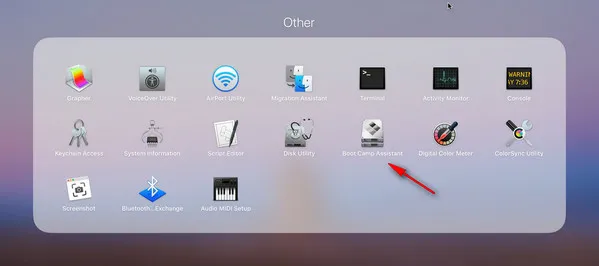
Step 3: Click on the Lanuchpad icon and click "Other" icon to open Boot Camp Assistant app.
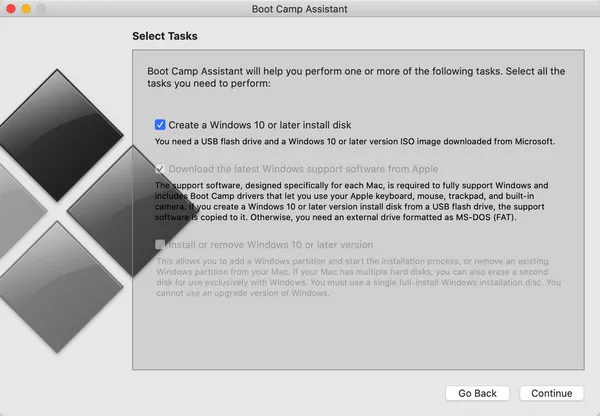
Step 4: Create a Partition for the Windows 10 Installation on Mac by launching Boot Camp Assistant and inserting the USB when prompted. Click "Continue" to start the app and tick "Create a Windows 10 or later install disk" in Select Tasks window.
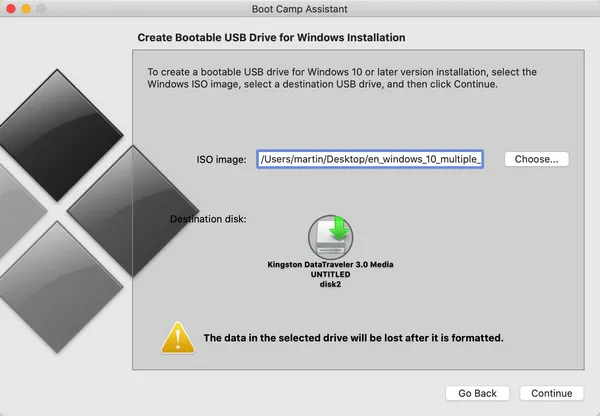
Step 5: Click "Choose..." button to import Windows ISO disk image into the app and you will see the USB drive is detected automatically. It also displays a warning mark at the end, saying the data in selected drive will be lost after it is formatted.
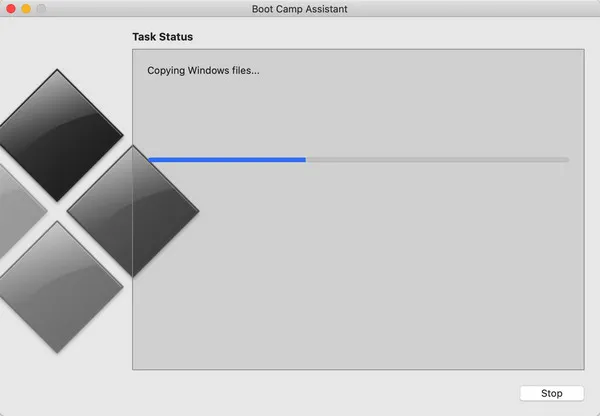
Step 6: Now, Boot Camp Assistant starts to copying Windows installation files to destination USB. This will take 10 minutes or so.
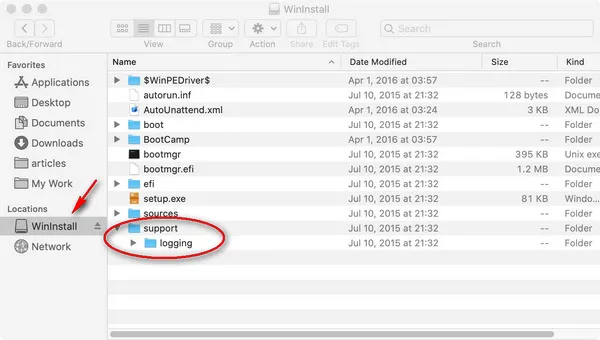
Step 7: After the Windows installation files are fully copied, the app starts to download Windows Support file from Internet and save it to USB afterwards. If this was not done, then you can use Windows properly on your Mac. And you need to wait more time in this step. The following screenshot is the file structure when the Windows bootable USB is created successfully.
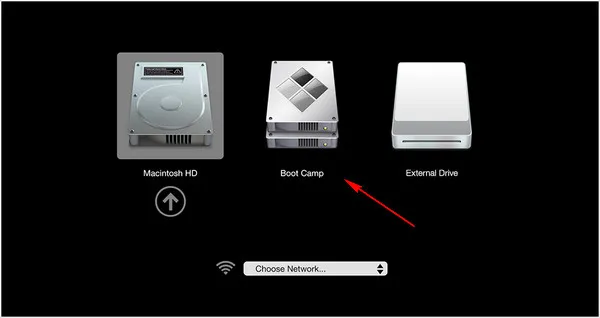
Step 8: Restart the Mac computer and press Power + Option key at the same time to open Start Manager; then click Boot Camp icon to start Windows 10 installation.
Conclusion
Although Boot Camp Assistant has been around for a long time, about 15 years, it's not the best application to install Windows on Mac because it is not working properly sometimes. There are many third-party alternatives today that can help you run parallel instances of macOS and Windows on the same computer. For some reason, if you're facing errors you don't know how to resolve or some other issues crop up, consider using another app such as VirtualBox, Parallel Desktop, BootChamp, Wine, and so on. Many of these offer a better interface and a host of additional features like Linux installations on Mac, support for Mac hardware features like the Touch Bar. Some of them are free but some offer paid upgrades for a better experience and the availability of technical support.

Petty is editor in chief at UUByte and writes various topics about Windows and Mac to help people make the most of current technology.