
In order to install a clean copy of Windows 10 on your PC, you need a Windows 10 bootable USB to start the setup process of this popular operating system. A bootable USB drive also comes handy when there is serious system failures, defective hard drive or partition issues. You need to burn Windows 10 ISO file on to USB device to make it bootable.
The ISO image file can be created from the original Windows 10 installation DVD or downloaded from Microsoft's Website after buying a license for activation. Some of us get really worried and confused when it comes to creating bootable USB drive, which is far more complicated than copying the ISO file to USB. You need also check compatibility of motherboard firmware installed in your computer as normally older motherboards don't support booting from USB device. Apart from these circumstances, it is quite easy to make a Windows 10 bootable USB with the help of ISO burning tools introduced in the following sections for different platforms, including Windows, macOS and Linux.
Part 1: How to Make Windows 10 Bootable USB on Windows PC
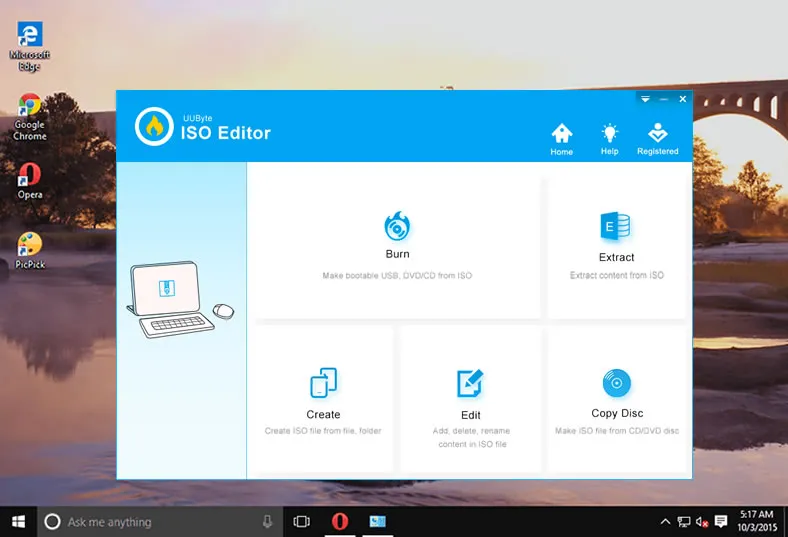
UUByte ISO Editor is the one of the best software to make Windows 10 bootable USB. It is a fast and reliable solution when it comes to ISO burning. The user interface is very swift and doesn't require any complex knowledge to do the job. You can also add or delete the ISO files according to your needs. It is 10x faster than its competitors as it has an smart file compressing and decompressing engines.
You know ISO file is not a regular file as they contain boot information so it has to be rendered correctly to USB device for an error-free booting experience. UUByte ISO Editor offers a 100% success rate when it comes to burning Windows ISO files and saves you a lot of time. Please follow the steps below to make a Windows 10 bootable USB drive using UUByte ISO Editor on Windows PC.


Step 1: Install UUByte ISO Editor on a Windows PC
Download .exe file and Install the software on a Windows PC. Make sure that you have downloaded Windows 10 ISO file in the right folder before starting the task.
Step 2: Import Windows 10 ISO
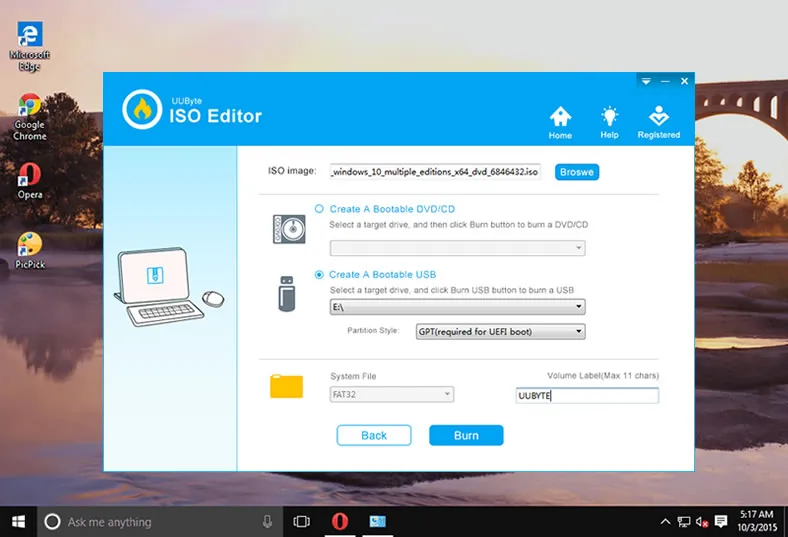
Now it's time to burn the ISO file to USB drive in order to create a bootable Windows 10 USB drive. To perform the task, plug in the USB drive and click on the "Burn" tab on the main window. Add Windows 10 ISO image to the program by clicking on the "Browse" button at the top.
Step 3: Make Windows 10 Bootable USB from ISO Image
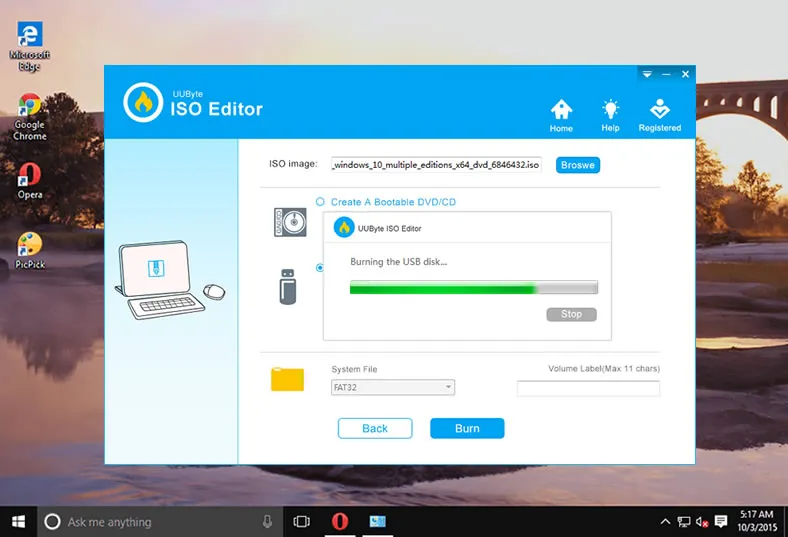
Choose the ISO file with the Browse button at the top. Also make sure that you are selecting the right drive name from the drop-down menu. You can also change the partition type according to your choice from the drop-down menu beside the "Partition style". Keep the system file to "FAT 32" or you can select the system type from the drop-down menu. Now burn the ISO file to USB drive by clicking on "Burn" button to create Windows 10 bootable USB drive.
This software is a powerful tool to create bootable USB drive from windows 10 ISO. As explained above it has got tons of features to help you create, burn, extract or edit ISO file. It supports both Windows and Mac. So if you are looking for a solution for creating Windows 10 bootable USB then go ahead and try UUByte ISO Editor, which will do the job with just a few clicks of mouse.
Part 2: How to Make Windows 10 Bootable USB on Mac
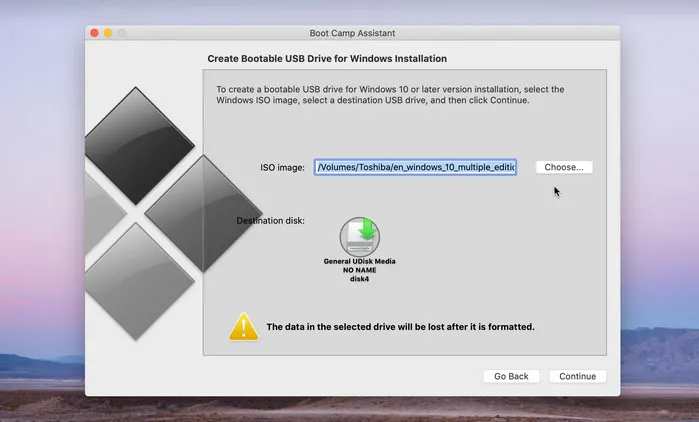
Many of us use Mac computer at work or at home. If you are one of them and want to run Windows on Mac then you need to create Windows 10 bootable USB drive. It can be done on the same system running macOS. It is useful when you want to replace hard drive or install a fresh copy of windows 10 on your device. Below mentioned are the steps which are required to create Windows 10 bootable USB on Mac using Boot Camp Assistant, a stock app shipped with macOS for dual boot. Please note that the USB must have 16GB of storage or more before starting the process.
Step 1: Get an USB drive that you want to use as a bootable device and insert it on your Mac. After inserting open Boot Camp Assistant app on your Mac.
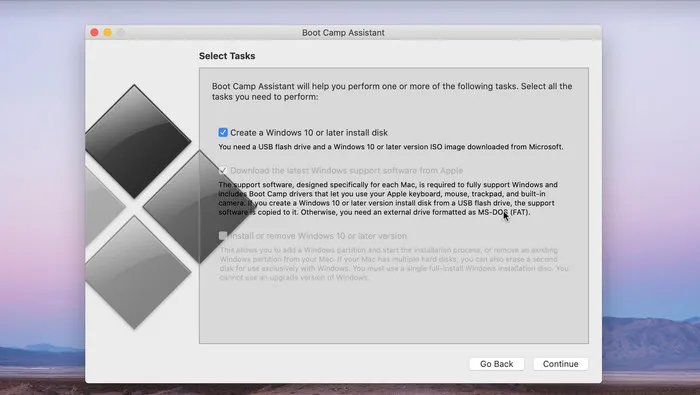
Step 2: You will see a brief introduction abou the app and click "Continue" button to move to the next window. An error message pops up if the local disk has less than 42G free space. Igonore this error and tick the box "create a Windows 10 or later version install disk'. Also, don't forget to uncheck "Install or remove Windows 10 or later version " box. Now tap "continue".
Step 3: Download the Windows 10 ISO file from Microsoft's official page and save it on your desktop for ease of access. Now Boot Camp Assistant will locate the file automatically or you may also click on the "choose" button to find and locate it manually.
Step 4: Tap on the "continue" button to start the process and wait till the USB drive is formatted and set up to become a bootable drive. After the process is completed your USB drive will be renamed. Safely eject the drive and use it as Windows 10 bootable USB drive
This process works great on Mac operating system but Boot Camp Assistant has issues running on macOS Mojave and later. So before starting creating a Windows bootable USB on Mac, take a good look at the operating system's version that you are using on Mac.
Part 3: How to Make Windows 10 Bootable USB on Linux
Linux can be used as primary operating system these days for a lot of people because of the evolution it gets in recent years. Some like to keep a dual operating system like Linux and Windows 10 on their computer as not all the websites especially ones doing online transactions like Banks don't support Linux. To make Windows 10 bootable drive on Linux, you can use the DD Command to get the job done easily.
Step 1: First thing that you need to do is to format the USB drive. You have to unmount the USB from the device. You can do that by typing the following command:
umount /dev/sdb*
Step 2: After unmounting you have to format the USB drive to FAT file system. You can do that by typing in:
mkfs.vfat /dev/sdb –I
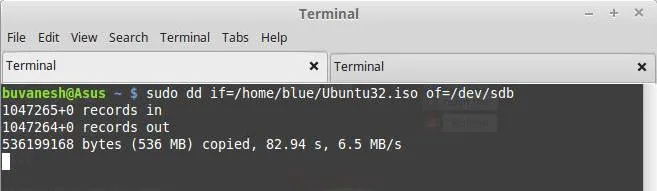
Step 3: It is now time to use the DD command.Type in the command below:
dd if=~/path/to/windows10/file.iso of=/dev/sdb
In this case "if" stands for input file which is used to specify the location of Windows 10 ISO file.On the other hand "of" stands for output file which specifies the location to write the ISO file. In this case it is /dev/sdb. You can monitor the progress by typing in (grep –l '^dd$'). This command will print process number for the dd tool.
Step 4: Now note down the process number and open a new terminal session and type in (kill –USR1 6762). In this case 6762 is your dd process id. It will now print the copying process statics.
Step 5: You are done. You can use this procedure to install Windows 10 from bootable USB.
This process requires a good knowledge of the command line. Moreover, Linux is coming up with newer methods all the time. So keep an eye on the Hub where you may find better ways to make Windows 10 bootable USB by yourself.
Wrapping Up:
You can try any of the methods above to make Windows 10 bootable USB but in terms of feature and UI interface, UUByte ISO Editor is way ahead than its competitors. Not only it gives you a lot of options and features, but it also saves you a lot of time and energy as it takes just a few minutes to perform the process using this software. It supports both UEFI and Legacy boots so you don't have to worry if the motherboard is an older version.

Petty is editor in chief at UUByte and writes various topics about Windows and Mac to help people make the most of current technology.