
The introduction of Apple's ARM based M1 chip brought a revolution in personal computer industry. This Apple Silicon chip is a complete new architecture to replace the long standing Intel-based Mac. According to Apple's official statement, M1 chip is a single chip made by 5nm process that delivers incredible performance and revolutionary power efficiency. However, it also brings up new problems, especially for those who wants to install Windows 10 on their M1 Chip Mac.
Mac Computers Running on Apple M1 Chip
Most of the Mac computers are still shipped with Intel CPU. As of the time we are writing this post, only a new models are powered by Apple M1 Chip. They are:
- MacBook Pro (13-inch, M1, 2020)
- MacBook Air (M1, 2020)
- Mac mini (M1, 2020)
The Traditional Way to Install Windows 10 on Mac (Intel x86 Chip)
Windows is currently the most popular desktop operating system on earth and many Mac users needs to run Windows 10 on their Mac, which is a huge demand in Mac user base. To support this feature, Apple developed an app called Boot Camp Assistant to let Mac users easily run Windows 10 along side with macOS on Mac.
Boot Camp Assistant is shipped with Mac OS X and macOS. So installing Windows on Mac with Boot Camp is a pretty simple task. Once a Boot Camp instance was installed on Mac, the user can smoothly switch between Windows and macOS with the help of Boot Camp utility.
Besides Boot Camp, you can also install Windows 10 as a sole operating system on your Mac. However, you need to create a bootable Windows 10 USB first. Then boot your Mac from USB and start installing Windows 10 on your Mac.
Why Cannot Install Windows 10 on Mac Natively with Apple M1 Chip
Simply put, Boot Camp can be only working on a Mac powered by an Intel processor. Below is the official documentation from Apple Support Page:

This means Boot Camp is not working on an M1 Chip Mac according to above statement. Because M1 chip is based on ARM architecture and only ARM version of Windows 10 can be installed on it. Apple does support this feature but the decision lies on Microsoft, who owns and develops Windows OS. Up to now, Microsoft only allows ARM version of Windows 10 to be preinstalled on new OEM hardware according to a Microsoft spokesperson in response to The Verge.
"Microsoft only licenses Windows 10 on ARM to OEMs. We have nothing further to share at this time."
The problem is that Mac is preinstalled with macOS, making its impossible to run Windows 10 on M1 chip Mac natively.
Any Possibility to Install Windows 10 on Mac on Apple M1 Chip?
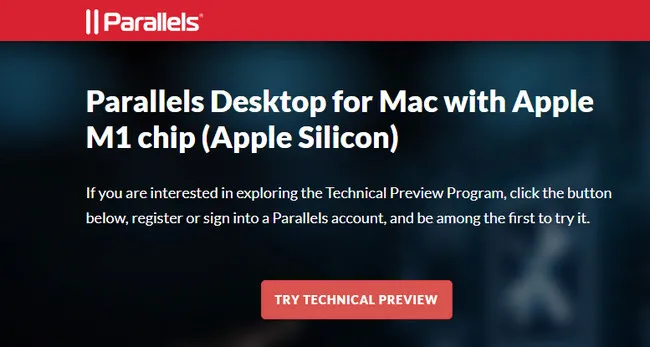
Currently, the only way to install Windows 10 on Mac running on an M1 chip is through virtualization software, i.e. Parallels Desktop. A virtual machine that gives the ultimate pleasure of dual OS on a single machine. Since the release of ARM-based embedded with Apple Silicon M1 Chip, Parallels also launched a new version that is specially designed for ARM processor.
How to Install Windows 10 on Apple M1 Mac with Parallels Desktop
The hope of light is Parallels Desktop and you are well very aware of it. Now, let's see how it will work and the installation process of Windows 10 on M1 Mac. This is for Mac that has an M1 chip.
Step 1: Create a free Parallets account from here. Then head over to the download page of Parallels Desktop for Mac with Apple M1 chip. Now, download the installation package on your Mac and move the app icon to Application folder.
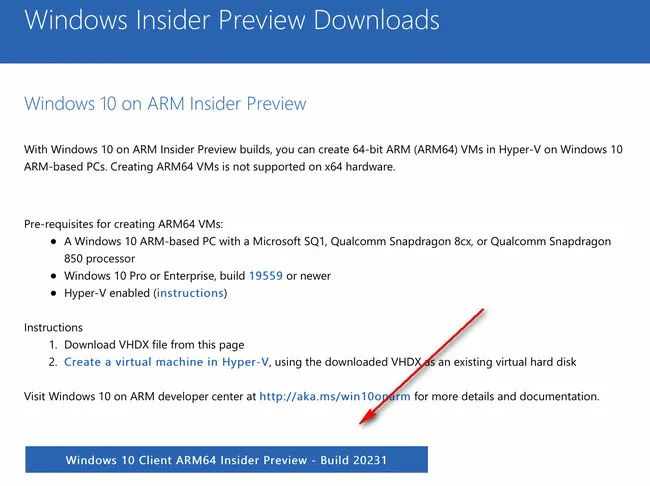
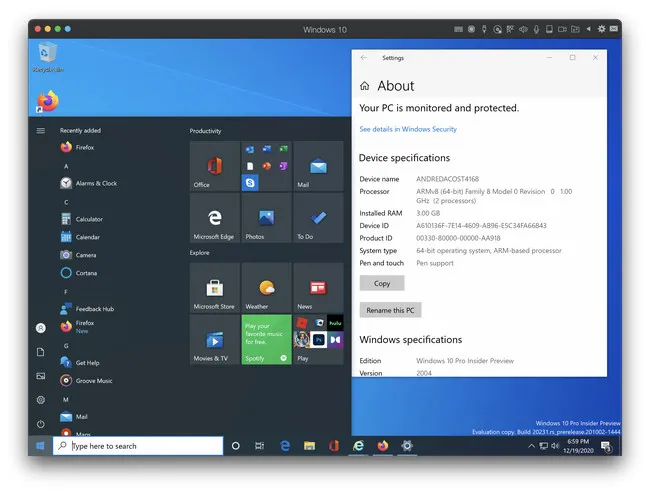
Step 2: Windows 10 for ARM is not yet for public download. You have to enroll Microsoft Insider Program to get the ISO image of Windows 10 ARM version. Please go to the official website of Windows Insider Program, sign in with your Microsoft account, and then click on the download link of Windows 10 Client ARM64 Insider Preview, which is a VHDX file around 8.2GB.
Step 3: Now, open Parallels Desktop app on M1 Mac and then drag the downloaded VHDX file to Installation Assistant.

Step 4: Click on the Create button and wait for a while. Installation Assistant will automatically parse the files in VHDX file and starts create a Windows 10 virtual machine on your Mac.
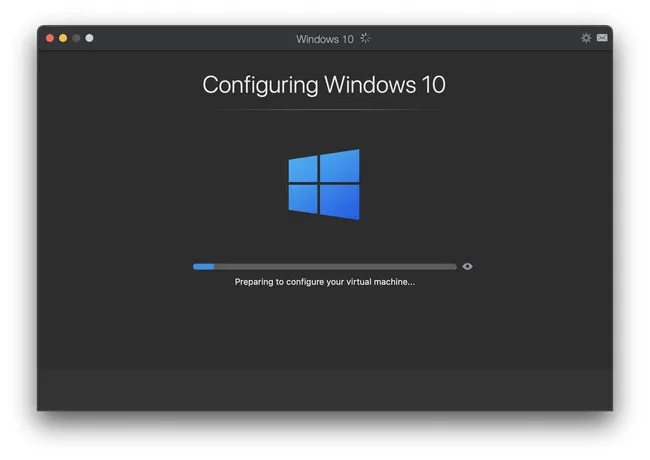
Step 5: After configuration, a Windows 10 virtual machine will be installed on your M1 Mac. Now, you need to install Parallels components to make it working more smoothly.
Addition Setup for Windows 10 Virtual Machine
After successfully installing Windows 10 on M1 Mac wihi Parallets Desktop, you need to make some changes on M1 Mac if Windows 10 ran into bugs or issues. So, let's begin with the Time Sync feature.
Disable Time Sync
First, open Parallels menu, and go to Windows 10 Configuration menu. Now, click on More options located at the left panel window. Soon, the Time Sync option will appear and you need to select the Do not Sync option from the drop-down menu.
Update Windows Insider
Windows update is always essential for a fresh installation of OS. This will help you to run Windows 10 on M1 Mac more effectively. So, let's see the detailed process.
Step 1: Click on Windows search bar, type 'Windows Insider Program Settings' and then press the Enter key.
Step 2: Soon, you will be directed to Windows Insider Program, click on the link that states Go to Diagnostics and Feedback settings to turn on optional diagnostic data.

Step 3: On the next page, you will get several options, click on Optional diagnostic data to enable it. You will get one option, i.e. Link a Windows Insider account and you need to click on it.
Step 4: Now sign-in to Windows Insider through your Microsoft account credentials. After logging in, you will get some insider settings, click on Beta Channel, and further select Dev Channel.
Step 5: Now, go back to the Settings page and move to Windows Update and Security feature, click on the Update button.
Step 6: After installing Windows 10 Insider Update, restart your device. Now, you can easily run Windows 10 on M1 Mac through Parallels.
However, if you want to further optimize the settings of Windows 10, then you can alter the processor settings. The method is quite simple, go to the parallels action menu and click on Windows 10 Configuration menu. Here, you will get few options at the left panel, click on CPU and Memory. Now, move to the Processor section and select 4 from the drop-down menu.
How to Install Windows 10 on Apple M1 Chip with UTM (Updated)
Parallels Desktop is great for running Windows 10 on M1 Mac but not everyone could afford the price. The basic license is 79.99 USD and you should also pay for future upgrade fee. Fortunately, there is a free way to do this now with UTM Virtula machine software.
UTM is a QEMU based virtual machine software designed for macOS only. It can help you run different operating systems on Mac securely. It is totally free and supports ARM64 Windows 10 by utilizing Apple's native hypervisor virtualization framework.
Requirement:
- Windows 10 Insider Preview ARM64.
- UTM virtual machine app.
- SPICE Guest Tools.
- A Mac with 8G RAM and 20GB+ free space.
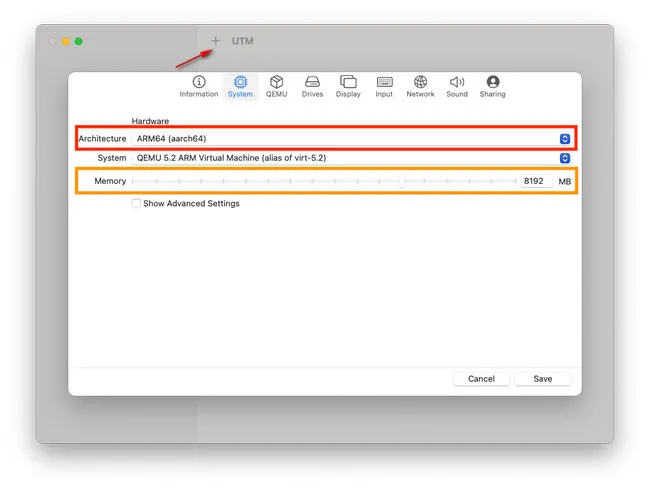
Step 1: Launch UTM app on your Mac and click '+' icon to create a new virtual machine. Please assign a new name for this virtual machine instance.
Step 2: In System settings, Please choose ARM64 for Architecture and half of the physical memory..
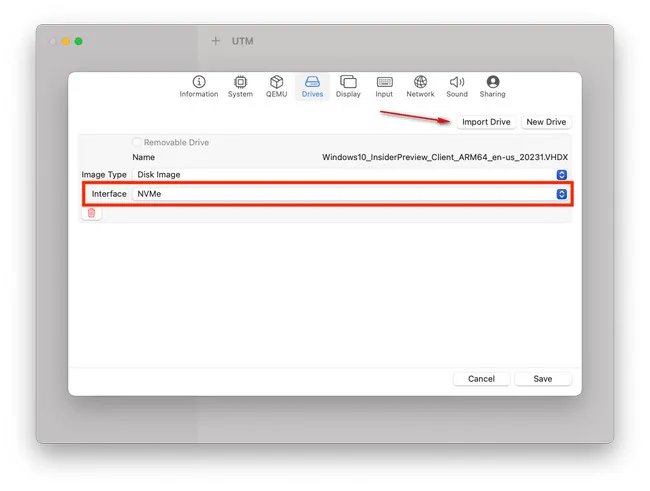
Step 3: From the Drives tab, click 'Import Drive' to load a Windows 10 VHDX. After completion, please set the drive interface to NVMe. This will load downloaded image file into UTM.
Step 4: Now, you need to add a new drive for installing Windows. Click 'New Drive' and check 'Removable' option from pop-up menu.
Step 5: Click 'Create' to start creating a new Windows 10 virtual machine based on above settings. Then Windows 10 installation will start after creation. Finally, install SPICE guest tools along with this instance.
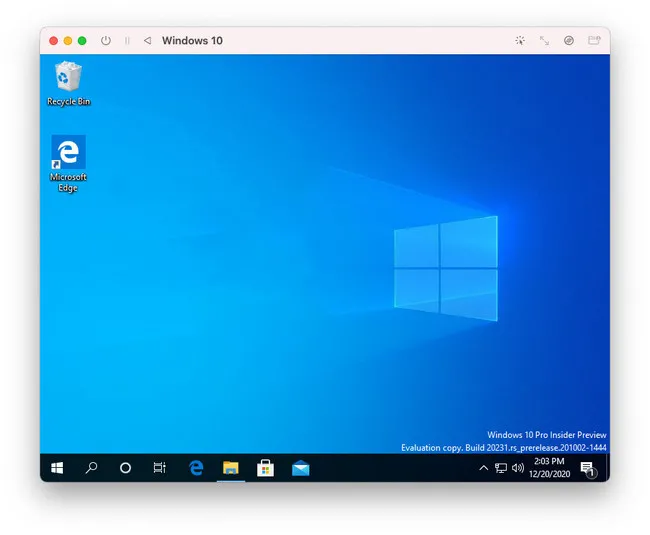
Once the Windows virtual machine is ready, you can make custom settings based on your own habit. However, it is not able to play games at this time because GPU virtualization is not supported. For troubleshooting guide, please check this official documentation.
How to Run Windows 10 Apps on an M1 Mac by Using CrossOver App
CrossOver is a cross-platfrom app that helps you directly run Windows application on macOS, Linux and Chome OS. The core is built upon a Microsoft Windows compatibility layer that allows CrossOver software to run Windows software on other operating systems. Unlike virtualization software, you don't have to download a full copy of Windows ISO and spends numerous time in setting it up.
However, the performace may get decreased and not all Windows apps can be run with CorssOver software. You can check the supported Windows software and games from this list, which has 16,479 entries. Basically, this is an alternative or indirect way to run Windows 10 on an M1 Mac.
Requirement for Apple Silicon Mac:
- macOS Big Sur 11.1
- CrossOver version 20.0.2 and above
- 500MB free disk space.
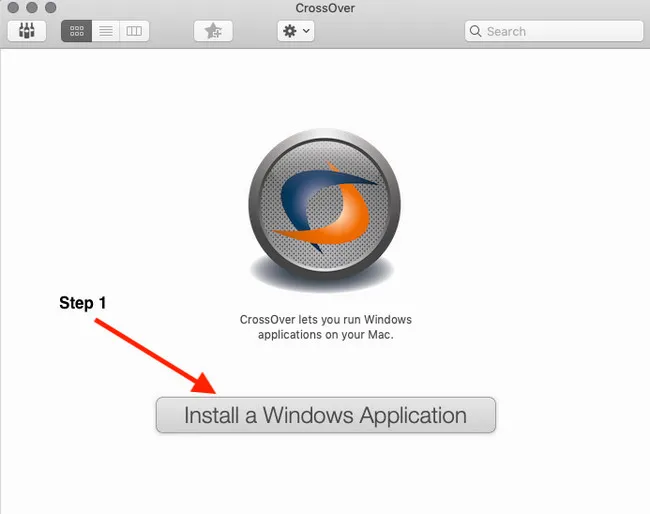
Step 1: Download latest version of CrossOver for Mac. And it is available for free trial.
Step 2: Unpack the zip file and drag the application icon to Application folder. Now open CrossOver app on your M1 Mac and click "Install Windows Application".
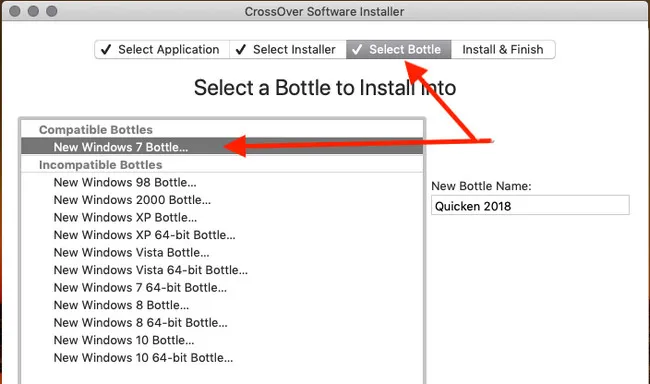
Step 3: Type the application name in search bar or locate installation .exe file from local folder.
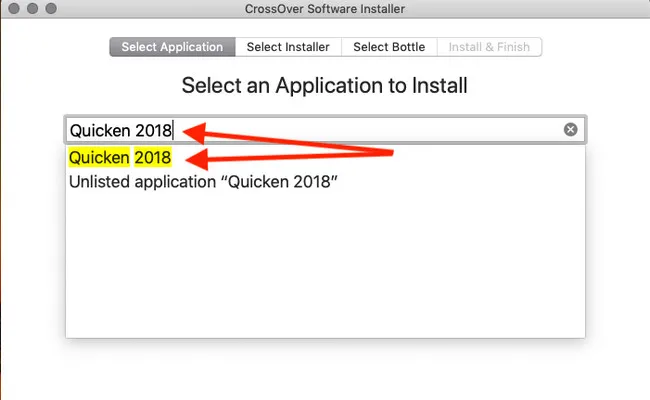
Step 4: Once the Windows installation file is found, then select a Windows 10 version to run this app. You can pick up from latest Windows 10 to oldest Windows 98.
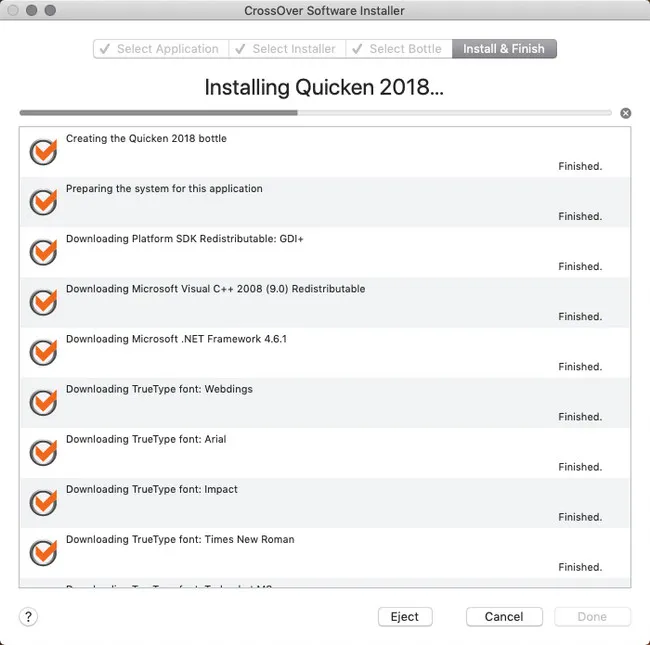
Step 5: The installation of selected app will be started. You will see a progress bar on the user interface. Once it is finished, you can now run this Windows app on Apple M1 Mac directly.
CrossOver is an ideal tool for M1 Mac users if they only wanted to run certain Windows app on their Mac. It does not require reboot when running Windows app. In addition, you don't have to install Windows 10 on your M1 Mac. This dramatically reduces the setup time and save more space on your Mac. But for premium features, you need to buy a license key at $39.95.
Conclusion
This is a complete tutorial on how to install Windows 10 on Apple M1 Mac. You can do this with Parallets virtualization software or directly run Windows app on Mac without installing Windows 10. However, neither of them have the same performace with a native Windows install using Boot Camp Assistant. Additionally, we will constantly watch out this topic and update accordingly when Microsoft adds support for Boot Camp.

Petty is editor in chief at UUByte and writes various topics about Windows and Mac to help people make the most of current technology.