
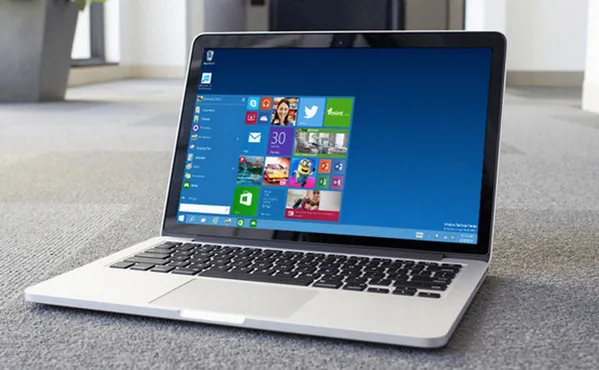
MacBook is one of the best-selling laptop models over the years because of its stylish design and ultra-portability. Also, Macs are more durable than Windows-based laptops according to my personal experience. But I never thought it could be so many Mac users who installed Windows 10 only on their Mac until my cousin asked me to do that. Please don't worry. This article will cover all the details to help you install Windows 10 solely on a Mac.
1. Why installing Windows 10 Solely on Mac?
However, a lot of users who are interested in Mac don't like or get used to macOS. Besides, some of the new hardware is only available on Mac like 8G video card in an all-in-one package. Those kinds of Mac owners are more willing to continue with Windows 10 and look for solutions to install Windows solely on their Mac. Below is a couple of reasons why Mac users insist installing Windows 10 as the sole operating system.
- More comfortable with Windows OS.
- Games or apps not supported by macOS.
- New hardware only available with Mac computers.
2. Select a Windows Version (Windows 10 Recommended)
To get started, you have to select a Windows version first. As you know, there are different desktop Windows versions, including Windows 10, Windows 8/8.1, Windows 7, Windows Vista and Windows XP. However, only Windows 10 and Windows 7 are suitable for working on Mac hardware.
For newer Mac models, we highly recommend Windows 10 as it gets better support from both Apple and Microsoft. This means Windows 10 is more stable and has fewer issues. Plus, Windows 10 comes with more fancy features and software updates.
Mac Models Eligible for Installing Windows 10
- MacBook Pro(2012 or later)
- MacBook (2015 or later)
- MacBook Air (2012 or later)
- iMac (2012 or later)
- Mac mini (2012 or later)
For old Macs not being listed in above section, we suggest installing Windows 7 on old Mac.
3. Preparation
In this article, we will go with Windows 10 as it is officially recommended by Apple. A few things you should be prepared for before installing Windows 10 OS on your Mac.
Requirements:
- Take a backup of Mac.
- 64+ GB USB Stick.
- Windows 10 ISO Image.
- Windows 10 bootable installer.
- Windows Support Driver.
4. Create Windows 10 Bootable USB Stick on Mac
After completing the preparation stage, we can start the task from now. We assume you still have access to macOS because Windows 10 OS is not installed on your Mac first. In this part, we should create a bootable Windows 10 USB stick on Mac for further OS installation like usually.
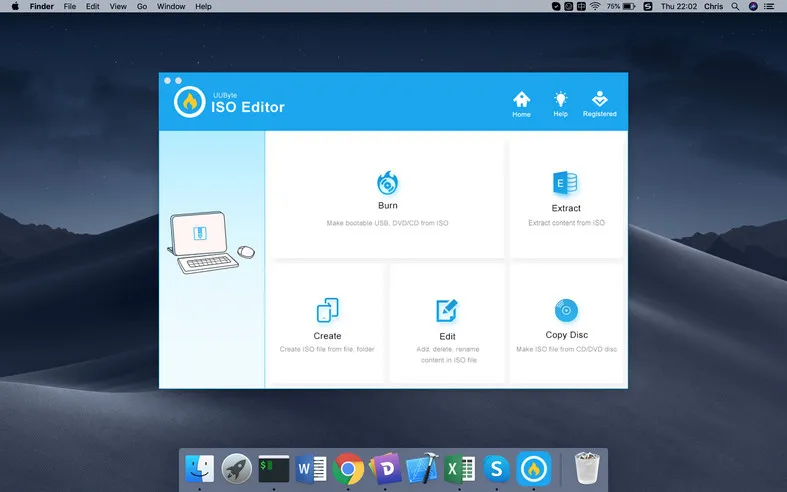
Sadly, there are few apps on Mac that can do this task. One of the most notable ones is UUByte ISO Editor, a well-known cross-platform ISO toolkit that is able to create Windows bootable USB on both Mac and PC.


Step 1: Please download UUByte ISO Editor .dmg installation file from this site and drag-drop app icon to Application folder. This allows you opening this app from Quick Launchpad.
Step 2: Insert an external USB drive into Mac and open UUByte ISO Editor app. Now, click 'Burn' tab on the main interface.
Step 3: Click the 'Browse' button to import Windows 10 ISO file into the app and select the USB drive from drop-down menu. Leave the other settings in default.
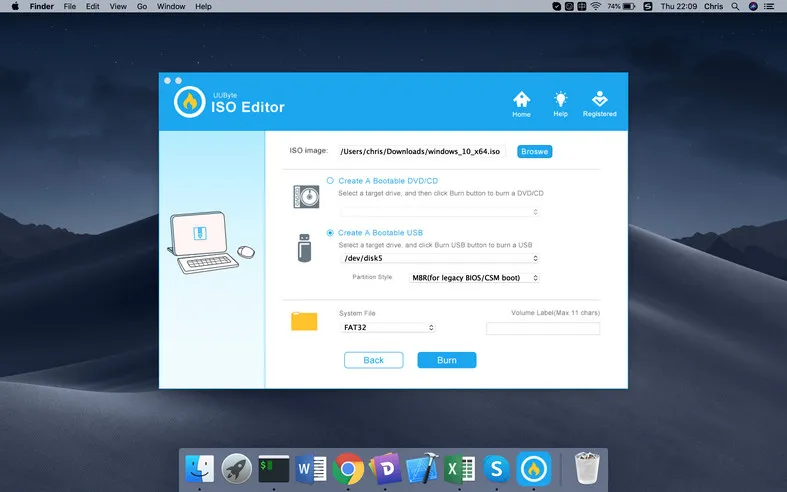
Step 4:When the setting task is done, click 'Burn' button to burn Windows 10 ISO to USB on Mac. This will be done in less than 10 minutes. Please be careful and keep USB well connected.
5. Download Windows Support Software
To run Windows 10 on an Intel based Mac, you have to download and install proper drivers to make it working as usual. And this process can be done with the help of Boot Camp Assistant app, a free utility being shipped with macOS by default.
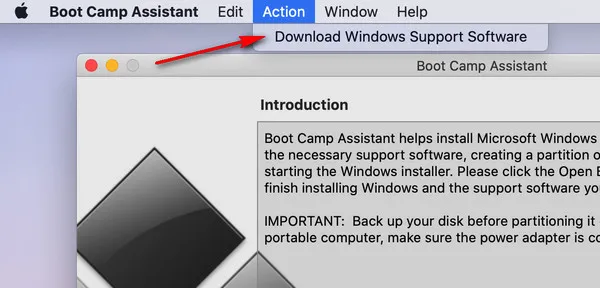
Step 1: Open Boot Camp Assistant from Utilities folder.
Step 2: From the top navigation bar, locate Action tab and select 'Download Windows Support Software' from drop-down menu.
Step 3: After that, Boot Camp app will remove Time Machine snapshots and other cache files.
Step 4: Choose a local folder to save Windows Support Software and start the downloading process.
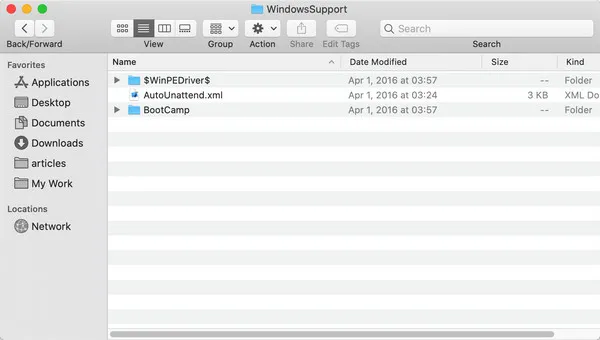
Step 5: Go to the download folder and make the following changes to AutoUnattend.xml file with a text editor.
InstallToAvailablePartition from True to False
WillShowUI from Never to Always
Step 6: Save the changes and copy the whole folder (WindowsSupport) to Windows 10 bootable USB stick.
6. Start installing Windows 10 Solely on Mac
From now non, it is the time to install Windows 10 solely on Mac as the above preparation task is done completely. Before getting started, it is important to back up data on your Mac. All data on local drive will be removed during Windows 10 installation.
Step 1: Plug Windows 10 bootable USB stick into your Mac.
Step 2: Turn off the Mac and wait 1-2 minutes. After that, press Power and Option key at the same time until you see the Startup Manager, where you can pick up a booting device.
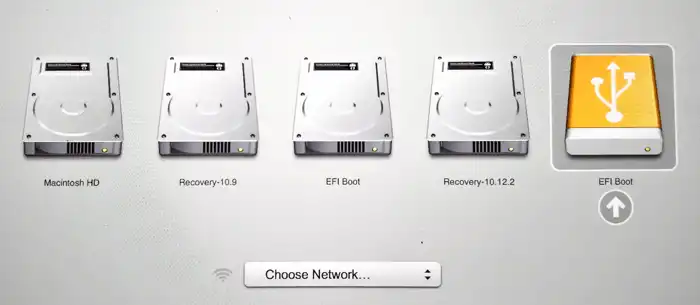
Step 3: Select the USB drive name and you will get into Windows 10 installation wizard shortly.

Step 4: Choose the Language, Region and Time Zone accordingly as prompted.
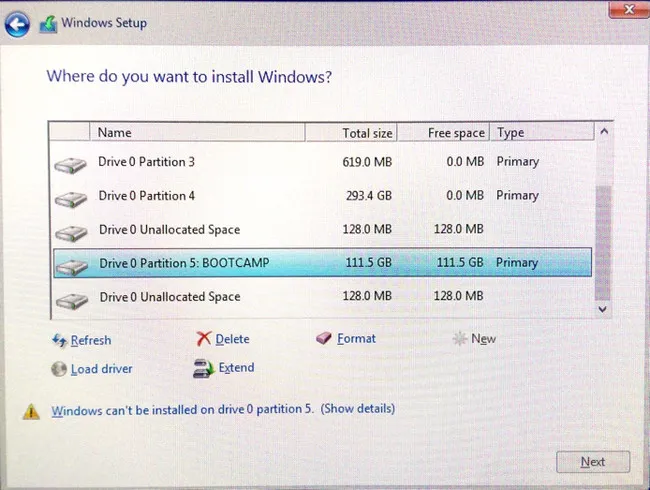
Step 5: At the end of process, you will be asked where to install Windows. Please select the internal HDD/SSD of Mac and click 'Device option (advanced)' to format drive to NTFS (GPT).
Step 6: Confirm the above operation and start Windows 10 on your Mac as the sole operating system.
Step 7: Once you get into Windows 10, you will find some of the drivers are missing (with a yellow question mark in Device Manager). You should run setup.exe from BootCamp folder located in WindowsSupport folder where you copied from your Mac.

7. Potential Issues on Intel Mac Powered by T2 Chip
We received several complains regarding T2 based Intel Mac, saying that Windows 10 installation process was not successful even strictly following above steps. So it is important to know what T2 chip it is and the potential issues.
T2 Security Chip is second generation of hardware encryption technology developed by Apple. It combines several other components into one single chip for data protection at system level. The main usage is for disk encryption and boot validation, which blocks unsigned software from running at bootup.
Mac computers that have T2 Chip
- MacBook Pro ( 2018 or later)
- MacBook Air (2018 or later)
- Mac mini (2018 or later)
- iMac (2020 or later)
- iMac Pro
- Mac Pro (2019 or later)
There are many positive things brought by T2 Security Chip. It also has some negative impact being linked to it. The primary one is for secure boot. This means Mac computers shipped with T2 Chip is unable to boot from external device in default. So there is a higher chance that you might encounter installation issues on those Macs.
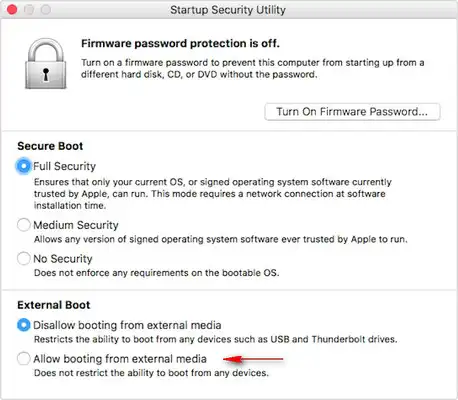
To solve this, you have to boot into 'Startup Security Utility' by pressing and holding Command and R keys at the same time. When the app is opened, please select ‘No security’ at Secure Boot section and ‘Allow booting from external media’ at External Boot section.
Conclusion
Installing Windows 10 on Mac is not tough task with the help of Boot Camp Assistant app. However, it could be much more difficult if you try to install Windows 10 as the sole operating system on a Mac. There are many addition steps and settings involved in this process. Please read the tutorial carefully and backup your important data on Mac before getting into the actual step.

Petty is editor in chief at UUByte and writes various topics about Windows and Mac to help people make the most of current technology.