
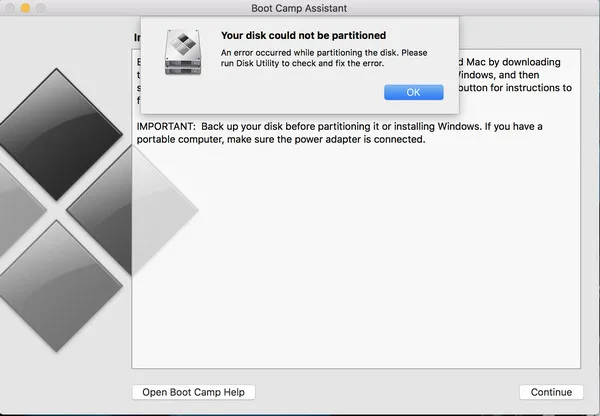
In modern days, cross-platform users have increased significantly because the work becomes simpler and easy. But, the traditional method of installing Windows OS on Mac via Boot Camp Assistant has become old and it gives numerous errors and one such is "Your disk could not be partitioned".
Though the issue is old but still there are many users waiting for the precise solution. But, in this article, you will get a unique way to fix Boot Camp disk partition error that will help you to accomplish the goal smoothly.
Before moving to the advanced solution, let's see the conventional and official solution such as disabling Timeline and erasing unallocated free space to fix this issue. These are the initial methods to fix the Bootcamp partition error. So, let's begin the task.
Official Suggestions to Fix 'Your Disk Could Not Be Partitioned' Error
This is a common issue that keeps repeating even on modern Macs. And Apple provdides official suggestions to get it fixed. However, this is not 100% working as we still receive complaints from other users after following their guidelines. But it is not bad to give it a shot.
1. Erase Unallocated Free Space
If the volume that needs to be partitioned is lacking free space, then Bootcamp will not support the installation of Windows. So, at this point, you must free up more space.
Step 1: Go to the Utilities folder of Application and open Disk Utility app from there.
Step 2: Select the internal disk or volume and then click on the Partition tab.
Step 3: Thereafter, you will get Apple File System space sharing interface on the screen, click on the Partition icon to expand the volume.
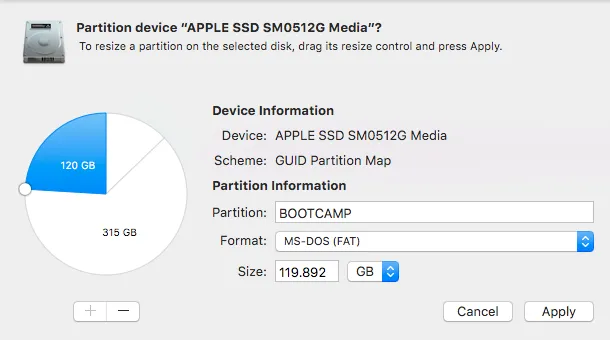
Step 4: Soon, you will find the Pie Chart showing the space in the internal disk, select 'Free Space', and then click on the minus (-) button located beneath the Volume label.
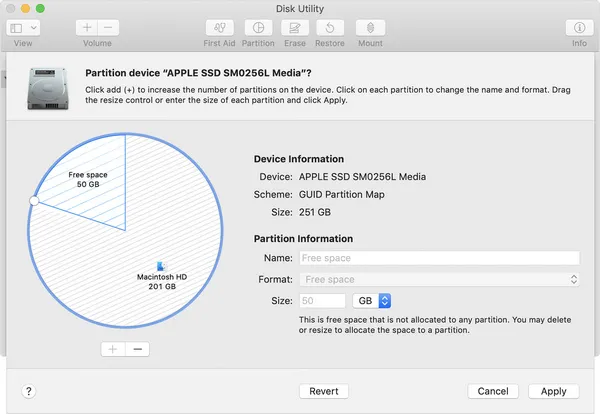
Step 5: Now, increase the space as per your requirement and then again launch the Bootcamp to install Windows OS on Mac.
This is a basic method that helps you to alter the space of the internal disk. There may be a possibility that your internal disk is full and due to the same, you are getting Bootcamp partition disk error because Bootcamp is not getting the sufficient space to allocate for Windows OS.
2. Disable Time Machine Temporarily
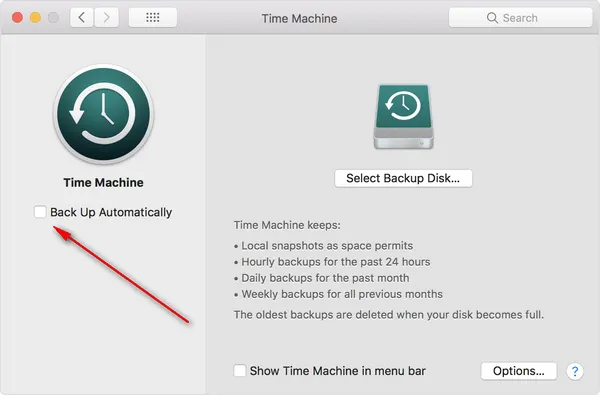
Time Machine is an inbuilt tool of Mac that helps you to take the backup of the Mac machine. It works automatically and takes the backup daily, weekly, or monthly. So, disabling the Time Machine will give you a new way to fix the error and the steps are very simple that is provided beneath.
Step 1: Click on the Apple menu, move to System Preferences, and then click on Time Machine.
Step 2: Choose the disk and click Remove disk icon. Soon, you will get the confirmation message for this task and you need to approve the same.
Step 3: After that, move to Back up Automatically section and then uncheck the box to turn it off.
Step 4: Wait for some time and then launch Bootcamp to install Windows OS on Mac.
The chance of success is quite low in this method, but a simple try may work for you. However, there are additional few official methods to fix this issue, such as repairing the startup disk via Disk Utility, and the installation of the latest macOS on Mac machine.
On the off chance, if Boot camp failed to get the result and you are still fighting with the issue, then you need to go with the advanced solution which means an efficient alternative, i.e. installing Windows on Mac without Boot Camp via bootable USB drive. In this method, you will achieve the goal without using Bootcamp Assistant app.
Boot Camp Alternative to Create Windows 10 Bootable USB on Mac
In this method, you need to create a bootable Windows 10 USB drive on and this means burning Windows 10 ISO file on the USB stick. Once you complete the task, you need to download the Bootcamp drivers and other related drivers that are necessary for Windows 10. So, let's see the method in a detailed manner.
UUByte ISO Editor is the most powerful app on Mac in order to create a bootable Windows USB installer. It is currently the best alternative to Boot Camp Assistant for installing Windows 10 on Mac. Moreover, it is also capable of editing, creating, and copying ISO file on any version of macOS. The interface is very smooth and with few clicks, you can accomplish the task.


Step 1: Download UUByte ISO Editor and install it on your Mac device.
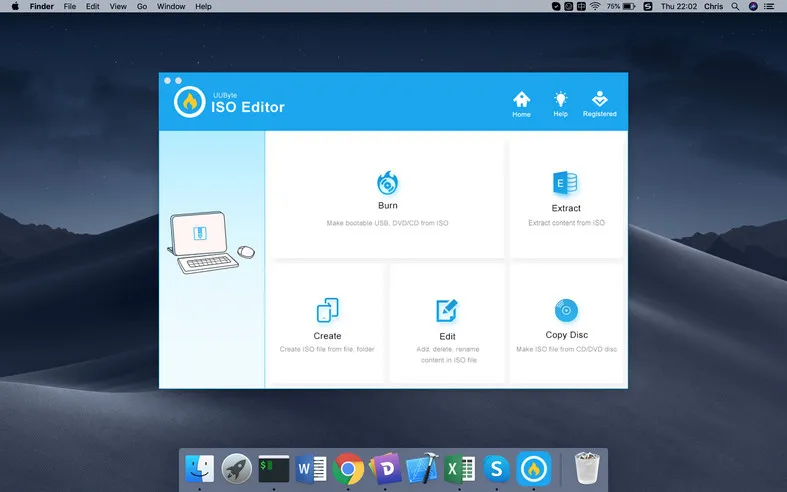
Step 2: Insert USB drive on your Mac and then launch UUByte ISO Editor. On the main interface, click Burn tab. You will get an ISO image option and parallel to the same, Browse button is listed, click on it and then import Windows 10 ISO image into the app.
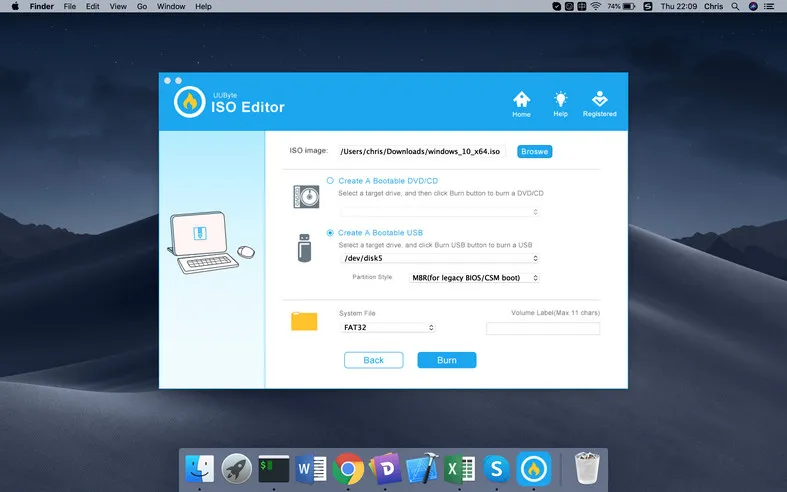
Step 3: After that, select the option 'Create a bootable USB' and then select your USB drive from the featured column. Thereafter, click on the Burn button to start the burning process. Once the task is completed, you will get the successful message on your Mac screen.
UUByte ISO Editor for Mac is an advanced ISO toolkit that enables the users to create, edit, copy, and extract ISO files on Windows and Mac OS. This app is designed for cross-platform users to help them easily create Windows bootable USB from ISO image.
How to Install Windows 10 on Mac without Boot Camp (Dual Boot)
Disk Partition is very important because it will help you to allocate the space for Windows on Mac. And this is the first step you should take in action. Sufficient space is required for any OS to run on the machine and if you fail to give the same, then the error will occur, so perform the task carefully to access Windows on Mac.
Launch Disk Utility app on your Mac and then select your Internal drive or Volume. Now click on the Partition and further click on the plus icon (+) to allocate the space for Windows 10. In the partition section, you can name it as per your desire. After that, move to Format section and select MS-DOS (FAT). Now, click on the Apply button to start the partition process.
Once the partition process is completed, you need to start the installation process of Windows on Mac. As you fulfill the entire requirement needed to perform the job, so let's head to install Windows 10 on Mac without Bootcamp.
Make sure the USB drive is inserted into your Mac. Next, restart your Mac, and amid doing the same, press and hold the Option key. Soon, you will get the list of drives, select the USB drive and it will be named EFI Boot. Thereafter, you will get the Windows setup interface. Now, select the partition that you created earlier and then click on the Delete button.
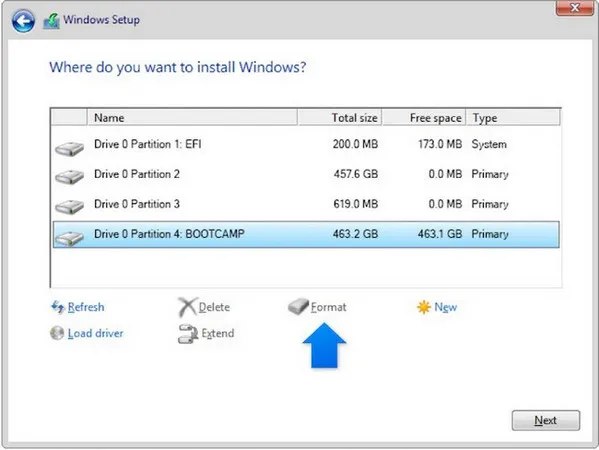
Next, select the drive that shows the unallocated space and further click on the New button. Thereafter, the Windows installation process will start and it will take almost 10 minutes to finish the process. Once the process gets completed, follow the on-screen instructions to finish the setup process.
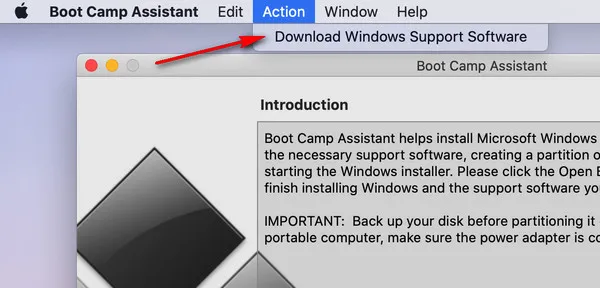
While running Windows on Mac, you will need the necessary drivers for the smooth performance of Windows on Mac machine. So, please download Windows Support Software from Boot Camp Assistant and install missing drivers on Windows partition by running Boot Camp Setup.exe, which you get from Boot Camp.
The Bottom Line
"Your disk could not be partitioned" is a frequent error when using Boot camp app on Mac. This post is all about the way to fix Bootcamp partition disk error. The conventional method offered by Apple will help you to resolve the issue for most of the cases. On the off chance, if you failed to achieve success, you can install Windows on Mac without Bootcamp app by using UUByte ISO Editor. Hence, go with the process and enjoy Windows dual boot on your Mac machine. Besides dual boot, you can also run Windows 10 on Mac from USB drive. However, you need to create a Windows To Go USB first.

Petty is editor in chief at UUByte and writes various topics about Windows and Mac to help people make the most of current technology.