
Are you stuck with a Windows installation DVD but your computer doesn't have an optical drive? Or maybe the DVD is starting to get old and moldy and you need to create a backup. Whatever the reason, a USB flash drive is a better option for storing your installation files because it lasts longer and is less prone to damage in the long run. Here, we show you three free methods to make a bootable USB from Windows 10/8/7 installation disk.
WinUSB - Make Multiboot USB from Windows Installation DVD
WinUSB is a free multiboot USB creator developed by that gives you various options to create bootable USB flash drive from Windows DVD and ISO file. As the name suggests, it is specially designed for Windows ISO installation files. Besides, the UI is much cleaner than most other applications as well. The unique aspect of WinUSB is that it can create a multi-boot USB, which means you can have several different Windows versions or even Linux distributions on the same USB drive depending on the capacity of the drive and format compatibility.
Step 1: Download WinUSB on your PC and insert the USB and Windows installation DVD, then launch WinUSB.
Step 2: On the main interface, select your USB drive from the center panel options.
Step 3: On the right-side panel, Choose the DVD option under Windows, and choose any other option you'd like to add. For example, if you have other Windows ISO files, you can also include them in the disk writing process.
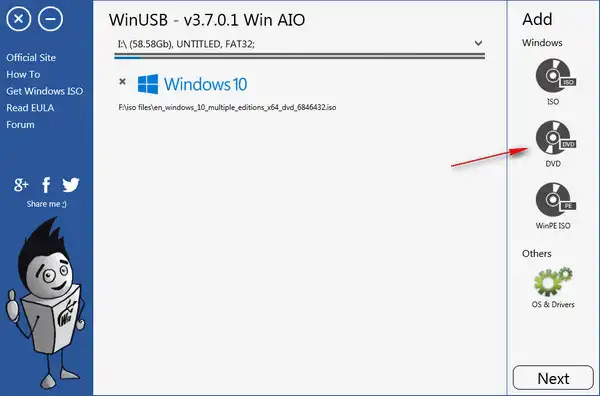
Step 4: Usually, there's no need to format your drive but you can choose the option if you want to. Hit Next to start burning Windows ISO to USB drive. In a little while, your bootable USB created from the Windows DVD will be ready for use.
The main reason that this tool is easier to use is that its interface is pleasant to look at and not at all confusing. You only have the controls that you need to create the bootable USB and it is all clearly laid out. In short, it's a fantastic free way to create a bootable USB from Windows installation DVD or any other ISO source, including the disk image file itself.
AnyBurn - The Ultimate Solution for DVD & USB Burning
This is another powerful free tool for creating bootable media on USB. The best part is that, based on the source ISO file on your DVD, it will automatically select the appropriate format for the USB drive. The only thing you'll need to do is to make sure you select USB-HDD as the ‘Write Method', as shown below:
Step 1 : Download and install AnyBurn on your PC.
Step 2: Launch the application after inserting the DVD and the USB drive. As mentioned above, there's no need to worry about the formatting. Click 'Create bootable USB drive' from the welcome page.'

Step 3: Choose the radio button next to Compact disc in the first section, and then choose your USB drive in the section right below that.
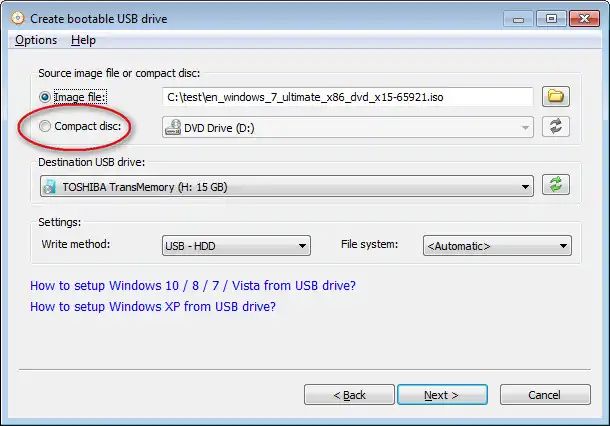
Step 4: As mentioned earlier, make sure the Write Method is selected as USB-HDD. Click Next and confirm the warning message with OK.
That's about it. A bootable Windows USB installer will be ready in a little bit. AnyBurn is a versatile disk image tool that has many functions, such as copying a DVD to an image file, putting an image file on a disc, burning files or folders to a DVD, ripping audio files from a CD, extract disk image file content, and more.
Rufus - The Single Purposed Bootable USB Creator
Rufus is a versatile disk image tool that focuses on convenience and speed. It will automatically format your USB based on the partition scheme and target system that you choose, which is really the only thing you need to know about this utility.
Step 1: Download and install the latest version of Rufus on your PC.
Step 2: Run the program and insert your USB drive as well as the Windows installation DVD.
Step 3: Under the Device option, make sure the flash drive is chosen and displayed; similarly, under Boot selection, choose Disk.
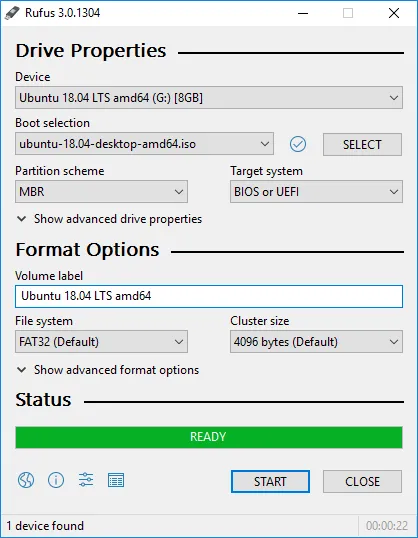
Step 4: Leaving other values as they are, change the Target System to UEFI (non CSM).
Step 5: The Format Options field should now show FAT32; if not, change it.
Step 6: Click on Start and then confirm that you want to erase the flash drive for the bootable USB creation.
If you are not using a new USB drive, we recommend that you take a backup of your data. The process, as you saw, will erase and re-format the drive to hold the bootable ISO for Windows.
Summary
All three tools showcased here are well-known free utilities for making bootable USB from Windows installation DVD. However, they don't come with any kind of customer support or tutorials, etc. For that reason, you may want to go with a more sophisticated tool that you might pay a few dollars for, e.g UUByte ISO Editor. The benefit is that you get full support, plus you'll have a much more user-friendly interface to work with that even beginners will find easy to navigate and use.

Petty is editor in chief at UUByte and writes various topics about Windows and Mac to help people make the most of current technology.