
How to create a bootable USB for Windows 10 when you only have a Mac available? After updating Mac computer to Mojave version, you realize that Boot Camp doesn't work any more, so your task becomes a challenge on Mac. In this guide, we'll walk you through the potential ways to create the media on your Mac through Terminal, UUByte ISO Editor software and UNetbottin tool. UUByte ISO Editor and UNetbottin are proven as one of the best Windows bootable USB creation software on macOS.
Make Bootable Windows 10 USB on Mac without Boot Camp #1: Disk Utility
If you do not like installing third party software on your Mac, you can then use the Disk Utility app along with Terminal to easily make a bootable USB for a Windows installation. It does not require any additional software to be installed on your Mac and you can do it by following these steps below.
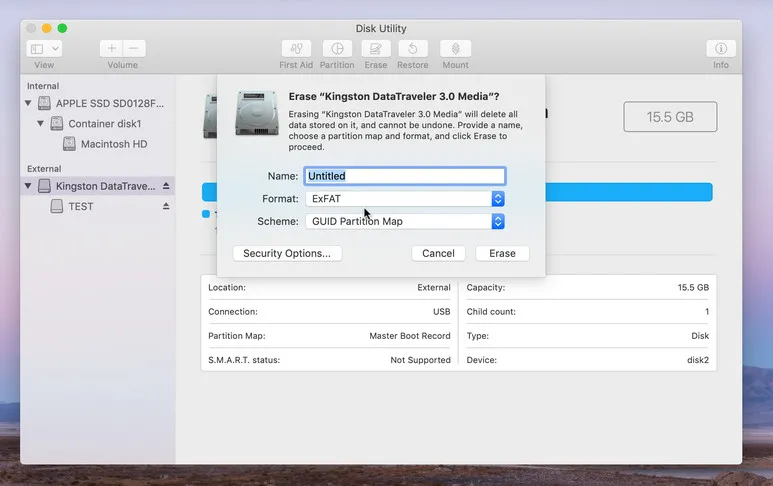
Step 1: Connect the targe USB drive on Mac. Make sure it has at least 8G free space and back up the data on the device. Now open Disk Utility app on Mac.
Step 2: The USB name should appear at the left sidebar below External section. Click Erase option from top menu bar and choose ExFAT from Format option. For newer device, the Scheme option should be set to GUID Partition Map.
Step 3: Open Terminal app and mount the Window ISO file with the following command. Assuming you save it on the Desktop. In my case, it's mounted as a Volume named "windows10.iso".
hdiutil mount ~/Desktop/windows10.iso
Step 4: Continue the command below to transfer all the files inside ISO image to your USB drive:
cp -rp /Volumes/windows 10iso/* /Volumes/Win10/
Step 5: Once the process is done, disconnect the ISO file with the following command:
hdiutil unmount /Volumes/windows10.iso
Step 6: You can now use the recently created USB to install Windows on your Mac or any Windows computers.
Create Bootable Windows 10 USB on Mac without Boot Camp #2: UUByte
If you feel Terminal commands are complicated and hard to follow, then you should consider UUBytte ISO Editor to help you. With this tool, creating a bootable drive on USB on your Mac is not a difficult task. All you need is to install the software on your Mac and then take all the advantage of the app. Apart from this, UUByte ISO Editor allows you to do other things like extracting or editing the ISO file.


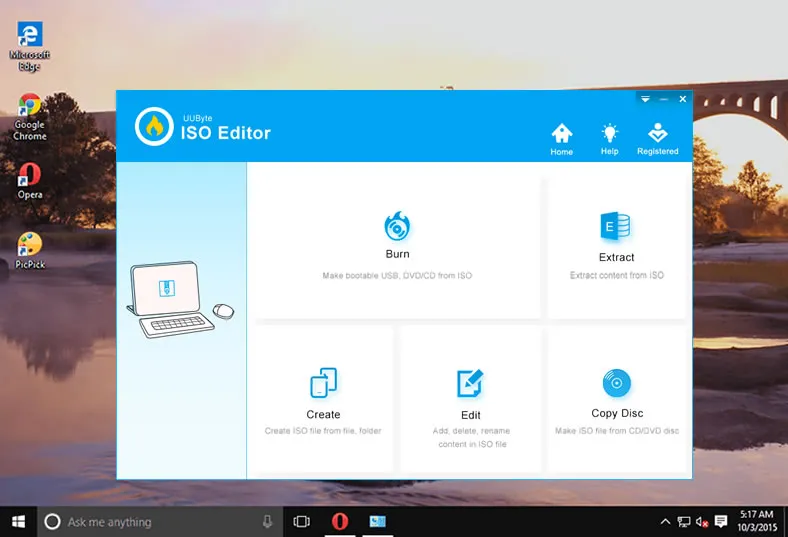
Step 1: First, download UUByte ISO Editor on your Mac. Make sure to choose the right version. Since you just need to burn an ISO to USB to create bootable media, the free trial version is already good enough.
Step 2: From the app menu, click "Burn" button and navigate to the place where you store the ISO file. Connect the USB drive to your Mac and wait for about 5 seconds so that the tool can recognize the USB.
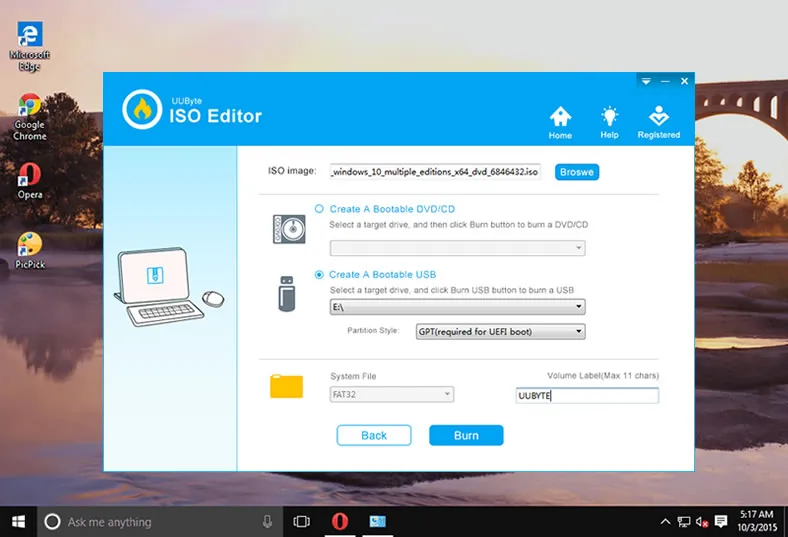
Step 3: Select the "Create A Bootable USB" option from the menu.
Step 4: Now, choose system file format of your USB as NTFS, set a name for it in Volume label and then click Burn.
Step 5: This step is very important. Make sure you disconnect all USB devices except a wired keyboard and the USB drive containing the Windows ISO files. Now restart your computer and hold down the Option (Alt) key at the same time. When you see the drives listed
Just wait for the app to do the leftover task. After 10-15 minutes, you will see a message that it has successfully copied ISO file to your USB drive and it now becomes a bootable drive.
Make Bootable Windows 10 USB on Mac without Boot Camp #3: UNetbootin
UNetbottin is a free and open-source utility, allowing users to make a bootable Windows USB drive on Mac, Windows and Linux OS. If you have a Windows ISO file stored on your Mac, here is how to use UNetbootin.
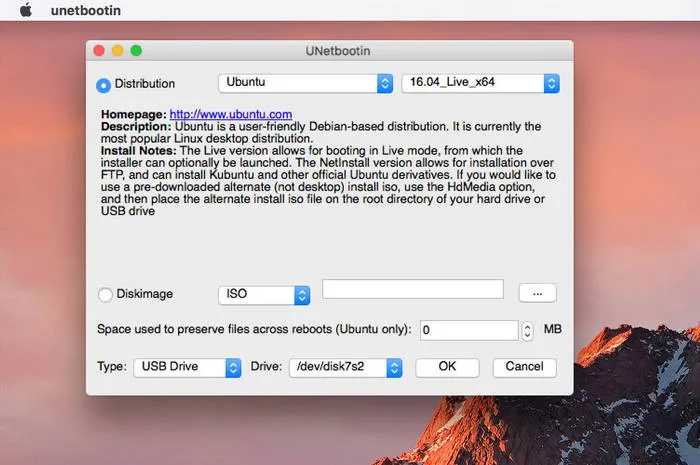
Step 1: Plug the USB drive into your Mac and then launch Disk Utility option. You can open it by searching on Spotlight. Select your USB drive, click on Info and take note the name since we'll need to use it later.
Step 2: Open UNetbottin and choose the "Diskimage" button and browse to the Windows.iso file. Double click on it to open the file.
Step 3: Select the type as USB Drive, choose your device. Hit OK to begin the installation.
Step 4: Wait for about 10-15 minutes for the process to complete, depending on the size of the ISO image.
Wrap Up
Above are the easiest ways to create a bootable USB drive on Mac from the ISO file without using Boot Camp. Now matter what method you chose, make sure to create a backup of your important data on your USB first since it will be formatted during the process.

Petty is editor in chief at UUByte and writes various topics about Windows and Mac to help people make the most of current technology.