
Most of ISO image files are pre-built, leaving little room for modification. However, it is neccessary to edit the ISO image file and rebuild a custom one in some cases. For instance, you have to add a custom virtual drive to Windows ISO image, which is mandatory for building Windows virtual machine from Vultr cloud platform.
Besides, Windows ISO contains too many features and some of them are not used. On a disk space limited device, it is very important to remove those bloatware from the installation file. This will save more space and boost the overall performance.
There are more cases when you have to edit a bootable ISO image file, such as adding or removing files. The major issue in here is that the ISO image file is not bootable after editing if you are using tools like WinZip, 7-Zip. However, don't be too frustrated. We will share the details on how to build a custom ISO image and make it bootable again.
Part 1: Extract Content from Windows ISO Image File
To edit an ISO image file, the first step is to extract content from it and save the extracted files on a local folder. This is a simple task and many tools can do that such as UUByte ISO Editor. If you have done this, then skip this part and move to next section.
Step 1: Download and install a trusted ISO extractor tool such as UUByte ISO Editor.


Step 2: Click the Extract button on the main interface and proceed to a new window.
Step 3: To extract files from ISO image, please click "Load ISO" button at right upper corner to add the ISO file into the program. Then click the Extract button and choose a local folder to keep the files compressed in ISO image. This will be finished in a minute.
Part 2: Add, Remove, Edit Files to Windows ISO File
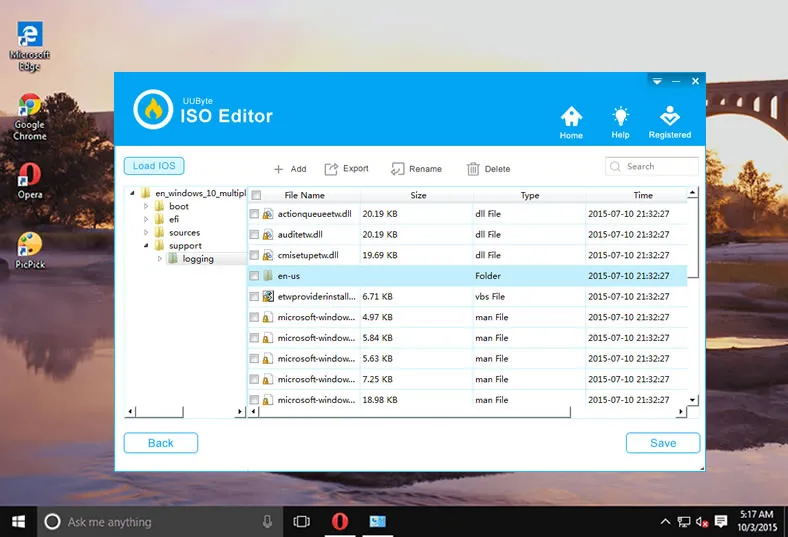
Navigate to the folder where files and folders are extracted from the original ISO image file. In here, you can add files/folders, delete files/foders as needed. However, don't touch the files in Boot and EFI folder, which stores critial information about booting. It is free to delete installation files/folders you are familiar with, such as Skype, browser extensions, games or other bloatware. Below is a screenshot of files and folders in a Windows ISO image file.
Part 3: Create Bootable ISO Image After Editing
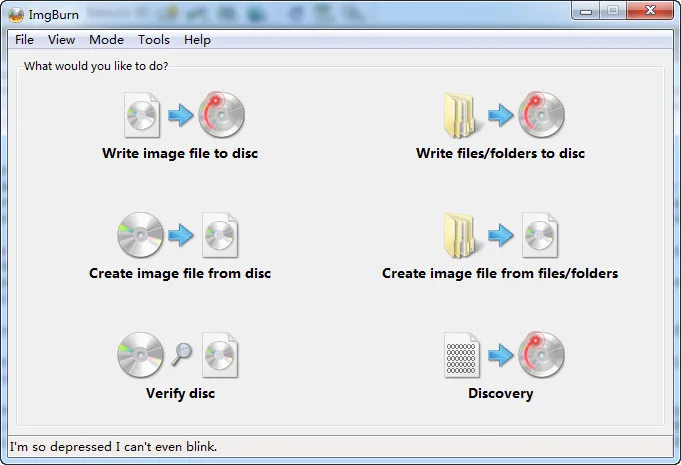
After modifying content in ISO file, it's time to make a new bootable ISO image file from the folders. We will cover a free tool called ImgBurn in this section.
Step 1: Download the latest version of ImgBurn (2.5.8.0) from its official website and install it on a PC.
Step 2: Launch ImgBurn and here you will get several options, click on "Create image file from files/folders".
Step 3: Click the folder icon at the center to import the folder being extracted and edited in Part 2. After that, the file path appears below Source label. Next, click the folder icon under Destination label and give a name to the new ISO file.
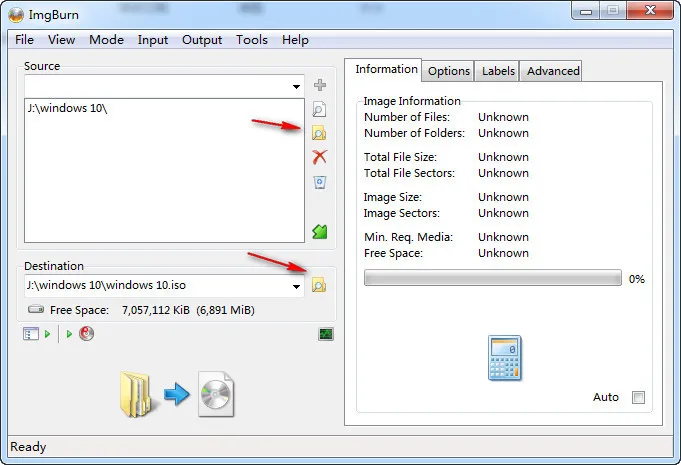
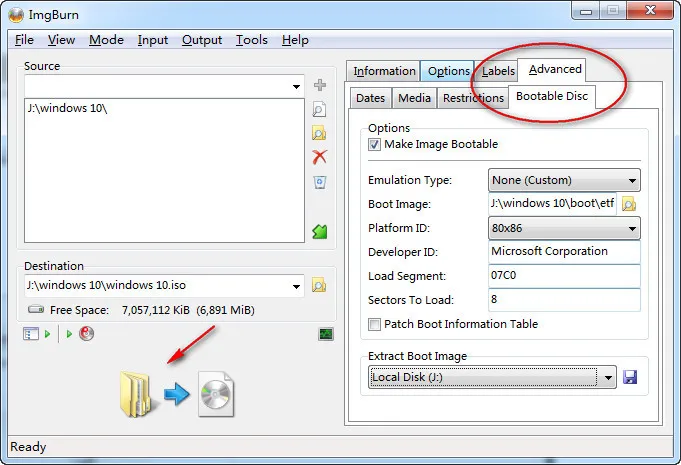
Step 4: To make the ISO bootable, please click "Advanced" tab and go to "Bootable Disc" section. First, tick the box named "Make Image Bootable". Set Emulation Type to None and click folder icon to add etfsboot.com to Boot Image. This file is sitting in boot folder. For Platform ID, please choose 80x86 from drop-down menu and Developer ID sets to Microsoft Corporation. Lastly, input 8 at Sectors To Load.
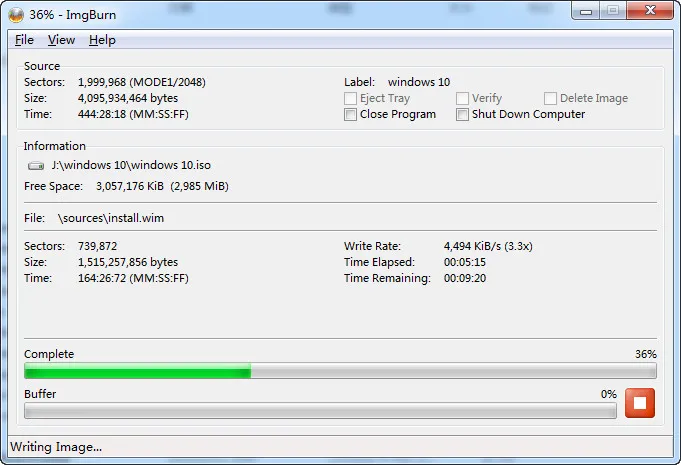
Step 5: After all settings are completed, just click the folder-to-disc icon below Destination section to start creating a custom ISO from local files and folders. And you have to wait 3-5 minutes before the task is done.
Part 4: Write Custom ISO Image to USB or DVD (Optional)
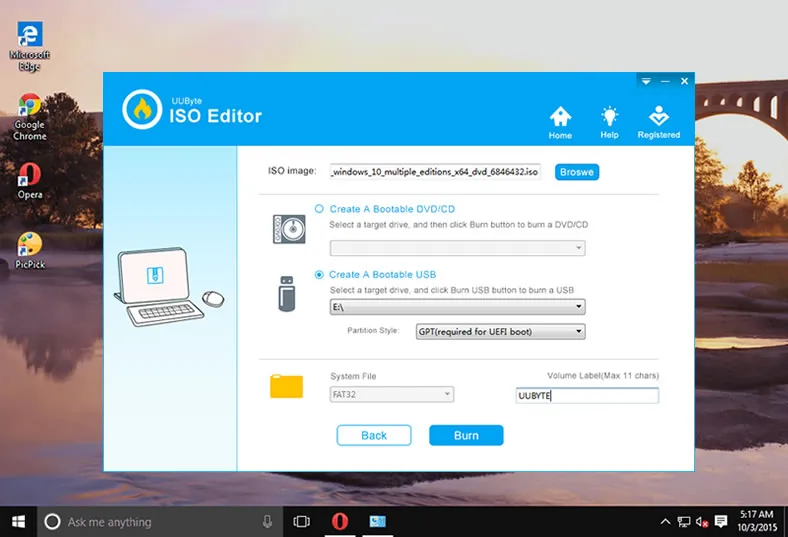
When the custom ISO image is ready, the next step is how to burn it to an external USB or DVD in order to make it as a bootable installer. If you installed UUByte ISO Editor as we recommended in Part 1, then there is no need to install additional programs for doing this as it has a native feature ISO burning. If not, you have to look for another image burning software and test it out by yourself.
To create a bootable USB or DVD from ISO image file, please open UUByte ISO Editor and click Burn menu at the welcome window. And then you will be lead to Burn page, where you should import the newly created ISO file and insert an USB or DVD. Finally, select the USB drive or DVD letter and click Burn button to start writing the custom ISO to target device.
Part 5: Alternative Tools for Building Custom Windows ISO File
In above example, we are using ImgBurn to create custom ISO from local folders. In deed, it is a great option for such task. However, it may fail in some cases. Hence, we will recommend two alternatives for building custom ISO image file.
DISM.exe: This is a command-line based tool that is available in Windows 7 and later versions. The full name is Deployment Image Servicing and Management . And this is the official tool recommended by Microsoft for mounting and editing Windows image file (.wim). You can use the following command to append additional image to a .wim file.
Dism /Append-Image /ImageFile:install.wim /CaptureDir:D:\ /Name:Drive-D
Full tutorial about using DISM.exe can be found out at here.
WinReducer EX-100: WinReducer EX-100 is a smart utility that helps the users to customize Windows 10 by editing the ISO files. The application only supports Windows 10 OS, it does not support the older versions of the OS. This is the dark side of Winreducer, but it gives a good result.
Download the latest version of WinReducer EX-100 on Windows 10 and then install it. Next, launch the application and it will ask for the activation key, just click No. Soon, you will be directed to the main interface with lots of features and by default, most of them are disabled. And you need to enable them by sliding the radio button in ON side.
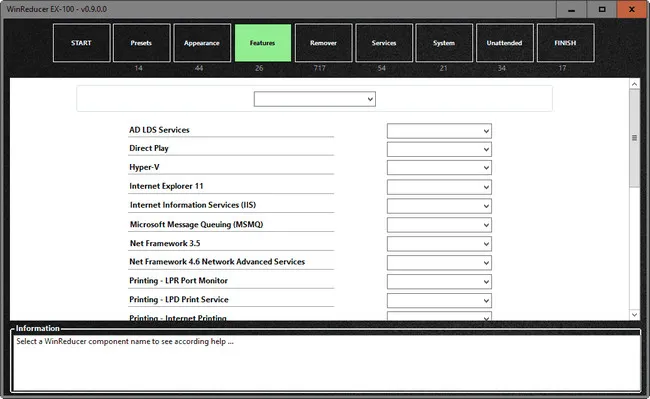
After the Configuration part, you will be directed to the main menu with a few options, click on the Options button. Next, move to the ISO section and then import the Windows ISO file which you want to rebuild. It may take some time because the application will extract the ISO file. Now, mount the ISO file by clicking on the Mount button. Furthermore, you can access the ISO file and now you can make the changes as per your need. Once the modification part is done, save the ISO file properly and then burn it using a good burning tool.
WinReducer EX-100 is a high-technology application that offers multiple features and the same may confuse the users. But the utility gives the utmost result in very less time. All the necessary options are listed at the main menu, so you can perform the task easily.
Summary:
This is a informative tutorial above to editing Windows ISO file. All of the steps have equal weightage and you can choose the one as per your need. However, if you have already kept the extractor and the burning tool on your computer, then you can use ImgBurn option. And, if you are a tech-savvy, then Winreducer suits you. But, if you need an instant result and does not want to hunt for multiple utilities, then UUByte ISO Editor is the best option for you..

Petty is editor in chief at UUByte and writes various topics about Windows and Mac to help people make the most of current technology.