
Ever since computers stopped coming with bootable disks, it became extremely important for people to create a bootable USB for backup. Unlike normal users, technicians always follow the practice ardently so that their work is never halted due to a malfunctioning computer. Operating System failure can not be anticipated, which is why experts like to keep a bootable USB ready with them for repairing the OS or reinstallation when needed.
Windows ISO is widely used for creating bootable disk for system installation or repair. However, a simple copy-and-paste won't work if you are trying to copy Windows ISO file to an external USB because no boot information is written to the USB during the copy process. 'Copy' is a word represented for non-technical world. Actually, it includes three distinct steps: format USB with boot sectors, extract Windows 10 ISO and copy extracted content to USB. All the steps can be done in Command Prompt but it is high advised to use thire-party ISO burnign software, which is much easier to get it done.
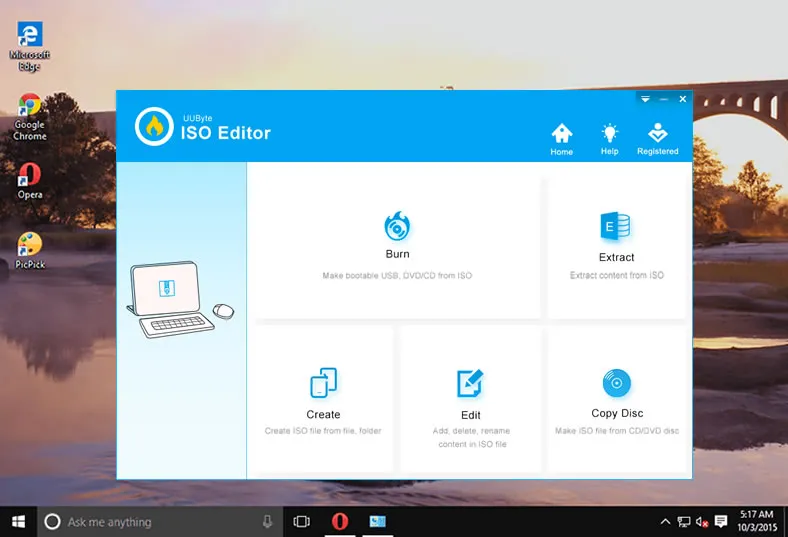
Part 1: Copy Windows ISO to USB via UUByte ISO Editor
Compatible with all Windows OS versions as well as macOS, UUByte ISO Editor is particularly a favorite for the purpose not just by us but by thousands of users. The reason is that the tool defines simplicity. The user interface is made for everyone with or without technical knowledge. But what truly stands out about this tool is its ability to add or delete files from ISO and re-create it according to your requirement. Follow the steps to quickly create a Windows bootable USB and experience the reason why the tool is loved by so many.
Main Features of ISO Editor
- Copy ISO to USB or DVD.
- USB or DVD is bootable.
- Extract ISO to computer quickly.
- Easily create a new ISO file from local files.


Step 1: Get a copy of the desired Windows OS ISO file from Microsoft. To reduce the download time, you can use third-party tools to download Windows ISO if the download speed was slow from Microsoft website..
Step 2: Download UUByte ISO Editor on your system from its official website. Allow the application to run and install on your computer. After the installation process, open the app from desktop shortcut and click "Burn" button.
Step 3: Insert an USB into the computer and wait for the tool to recognize the device in a few seconds. Click on the "Browse" button next to the ISO image option. Navigate through the files to and select the Windows ISO file from a local folder.
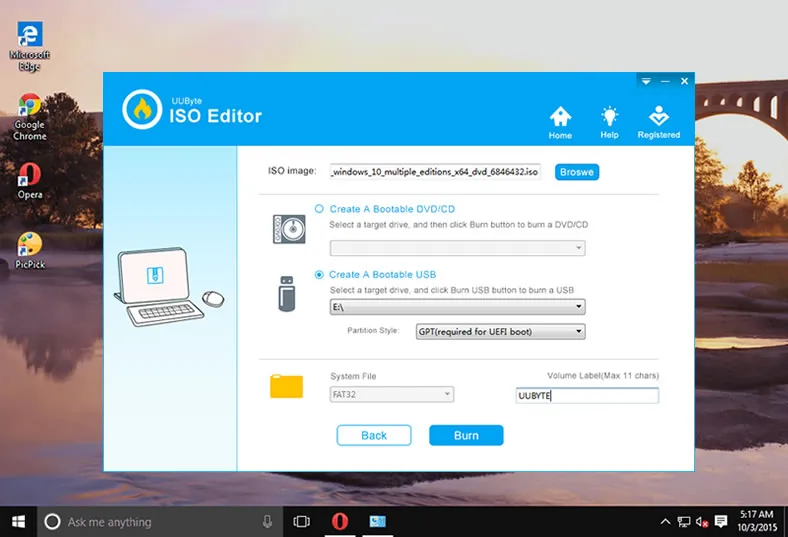
Step 4: Finally, click on "Burn" button and wait for the successful completion of the process. Close the window and remove the USB.
This is how to create a Windows bootable USB with UUByte ISO Editor. It takes a few minutes to complete the task and has a much higher success rate. Besides, it supports well for latest Windows 10 ISO file.
Part 2: How to Copy Windows ISO to USB Drive Using Free ISO Burner
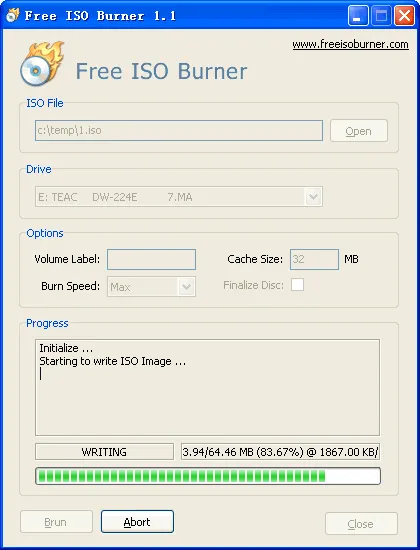
Free ISO Burner is a single-window based applicatio maintained by an unknown developer. The name itself gives away that the tool is free to use and can copy Windows ISO files to USB flash drive. It is completely free, even for commercial usage. And unlike other free software, no adware or spyware comes with Free ISO Burner. In addition, It's a little easier to understand and use than Rufus but, being open-source, it has its disadvantages.
Step 1 : Download Free ISO Burner and open it as it doesn't need installation. Insert the USB and wait for the tool to detect it.
Step 2: Click on the "Open" button at the top of the window to browse and select the Windows ISO file that is meant to be burned from the downloads section.
Step 3: Now, using your mouse click on the "Burn" button on the bottom left of the window and wait for the burning process to complete. Once done, select the close option on the window and remove the USB.
Despite the simplicity, the tool has been reported to be slow and outdated (last update was on Feb 28, 2017). There's also no official support and it is hard to get a reliable anwser when you have problem in using it. If you don't want any of those hassles, the next method is certainly for you.
Part 3: How to Copy Windows ISO to USB Stick with Rufus
Rufus is a free utility tool used for burning Windows ISO to USB that claims to create bootable USB easily. You can also download Windows ISO within the tool. However, this app can only run on a Windows computer. For Linux and Mac users, you have to use the above suggestions instead. Please follow the steps to find out how easily the process can be completed using the tool to copy Windows ISO to USB.
Step 1: As mentioned above, download the Windows ISO file from the official Microsoft website to your system. Now download and install Rufus to your computer as well.
Step 2: Insert the USB and then launch open Rufus on your computer. You will be greeted with a small pop-up like a window with a lot of options.
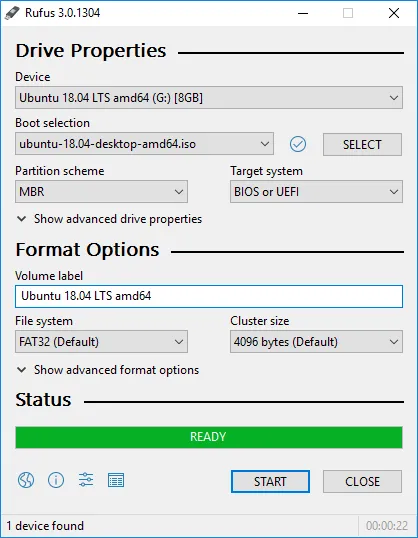
Step 3: Click on the "Select" option to add the device you would like to format, which in this case is the USB.
Step 4: In the lower section of the small window, click "Select" button to find and add Windows 10 ISO using the mouse pointer.
Step 5 : Click on the "Start" button and wait for the process to complete. Once ready, select close and remove the USB.
Rufus, despite its super small size and good speed, may look a bit confusing for its interface, so you might want to try another utility.
Conclusion:
Out of all the three, we would recommend UUByte ISO Editor for copying Windows ISO to USB mainly for its efficiency. Not only it is fast but it completes the process at one go. Burning Windows ISO file to USB is one process known to never be completed in a single go, but not with this tool. While the other two tools mentioned above can be used as alternatives, the complicated interface of Rufus and lagging speed of Free ISO Editor can prove to be disappointing in comparison with UUByte ISO Editor.

Petty is editor in chief at UUByte and writes various topics about Windows and Mac to help people make the most of current technology.