
RAW (.raw) files are basically a specific Photoshop format for images. These are lossless in terms of quality, but the disadvantage is that they cannot be opened like normal image files with bitmap-based tools. Users also use the term "raw image files" to refer to various other digital camera and scanner formats such as DNG, CRW, NEF, and so on, as well as raw disk image files for software installation. For this exercise, we're referring to .raw files that are used to install software applications.
To burn a .raw file to USB drive, you will need special software like UUByte DMG Editor. Along with this versatile software, we will also showcase two other ways to burn a RAW file to a pen drive on a Windows PC.
Method 1: Burn RAW File to USB Drive with UUByte DMG Editor
First, don't be scared or confused by its name. UUByte DMG Editor is a comprehensive tool to manage disk image files of various formats, including .raw and .dmg files. With this utility as part of your software arsenal, you can extract and burn disk image files to various media storage devices, including USB and DVD disc. The operation is simple and can be executed with the following steps:


Step 1: Installation
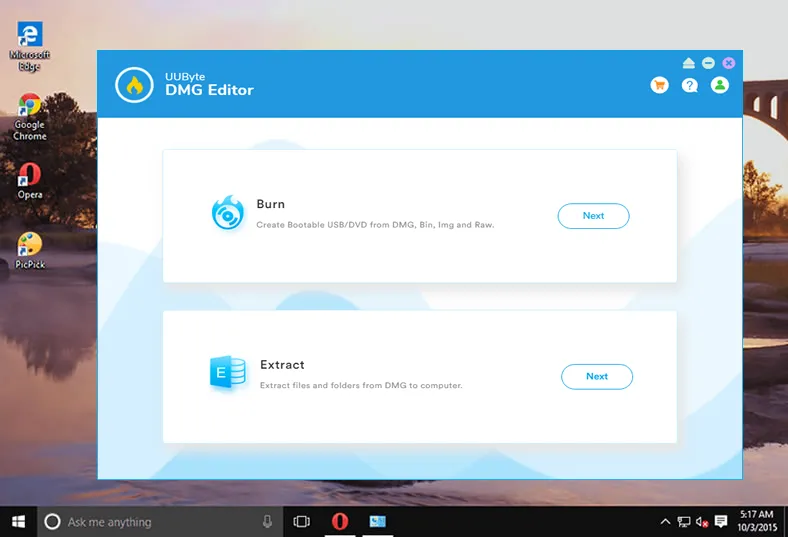
Download and install the software from the official site here. When you launch UUByte DMG Editor, you will see a Burn and an Extract option. Click the Burn option to go to the next page.
Step 2: Attach USB Drive and Import .raw File
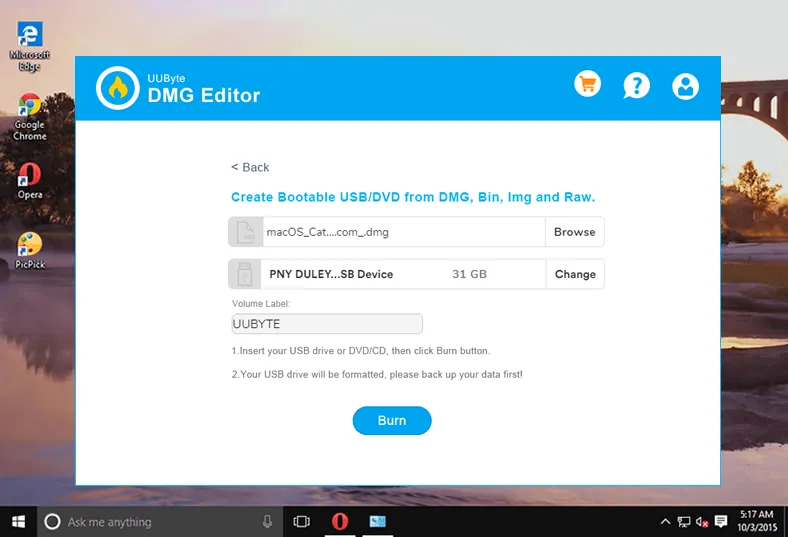
Insert your USB drive into an available port on your computer. In the software window, click on Browse and select the .raw file to be burned to USB. Check if your USB drive is detected and displayed in the next field. If not, click Change to select the right one.
Step 3: Start Burning RAW to USB
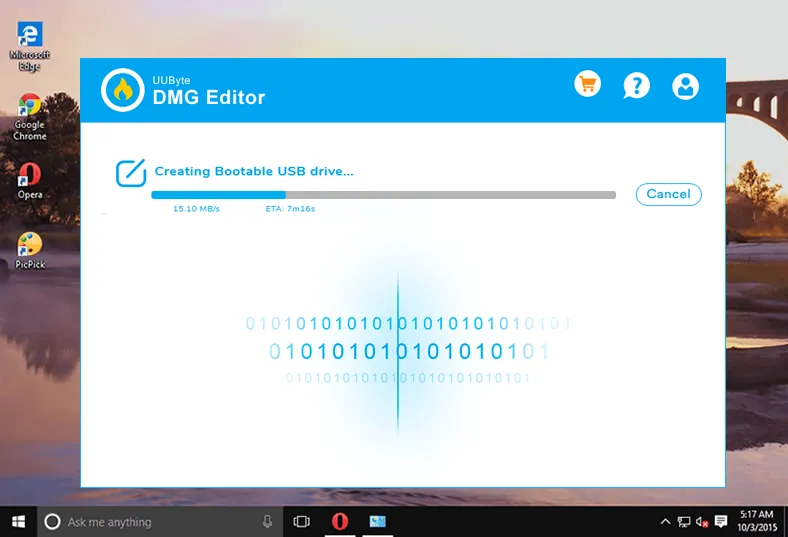
Rename the drive to indicate what it contains and click the Burn button. Wait for your file to be burned to the media storage device.
That's all you need to do. As you can see, the software is designed to be easy for first-time users, but powerful enough to appeal to experts who regularly work with disk image files. UUByte currently supports more than 10 different disk image formats and has a very high burn success rate. It also supports a wide range of OS images for multiple platforms. You can also use the software to directly open disk images and extract their content even if the OS doesn't natively support that particular format. For example, you can open and extract DMG files on Windows, and so on.
Method 2: Write .raw File to USB via Win32 Disk Imager
Another way to burn a RAW file to USB is with Win32 Disk Imager. This particular utility works both ways: you can burn a disk image file to a portable storage device and also take a backup of a device as a raw image file. It works on Windows 7 to Windows 10 and may also work on Server versions, although it has not been fully tested by the creators of the software. Here are the steps involved in burning a .raw file to USB:
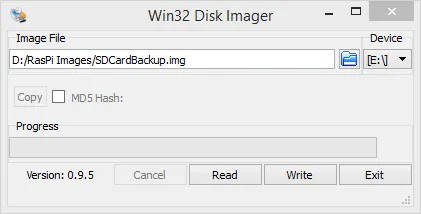
Step 1: Download the software from Source Forge and install it on your PC. Run the .exe file as an administrator and launch the software.
Step 2: Click the folder icon and browse to the folder where your .raw file is located. Click Open to import it into Win32 Disk Imager.
Step 3: Insert your USB and select it under the Device section using the dropdown option.
Step 4: Click on Write and confirm with Yes. Once the USB is ready, you can eject it and use it for whatever purpose you need.
Although Win32 Disk Imager is generally reliable, there are certain cases where you may come across an error. For example, the target device may not be detected, it may not support your Windows Server version, and so on. Since it is a free and open-source product, the only support you will get is from the community of users, which is often a long process.
Method 3: How to Burn RAW File to USB in Linux
The third way to burn a RAW file to a USB drive is to do it on a command-line interface like Terminal in Linux. While the method itself is simple, you may need some experience to handle it when things go wrong. The ‘dd' command can be used for this purpose, as explained below:
Step 1: Insert your USB drive into the Linux computer and open Terminal. Put your .raw file into a separate folder.
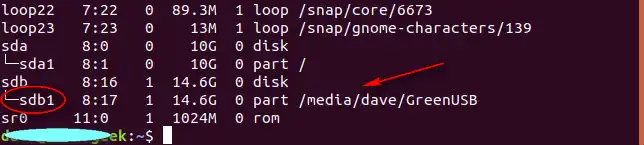
Step 2: Use "lsblk" command (hit Enter after you input the command) to list all available devices. This is to confirm that your device has been detected. In following screenshot, sdb1 is the identifier of inserted USB drive.
Step 3: Next, unmount the USB with the command shown below, once again followed with Enter:
sudo umount /dev/devicename
Step 4: Modify the last part to match your device name as shown after executing Step 2. Finally, burn the file to USB with this command (followed by Enter):
sudo dd if=/path/to/file/downloads of=/dev/devicename
Change 'downloads' to the name of the folder containing the .raw file and 'devicename' to your USB drive's name, as explained in Step 3. The only problem with this method is that it is dependent on several factors in order to successfully create a bootable drive. For example, your drive may not be detected, the RAW file itself may be corrupted, the partition type may be wrong, etc.
To avoid all these problems, it is recommended to use UUByte DMG Editor and get the job done in minutes with zero confusion and zero hassle. The product will serve you well across both Windows and macOS ecosystems and you will receive timely security and feature updates so you always have the safest and most current version at your disposal.

Petty is editor in chief at UUByte and writes various topics about Windows and Mac to help people make the most of current technology.