
Adding files to an ISO disk image is not as simple as you might think, especially for bootable ISO images, which includes system files and hidden booting information. As far as I know, there is no free tool available to edit a bootable ISO image. So the only solution is to use a premium tool, no other workaround possible.
This article shows you three different ways to add files to a bootable ISO. However, remember that the ISO needs to remain bootable at the end of the process. Keeping that in mind, let's see how to go about editing ISO image.
Method 1: Add Files to ISO Image Using Free ISO Creator
The first process is a bit of a tedious one, but it will get the job done. Essentially, what you will be doing is first extracting the contents of the ISO file, then adding the file or files you want to include, and then burning the data to create a new ISO file that is bootable. You will need the right tools for this, which are basically an archive utility, an ISO (bootable) creator, and an ISO burning tool. All these are shown in the description below:
Step 1: The first action is to extract the contents of your ISO file. For this, you can use WinZip. Open the ISO file in the archive tool and extract to a folder. You can do this by right-clicking the file in Windows Explorer and selecting the extraction function. Specify a folder location for the files to be extracted to.
Step 2: You can now add your file or files to this folder using drag-and-drop or copy-paste.
Step 3: The next step is to create a bootable ISO file that includes the new file(s) you added. For this, you can Free ISO Creator. This tool is simple to use. After installing it, open the program and follow the instructions in the wizard to make a bootable ISO file from the folder on your computer.
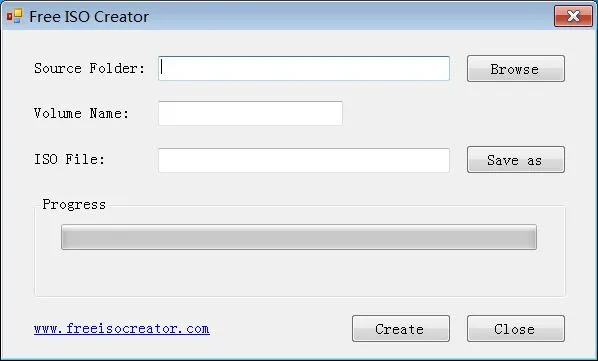
If you followed the steps above correctly, you should now have a bootable ISO file with the additional file(s).
Cons:
- Need two separate tools.
- Windows 10 ISO is not supported for booting.
- ISO creation process is much slower than UUByte.
Part 2: Add Files to Bootable ISO Image with UUByte ISO Editor
The name of this versatile tool shows that you can use UUByte ISO Editor to directly edit the ISO file without having to extract the contents. It allows you to add and remove files without disturbing the boot-ability of the disk image, which means you will save a tremendous amount of time. It is available for both Windows and Mac, so that's a major plus point.
The best part about the tool is that you can also use it to create ISO files, extract the information and burn ISO to CD/DVD or USB, and all of these actions can be done in just a few clicks. Here are the steps you need to follow:


Step 1: Prepare for Download and Install
Download and install the appropriate version of UUByte ISO Editor (Windows/macOS) and launch the program. You will see 5 options listed on screen for dealing with ISO image.
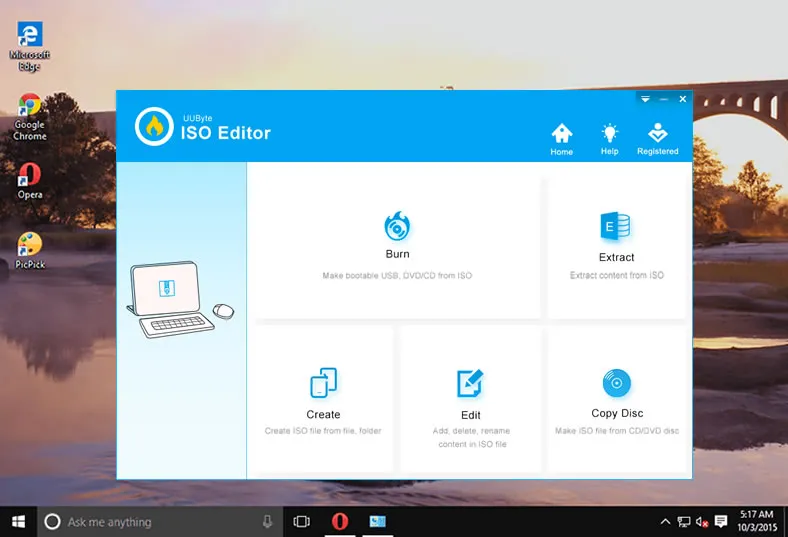
Step 2: Load Bootable ISO Image
Click on the Edit option in the main window. This will take you to a new page, where you will be able to see a Load ISO button on the top-left. Click on it, navigate to your ISO file in Explorer or Finder, and confirm the import.
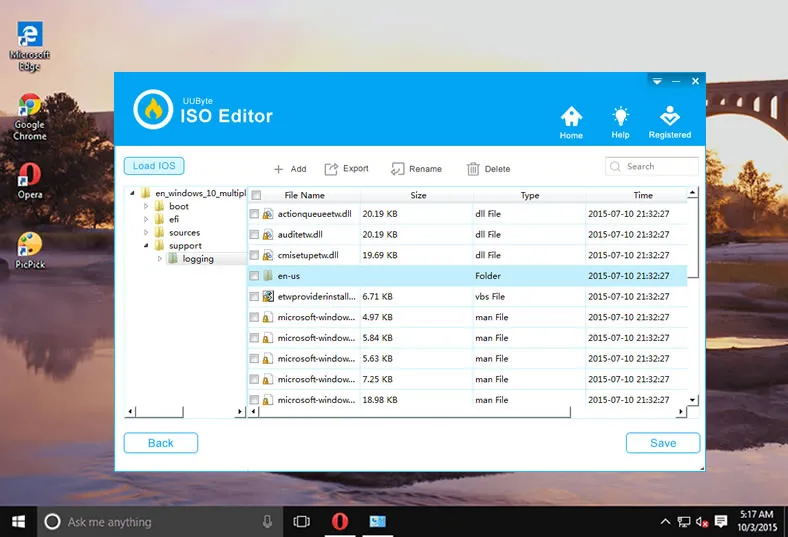
Step 3: Add Files to ISO and Recompile New ISO
Once the file loads, you'll be able to see all the contents in the main window. You can now copy and paste your additional files here and hit the Save button when you're done. A new ISO image contacing the added files was created.

One major advantage of this utility is that the new ISO that is generated will be bootable, but will also contain the new content. If you want to add a file to your bootable ISO quickly and without errors, this is the recommended method to follow.
Part 3: How to Add Files to Bootable ISO Image via WinRAR
This method is very similar to the previous one but uses a different archive tool. You can't use the tool to once again create a bootable ISO, so you can use the Free ISO Creator from Method 1 for this purpose. Here are the steps involved in the process:
Step 1 : If you don't have WinRAR on your PC, download and install it.
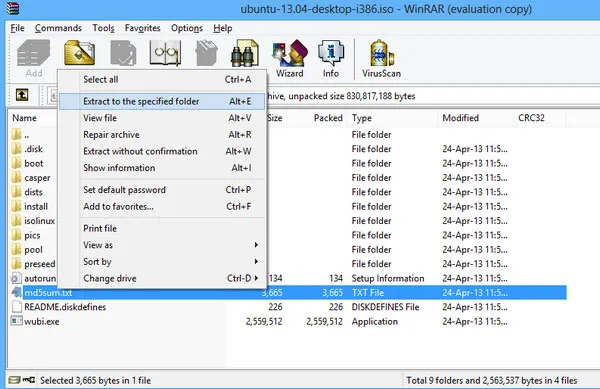
Step 2: Run the application and select ISO file for extraction using the Add button in the toolbar.
Step 3: Hit the Extract button to save the contents of the ISO file to your PC. You can now add your file(s) to this folder.
Step 4: As with the previous method, you can use All Free ISO Creator and follow the instructions in the wizard tool to generate a bootable ISO file from this folder.
Summary:
Both these are workaround methods because there aren't any notable free tools for editing ISO files. If you'd rather not bother with multiple tools and a confusing process, then UUByte ISO Editor is a great way to go!

Petty is editor in chief at UUByte and writes various topics about Windows and Mac to help people make the most of current technology.