
First time Windows 11 was released to the general public, I was super excited to try it on my laptop. It was necessary too since Windows 11 is required by a part of my work. But when I check with the PC Health Check App from Microsoft, to my disappointment I found out that my laptop didn't meet the basic requirements for Windows 11.
After doing a bit of research, I went ahead and bought a new laptop. It came with Windows 11 preinstalled. I used it for a while, and it looked pretty great! But then I went ahead and changed jobs, and now I needed to work on Windows 10. I didn't want to give up on Windows 11 because by then I really started liking the new UI. So, I decided to dual boot Windows 11 and Windows 10 on my laptop, this way I could be able to use both as and when required. Here's how I did it, you can read the instructions below to dual boot Windows 11 and Windows 10 on the same PC.
Prerequisites for Windows 11 and Windows 10 Dual Boot
There are 2 things you would need to dual boot your laptop and install Windows 10 on it along with the preinstalled Windows 11 operating system.
A blank USB flash drive with at least 8 GB in size.Windows 10 OS is pretty big and you should have a large volume USB drive. USB 3.0 is more recommended as it is much faster in speed. Make sure backup the data in USB drive. Otherwise, the data will get deleted in the process and you will not be able to recover it again.
Windows 10 Media Creation Tool. This is the right software to help you create a Windows 10 USB drive for Windows 10 installation. Here is the download link: https://go.microsoft.com/fwlink/?LinkId=691209
Create a Bootable Windows 10 USB Drive
The first thing you need to do is to create a bootable Windows 10 USB drive which we will later use to install Windows 10 on your laptop with Windows 11 dual boot. You can follow the below steps to create this bootable USB.
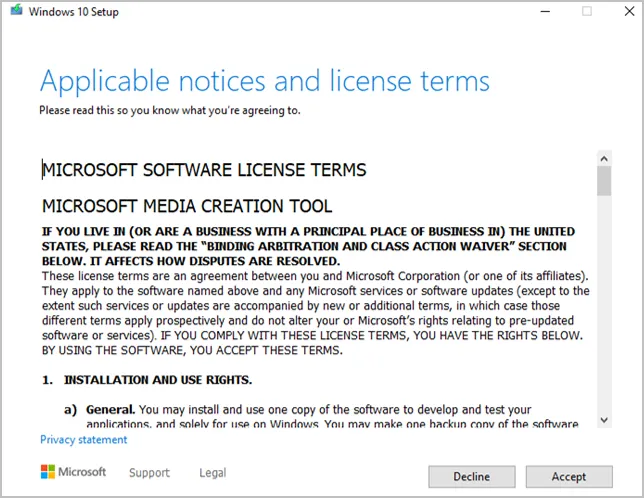
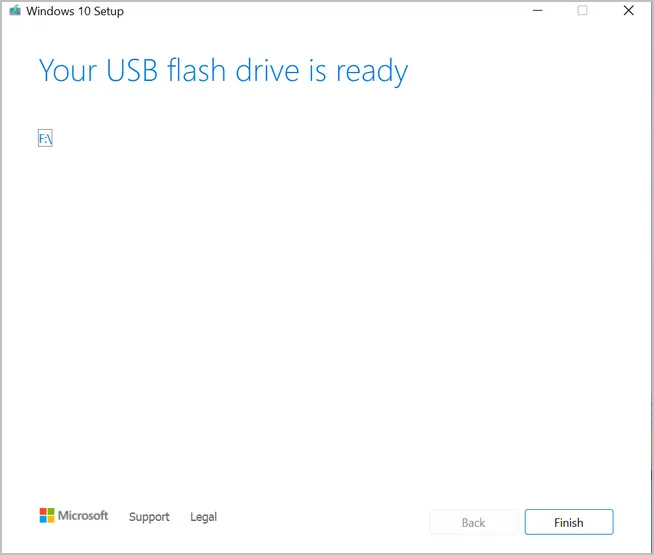
First, Insert the blank USB flash drive and launch Windows 10 Media Creation Tool. It does not require any installation. The welcome window that you will see is the license agreement. Click on the Accept button to continue.
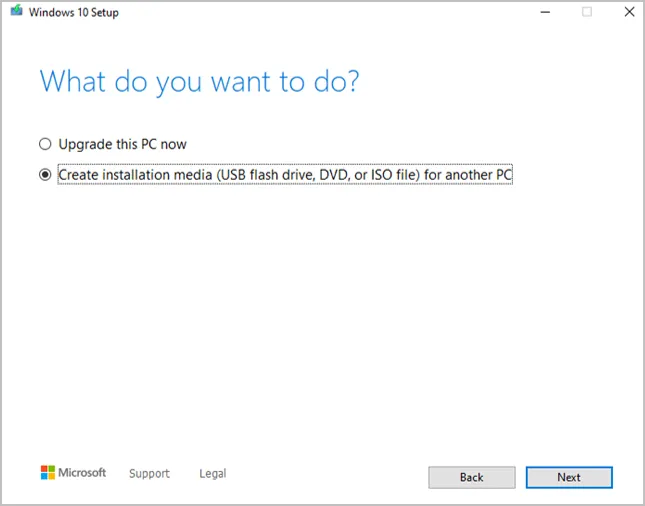
On the next window select Create installation media for another PC and then click on the Next button to continue.
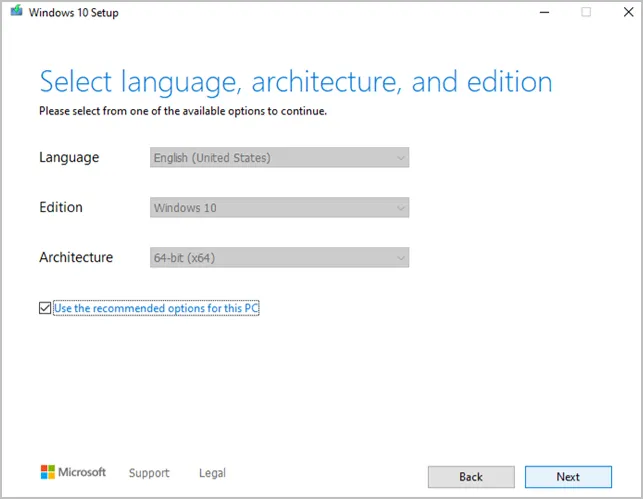
You need to select the Language, Edition, and Architecture for the Windows 10 operating system. Select your choices for these options respectively and click on Next.
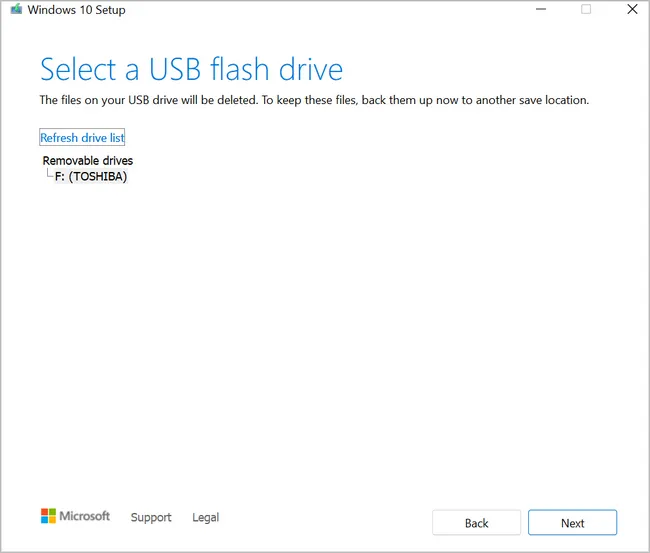
Now you will be asked to choose the media which you would like to use. In our case it is the USB flash drive, so select that option on this window and click Next. Then, select the USB flash drive that you are using from the list. If you cannot view it, click Refresh drive list. Then click on Next to continue.
On the next window, simply click Next, and then finally, click Finish. This should download Windows 10 ISO image and create a bootable Windows 10 USB from it. Once the process completes, you can close the Media Creation Tool program and take out the bootable USB flash drive we created. Now, lets move onto the next step.
Allocate Space for Window 10 OS Installation
Before you install Windows 10 alongside Windows 11, you need to allocate storage space on the hard drive for the same. This will be like a separate partition where only Windows 10 will be installed.
First thing you need to do is to open Disk Management on Windows 11. For that, press the Windows and the R keys on your keyboard. This will open Run window. Type in diskmgmt.msc here and click on the OK button to open the Disk Management tool.

On this tool, click on the partition from which you would like to allocate space for Windows 10. For example, in my case I have only 1 partition named OS. The rest are system partition and should not be touched. Right click on that partition and then click on Shrink Volume.
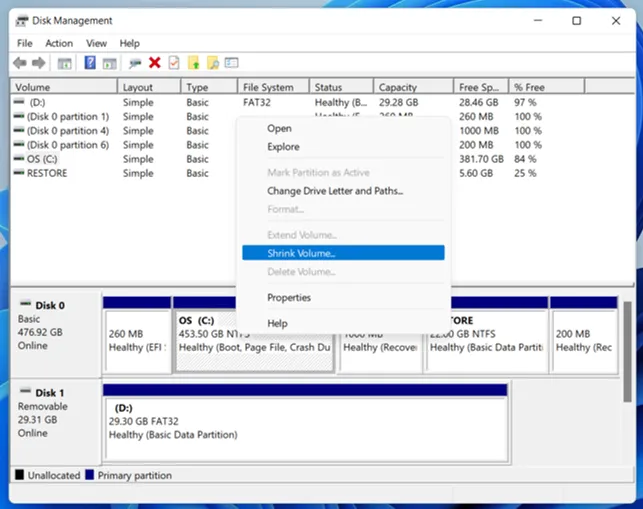
This should bring up a new window where you can mention the amount of space you want to allocate for Windows 10. Type in that number, then click on Shrink. This should resize your existing hard drive partition, shrink it by the same amount that you mentioned, and then allocate that space in a new unallocated partition.
Once you can view that unallocated space, right click on it and click on New Simple Volume. This will bring up the New Simple Volume Wizard, click on Next to continue. Enter the size for the new volume allocated to Windows 10 and then click on Next.
From the next window, choose Assign the following drive letter and click Next to continue. Now you will be asked to format the new partition. Here, click on the option that says Format this volume with the following settings, for File System select NTFS, keep Allocation Unit as Default, mention the volume label as Windows 10, check the option for performing a quick format, and then click Next.

Finally click on Finish button. This should format and ready the new partition for installing Windows 10. Once done, you can move to the next step of this process.
Install Windows 10 on Windows 11 Machine as Dual Boot
Now that we have made all the required preparations, we will begin the actual process of installing Windows 10 alongside Windows 11 as a dual boot on your laptop.
Insert Windows 10 bootable USB flash drive in Windows 11laptop. Restart the device and make sure that it boots from the USB drive. You may have to open Boot Menu in BIOS Settings. To access Boot Menu press and hold down the F12 key on your keyboard as soon as you restart the laptop, then select the USB flash drive from the list and continue.
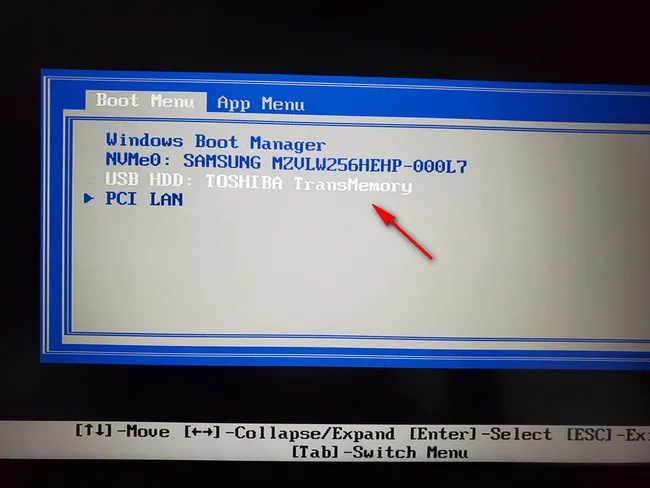
Once you are able to boot from the Windows 10 USB flash drive, you'll see the Windows 10 setup menu. Here, select your language and other respective options, then click on Next. In the next window, click on Install Now button.

Next, select the option for Custom: Install Windows only (advanced) to continue.
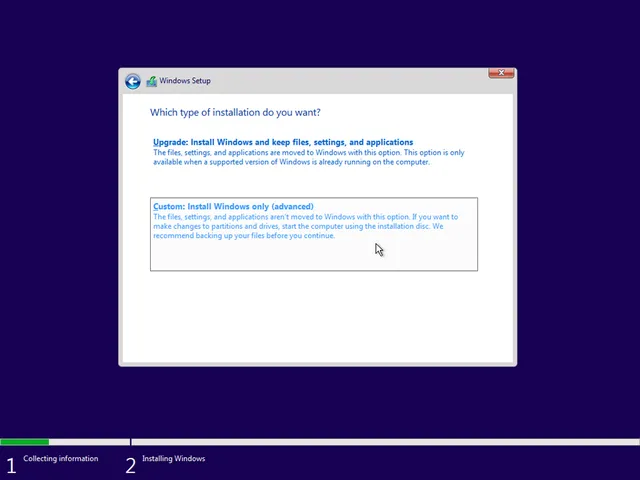
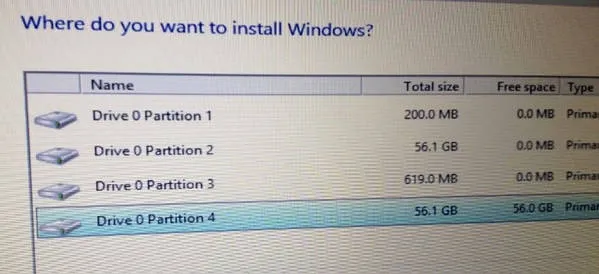
Now you need to select the partition where you would like to install Windows 10 on your laptop. For this, select the partition we created in the previous steps and click on the Next button.
From this point onwards, simply follow the instructions on the screen and you should be able to install Windows 10 on your laptop.
Wait, we are not done yet. We need to make sure that you get to choose which operating system to boot into every time you restart the PC.
Set up Default Operating System
At this point, you may or may not be able to see the boot menu which let's you choose the operating system that you would like to boot into. Here's how to enable it.
Boot into Windows 11 desktop first. Click on Windows icon and navigate to Settings -> System -> About -> Advanced System Settings. This should bring up the System Properties window.
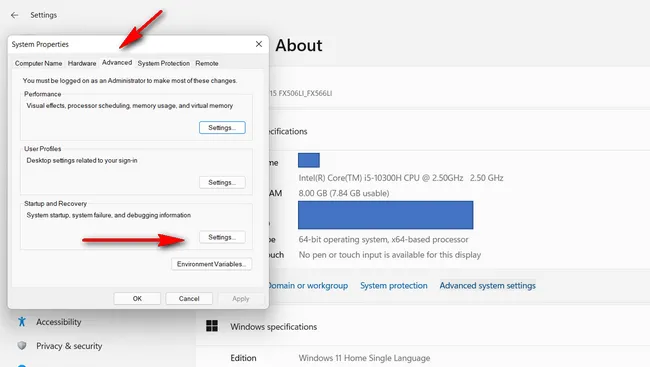
In the System Properties window, click on the Advanced tab, then click on Settings under the Startup and Recovery section. At this time, select a default operating system from the drop-down menu, then select the option that says Time to display list of operating systems, enter the time in seconds, and then click OK.
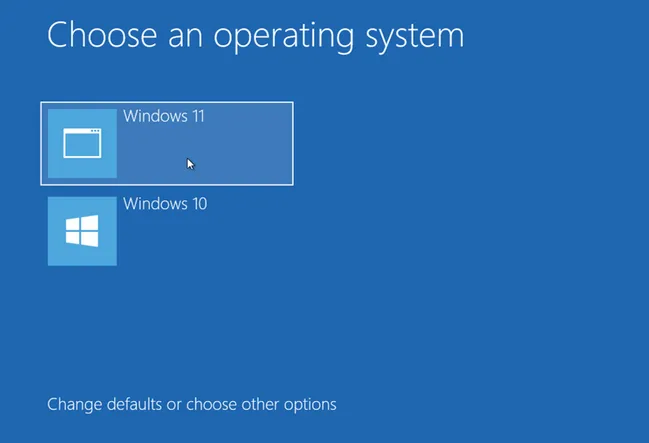
Now, every time you boot up your laptop, you'll be able to see a list of operating systems as shown below. You can click on any of them to boot into that operating system.
That's it, we're done. You successfully created a dual boot Windows 11 and Windows 10 laptop. Congratulations! Dual booting a laptop is also useful in case you want to use Windows 11 without having to worry about its stability issues considering that it is still pretty new.

Petty is editor in chief at UUByte and writes various topics about Windows and Mac to help people make the most of current technology.