
Windows 11 was officially unveiled by Microsoft on Oct 5, 2021. A lot of folks including me want to try it out, mostly because of redesigned UI. However, I don't want to pay extra money to build a new machine with Windows 11 compatible hardware. In fact, most of us prefer upgrading the current Windows 10 PC to Windows 11 without additional cost. However, here comes the problem as the Old PC may be not eligible for a direct upgrade because it does not meet the minimal system requirement demanded by Windows 11.
Here is the screenshot taken from my three-year old Windows 10 PC, which lacks TPM 2.0 , Secure Boot and the CPU is also not included in the supported list.
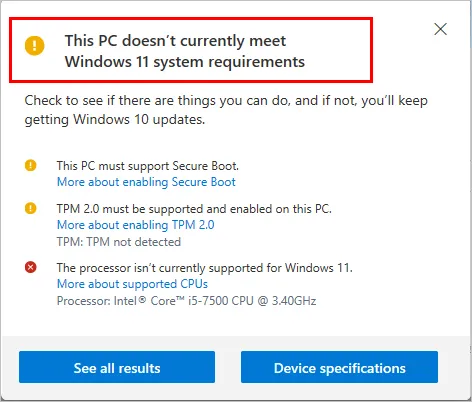
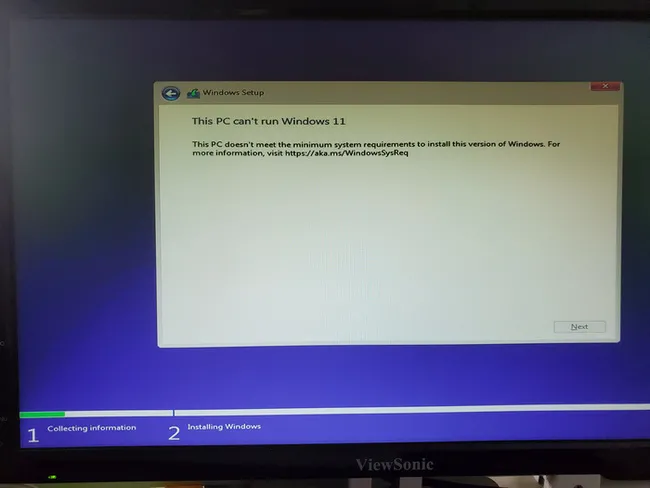
You will receive a "This PC can't run Windows 11" error on unsupported hardware when you are trying to clean install Windows 11 on an old machine. This is mostly because the PC is missing TMP and Secure Boot module. The second is unsupported CPU at least for a 8-Gen of Intel processor.
However, there are a few hacks you can apply to bypass those restrictions and install Windows 11 fully on unsupported hardware.
[Disclaimer]: Please back up your data and task your own risk by doing this as the condition varies from computer to computer. I can guarantee this works perfectly on my PC. And it should work in most of cases because those tricks are shared by industry experts. Also, the PC won't receive Windows updates and official support for unsupported hardware according to Microsoft statement.
If you are OK for this and still keen to get through the troubleshooting process, please check out the detailed tutorial shared in below to install Windows 11 on un supported PC or laptop.
Table of Content:
Part 1: How to Install Windows 11 on a PC without TPM or Secure Boot
The most popular reason why Windows 11 can't install on this PC is that the device has no TPM 2.0 or Secure Boot, which is a quite high standard and can be only found on modern PCs and laptops. It is common to see this error based on my research.
To bypass TPM or Secure Boot restriction, you have to manually edit Registry entry during the installation process. It is a time-consuming and risky process. However, this could be easily done with the recent release of rufus 3. 16, a free and reliable tool for creating Windows bootable USB.
The new release improves Windows 11 support and adds a new feature to let user install Windows 11 on a PC without TPM or Secure Boot. Most importantly, the task is super simple and you will get a Windows 11 bootable USB drive (without TPM or Secure Boot) for clean install in less than 10 minutes. Bravo!
Step 1: Download rufus 3.16 from this link website and plug in a USB flash drive.
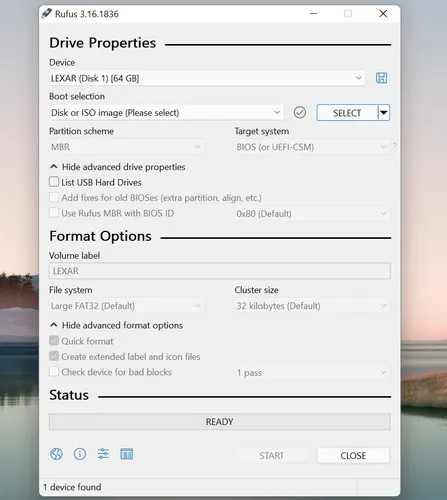
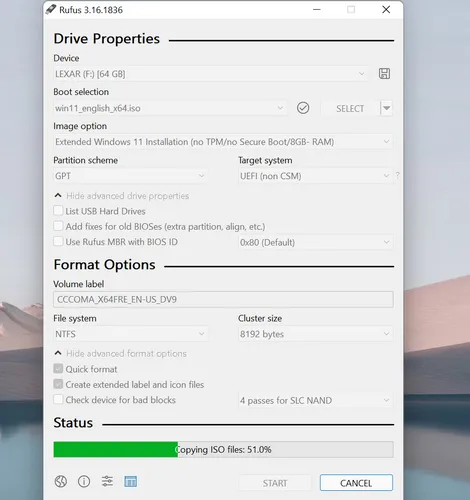
Step 2: Open rufus-3.16.exe with double click. This is a portable executable file and no installation is required. You will see the following screenshot:
Step 3: The USB drive will be auto detected and shown under Device section at the top. Now, import Windows 11 ISO into Rufus and you will see Extended Windows 11 Installation (No TPM/no Secure Boot/8GB-RAM) under Image option. This is the one for creating a Windows 11 bootable USB to be used to install Windows 11 on unsupported hardware, specifically for devices without TPM 2.0 or Secure Boot.
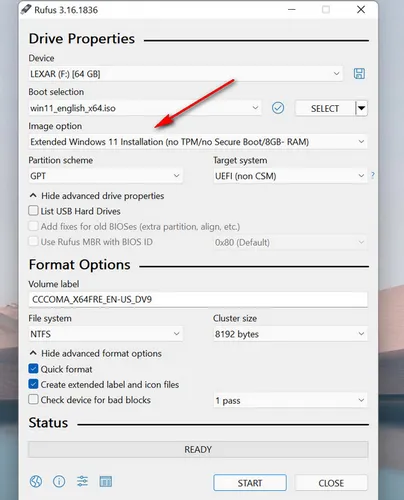
Step 4: Other settings like partition scheme, target system, file system are set by default. This is based on the ISO file you just added.
Step 5: Hit START button at the bottom. Rufus will format the USB drive to NTFS, create new boot partition and copy ISO file to USB drive.
Step 6: Wait 5-20 minutes (largely depending on the USB writing speed) and you will get a Windows 11 bootable drive for installation on unsupported PCs.
Part 2: How to Install Windows 11 on a PC with Unsupported CPU
According to Microsoft Windows 11 specification, only Intel 8th-Gen and AMD Ryzen 2000 later CPUs are compatible with Windows 11. Please check out the full supported list for Intel Processor and AMD Processor.
Simply put, if your computer was powered by an Intel CPU, it should be newer than 2017, the year which Intel 8-Gen CPU was introduced. For AMD CPU, it should be 2018 or later as AMD unveiled Ryzen 2000 processor in 2018. Honestly, this is quite critical standard for less elder PCs. That's why so many people are eager to know how to bypass CPU limitation.
The above Rufus hack can only bypass TPM 2.0 and Secure Boot restrictions. To install Windows 11 on a PC with unsupported CPU, the hack is different.
[Updates]: According to our recent testing, the follow trick can be also used to bypass TPM 2.0 and Secure Boot check during Windows 11 installation. If the above method failed, this is the alternative solution to install Windows 11 without TPM 2.0, Secure Boot or unsupported CPU.
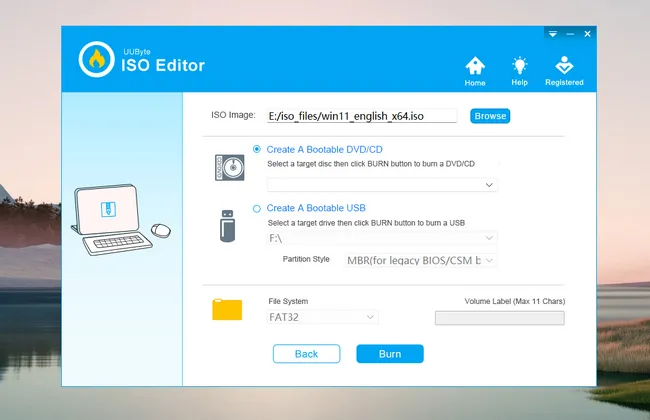
Step 1: Download UUByte ISO Editor and create a Windows 11 bootable USB with it. You can refer this tutorial if you have problem using this tool. Please don't use Rufus this time as it will format USB to NTFS and some old computers like mine does not recognize it as a bootable device.
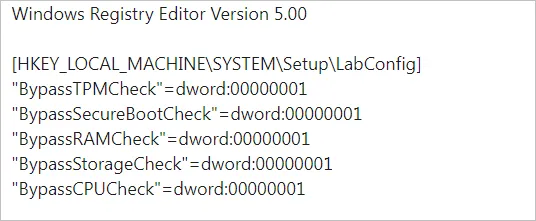
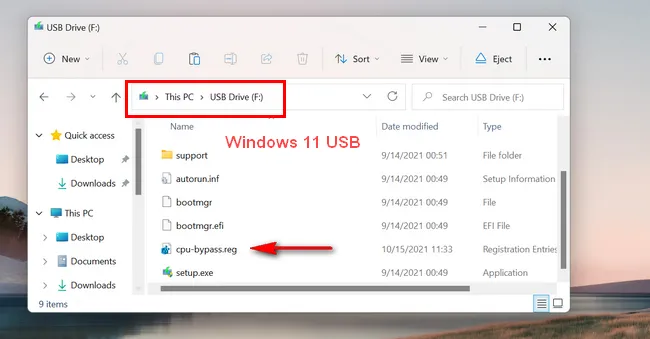
Step 2: Create a new text file and paste the following content into the new file. Finally, rename it to cpu-bypass.reg . For convenience, you can also download the zip from our website and unzip it to get the same reg file. This will be used to bypass CPU restriction during Windows 11 installation.
Also make sure copy this .reg file to Windows 11 bootable USB drive you just created with UUByte ISO Editor.
Step 3: Insert the USB into the computer where Windows 11 will be installed. Open Boot Menu at start up; select the USB drive name to get into Windows 11 setup as the following screenshot shows:
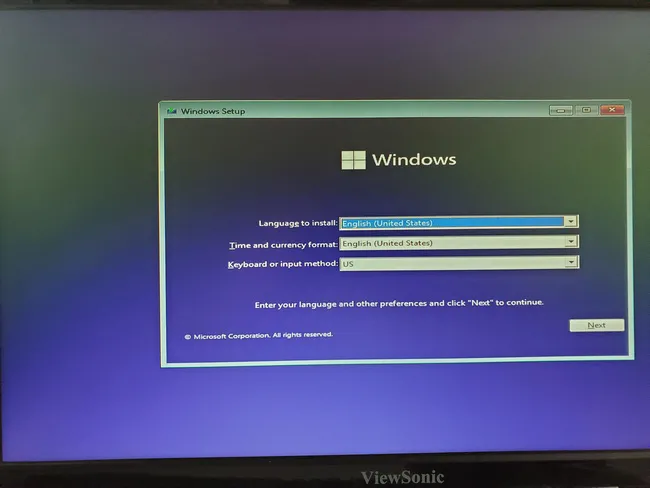
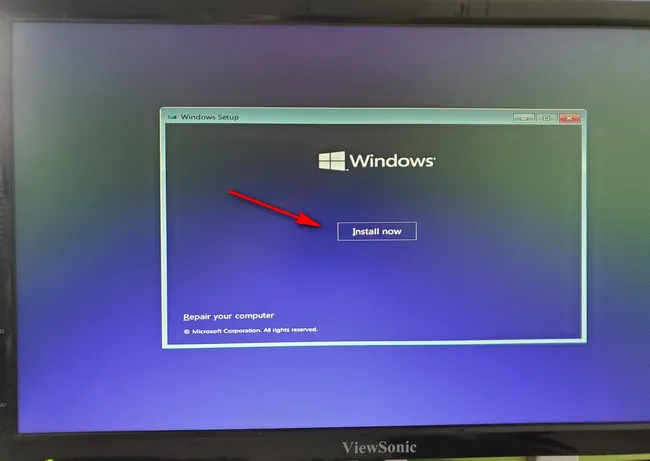
Step 4: Click 'Next' after language, time zone and keyboard selection and click 'Install Now' button to proceed.
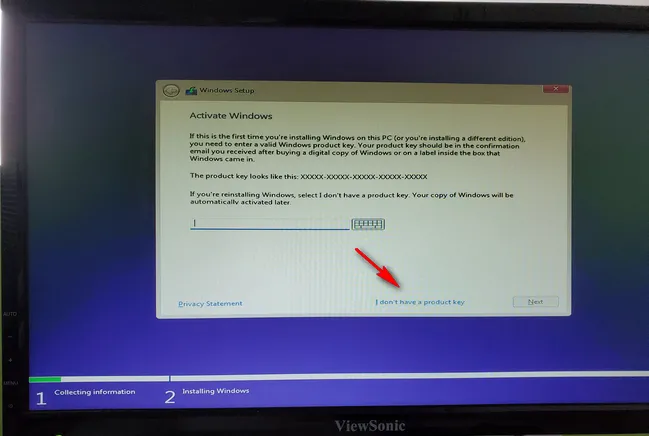
Step 5: You will be prompted to enter a product key to activate Windows 11. Please click 'I do not have a product key' this time to continue the installation process.
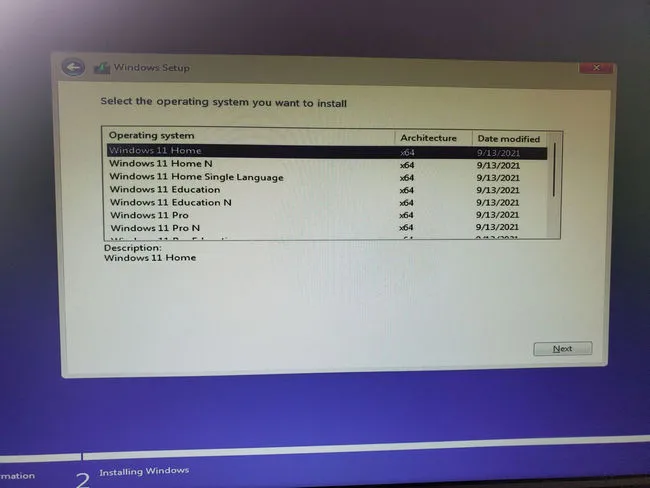
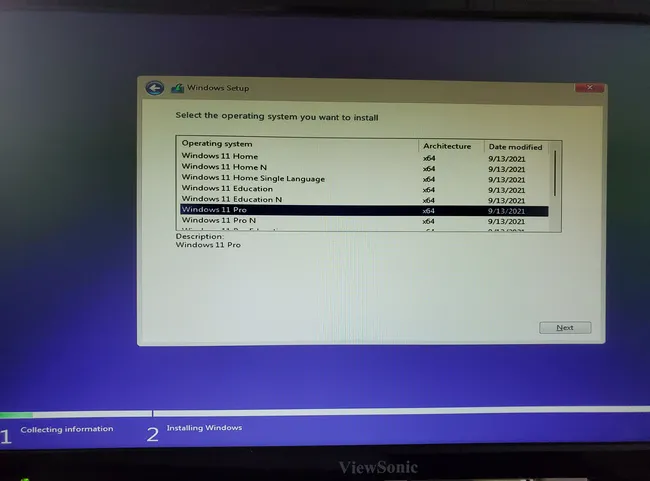
Step 6: In next screen, you will be asked to choose a Windows 11 version. Please pick up the right edition that is coordinated with previous Windows version. By doing this, you can use previous product key to activate Windows 11 installation.
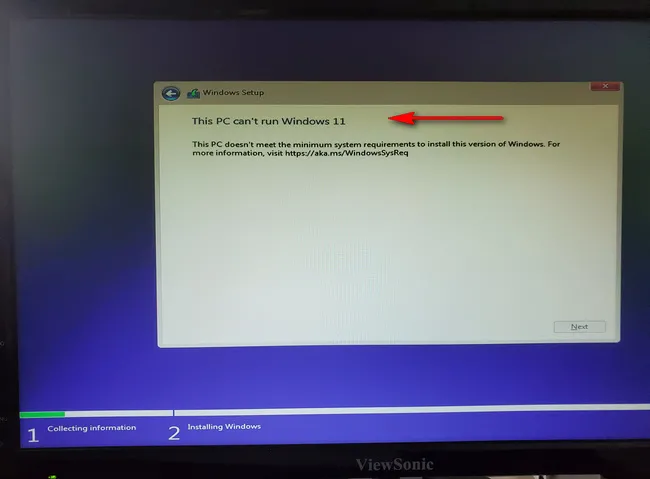
Step 7: You will receive this error without any hack as the PC cannot run Windows 11 because of unsupported hardware.
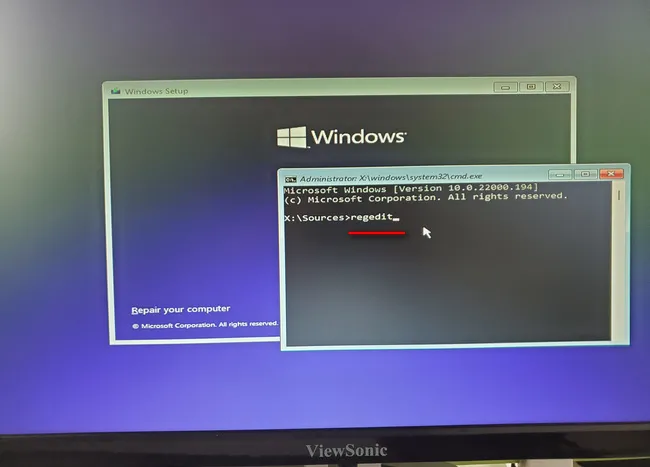
Step 8: Close the pop-up window and this will be back to Windows 11 installation Windows we posted in Step 3, which has a ' Install Now' button at the central. Now, press shift + F10 to bring up Command Prompt and enter 'regedit' to launch Registry Editor.
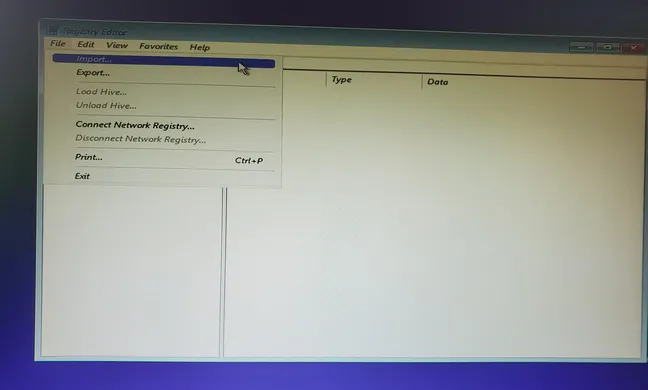
Step 9: Find the File menu at the top and choose 'Import' option.
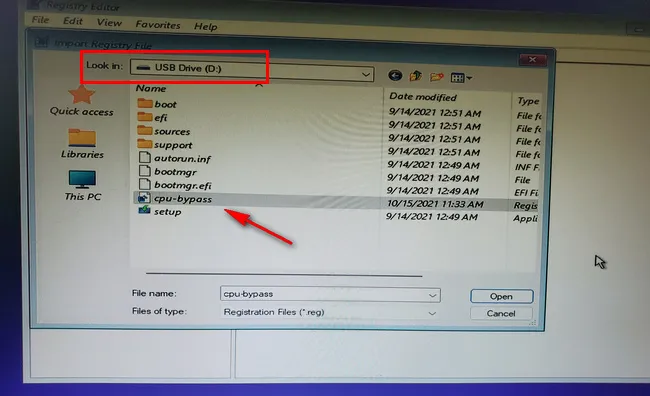
Step 10: From the browsing window, locate the USB drive and pick cpu-bypass.reg.
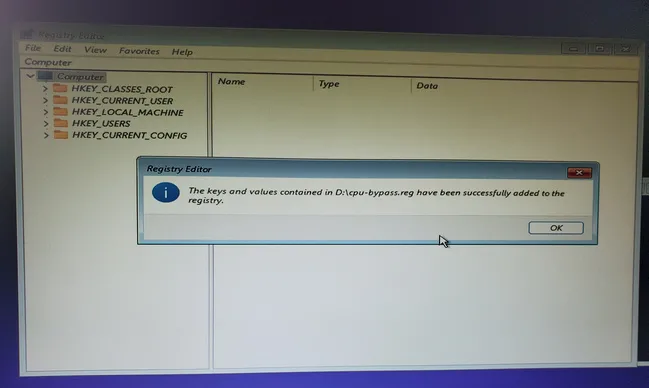
Step 11: You will see the keys and values in previous reg file was successfully added to the registry.
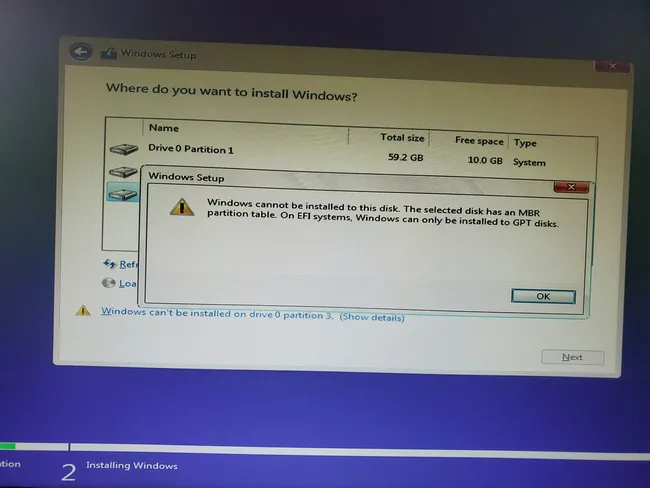
Step 12: Close Registry Editor as well as Command Prompt. Then click 'Install Now' to start Windows 11. You will not receive previous error message at the time. At the end of process, please select a partition to install Windows 11.

Note: If the disk was formatted to MBR, you have to convert it to GPT in order to install Windows 11. You can do this with diskpart command (full tutorial). This means you have to go back to Command Prompt again as we shared in Step 8.
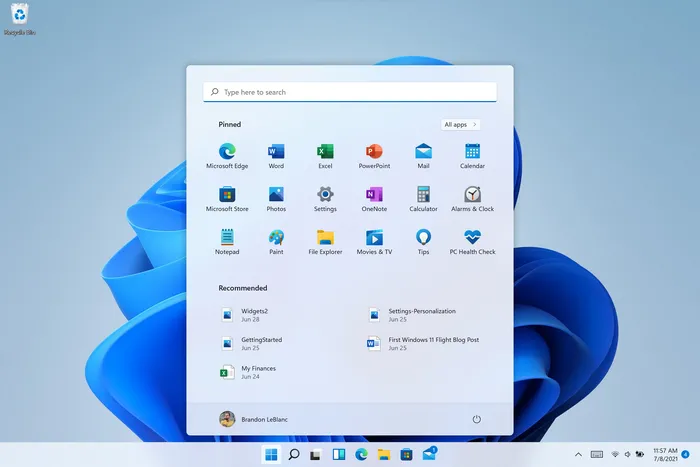
Step 13: Follow the screen prompt to install Windows 11 on your PC. You will need a Microsoft account to complete the installation process. Once it is finished, you will be redirected to a brand-new Windows 11 desotop like the following:
The above is a complete tutorial to bypass Windows 11 installation restrictions without TPM 2.0/Secure Boot/supported CPU when you receive an error, saying this PC can't run Windows 11. According to my researching, you can still install Windows 11 on a PC on those unsupported CPUs:
- 3rd-Gen Intel i5
- 4th-Gen Intel i5
- 5th-Gen Intel i5
- 7th-Gen Intel i7
- 6th-Gen Intel i7
I will constantly update this post when more unsupported CPUs are able to run Windows 11. Please don’t hesitate to send us your case upon success so we can make the post more accurate!
You can also check our post on how to install Windows 11 on unsupported hardware we wrote last month. It shares two different approaches to bypass TPM and Secure Boot.

Petty is editor in chief at UUByte and writes various topics about Windows and Mac to help people make the most of current technology.