
Windows 7 is still a favored edition of Windows operating system. Some of the apps can only work on Windows 7, especially those 32-bit apps. In addition, Windows 7 is more stable than Windows 10 and no auto-update from time to time, which will cause a lot of problems according to user feedback.
If you want to install Windows 7 on a PC or Mac, please create a Windows 7 bootable USB first. This will be used for OS installation.
Before diving into the tutorial, you need to prepare for a USB drive and download Windows 7 ISO image file from these links.
Top Windows 7 Bootable USB Creator:
1. Create Windows 7 Bootable USB Using Command Prompt (Free)
Command Prompt is an advanced tool that system administrators cannot live without. You can complete a lot of complex tasks within this free free utility and there is no need to download additional software. The only drawback is that no visial user interface is available and you have to learn each command by yourself.
We are going to use this free tool that is packed with Windows OS to make a Windows 7 bootable USB. Basically, this method works on all Windows computers, including Windows 10, Windows 8 and Windows 7.
In the following example, the screenshots are taken from a Windows 10 PC. Don't worry! The commands would remain the same for Windows 8 and Windows 7. Now, let's get to the details.
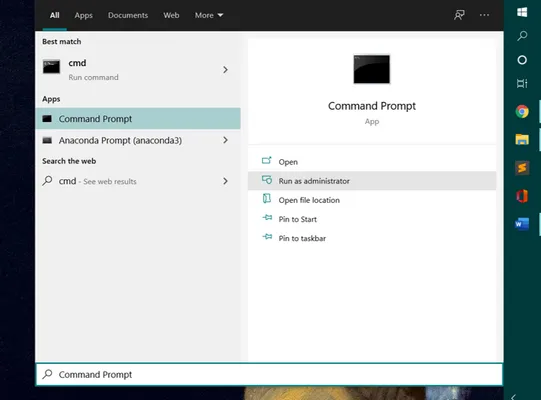
1. Type 'command prompt' in Windows search bar located at the Taskbar. From the returned search result, click on it and select Run as administrator.
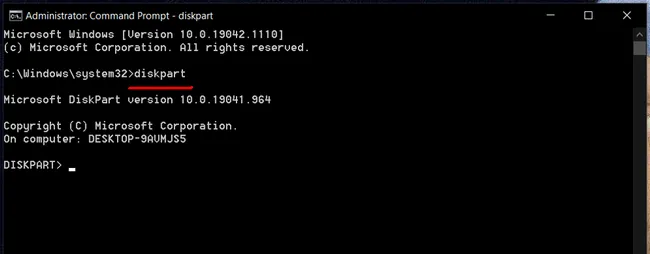
2. In the Command Prompt window, type diskpart command to open DISKPART utility, a built-in tool for managing computer disks and partitions on Windows.
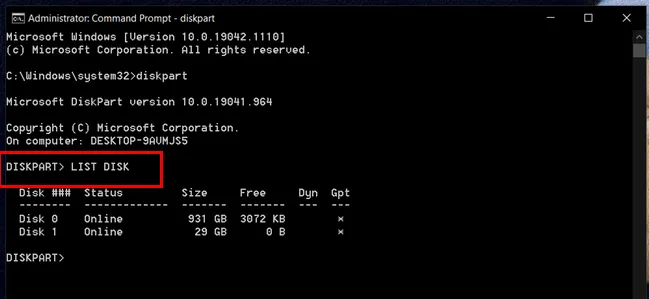
3. At this point, insert the USB in to the computer. Next, type LIST DISK command to list all USB devices attached to this PC.
4. Now you need to choose the USB drive from this list. Here, Disk 1 is my USB drive. You can locate the USB drive by size on this screen. To select the USB drive, you need to enter SELECT DISK 1 command.
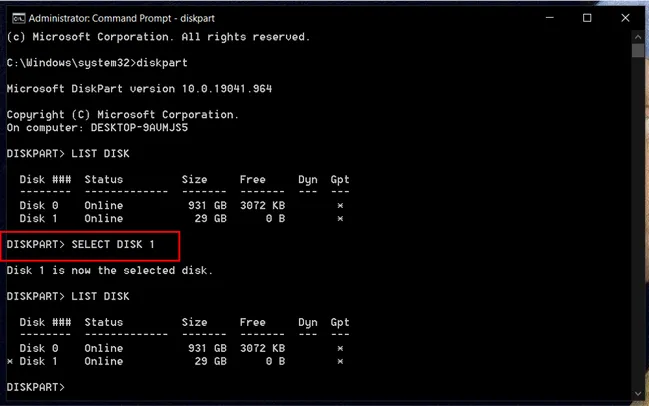
5. To confirm whether the USB drive was selected, use the LIST DISK command once again. The selected disk will show an asterisk beside its name.
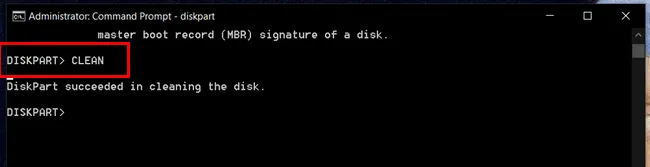
6. Now we need to clear the USB drive. For that, please use CLEAN command and press Enter. This will delete all partitions and volumes on selected disk.
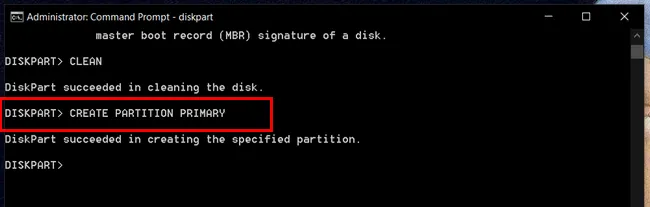
7. Now we will use CREATE PARTITION PRIMARY command to create a primary partition on this USB so that the PC can boot from it.
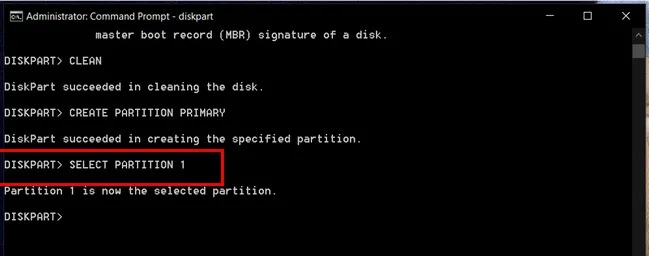
8. Next, we need to select this primary partition that we just created. To do that, continue with SELECT PARTITION 1 command.
9. After that, you should format this drive with NTFS file system if you are going to install Windows 7 on a PC. For Mac, you need to format it to FAT32. This can be archived with FORMAT FS=NTFS QUICK.
10. Now, you need to activate this partition with ACTIVEcommand. Don't forget to press Enter after typing.
11. Once done, close command prompt and you have a bootable USB drive. All you need to do is extracting content from Windows 7 ISO and copying them to this USB drive and you're good to go
Conclusion: This is a complete free way to create Windows 7 bootable USB. But it is quite complex and risky. Generally, it is great for users who are familiar with text commands and unwilling to install third-party software to get the job done.
2. Create Windows 7 Bootable USB with ISO Editor (For Windows & Mac)
You may be shocked on how complicated Command Prompt method is. Honestly, many normal users are more willing to try out simple solutions for creating Windows 7 bootable USB, at least comes with graphics user interface. This is not a problem at all!
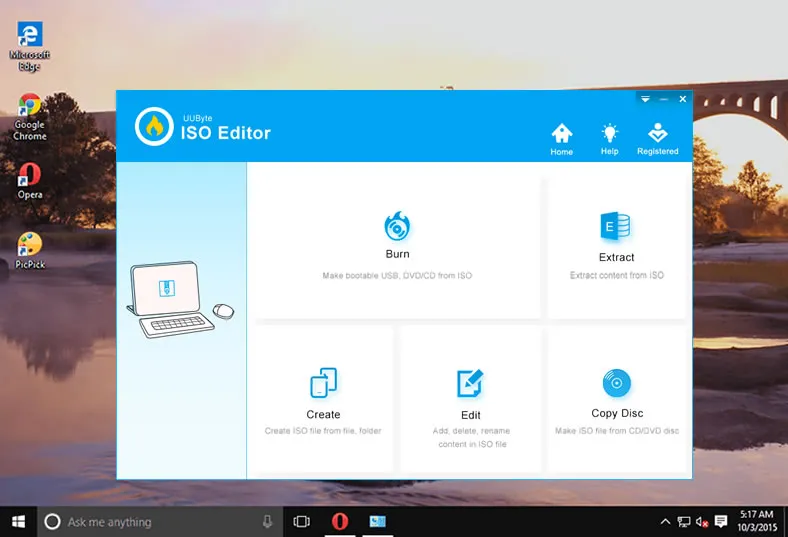
From our researching and comparison, UUByte ISO Editor is the simplest application to create Windows 7 bootable USB on a Mac or PC. Most importantly, there is no need to input a single command. You can make a bootable USB in 3 easy steps under a clean user interface (you will see in the following tutorial). In addition, it has a few other useufl features for handling ISO image file.
Key Features of ISO Editor
- Directly burn Windows ISO to USB or DVD.
- Extract conten from ISO image.
- Make a new ISO file from local files or folders.
- Work smoothly on Windows PC and Mac.
- Freely edit files or add content in ISO image.


Step 1: Go to UUByte official website to download UUByte ISO Editor and install it on a PC or Mac. In here, we will use the Windows version for example. The steps are the same when using it on a Mac. Now, start the app from desktop and insert the USB drive to proceed.
Step 2: Press the Burn button at the main screen. This will go to the window for creating bootable Windows drive. At this time, kindly import the Windows 7 ISO image by using the blue Browse button. Then enable Create a Bootable USB option and pick up the USB from drop-down list.
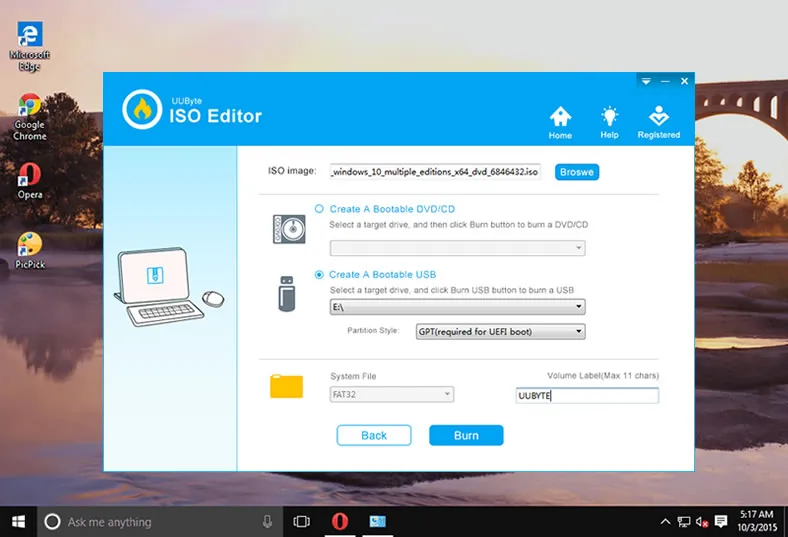
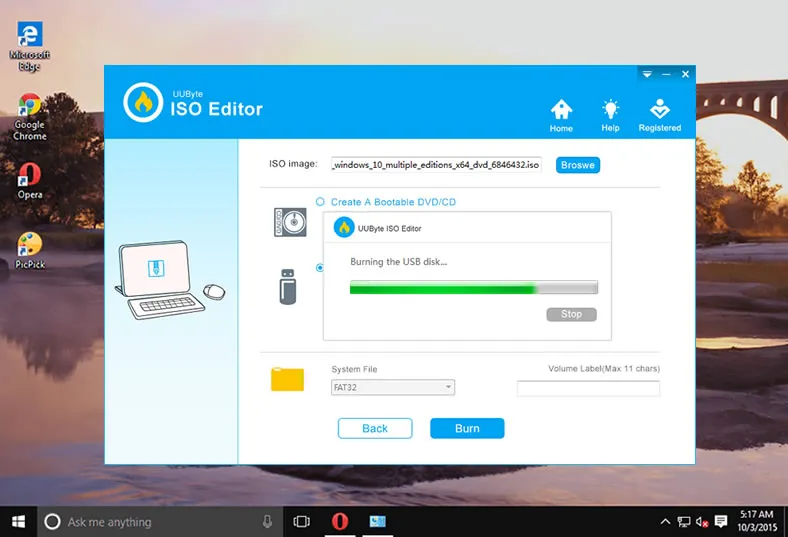
Step 3: Finally, press the blue Burn button to start the process. Once the task completes, which usually takes 5-10 minutes, you will have a Windows 7 bootable USB for OS installation.
This is much easier than Command Prompt, right? It is the preferable way to create a Windows 7 bootable USB nowadays!
Conclusion: A great tool for creating Windows bootable USB without any hassle thanks to its intuitive user interface. If you want to get a Windows 7 bootable USB in a short time, then UUByte ISO Editor is the right tool for you!
3. Create Windows 7 Bootable USB via balenaEtcher (For Windows, Mac & Linux)
As you saw for yourself, the above process can be a bit complicated and lengthy. To solve that use you can use a utility like Etcher. This is a free utility which you can use to create a Windows 7 bootable USB very simply.
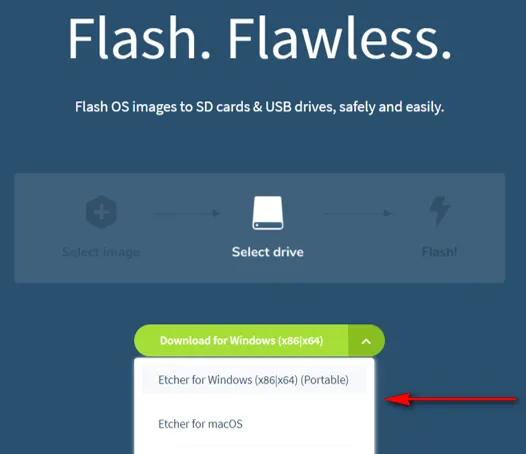
1. Head over to their website (https://www.balena.io/etcher/) and download the latest version of Etcher software. There is also a portable version available, you can use that tool if you do not wish to install it before using.
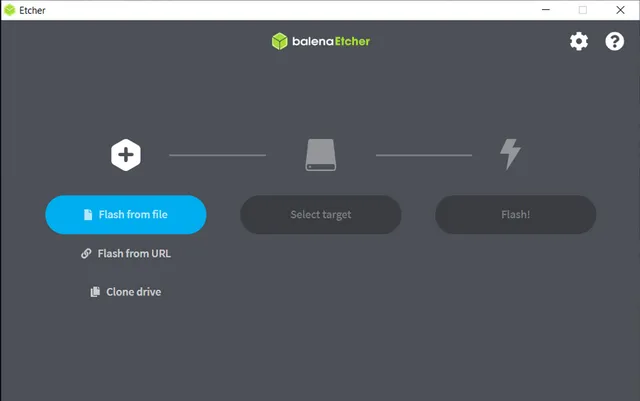
2. Once downloaded, fire up Etcherutility and insert the USB drive in the port of PC.
3. Click on the Flash from file button and select Windows 7 ISO image, then click on Select target button to choose the USB flash drive. Once done, finally press the Flash button to create a Windows 7 bootable USB.
4. Once the ISO burning process completes, it will be followed by a validation process which would check if the bootable USB was created properly. This may automatically eject and reconnect the USB.
5. After validation, the USB flash drive would be automatically ejected, and you can take it out of from the PC. Now you have a Windows 7 bootable USB drive
Conclusion: A free and straightforward to create bootable USB drive. However, Windows ISO is not well supported and you might experience errors during this task. Also, success rate is a bit low!
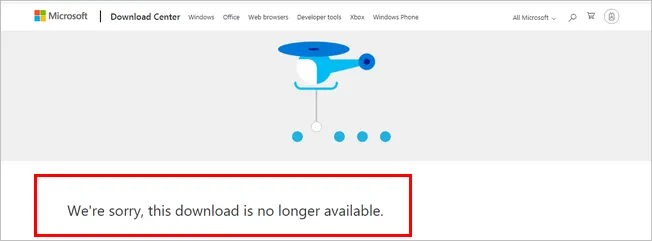
4. Microsoft Windows 7 USB/DVD Download Tool (Deprecated)
This could be our first choice in the past when it comes to create bootable Windows install media as it is a free tool developed by Microsoft. Unfortunately, it is no longer supported by Microsoft and the download is not available from Microsoft website. You can still download this tool from other website but it is not safe. Virus or malware may be along with the download file. That's why we only list it at the end of this post.
1. Download Windows 7 USB/DVD Download Tool from Microsoft page (https://www.microsoft.com/en-us/download/windows-usb-dvd-download-tool) and install it on your PC.
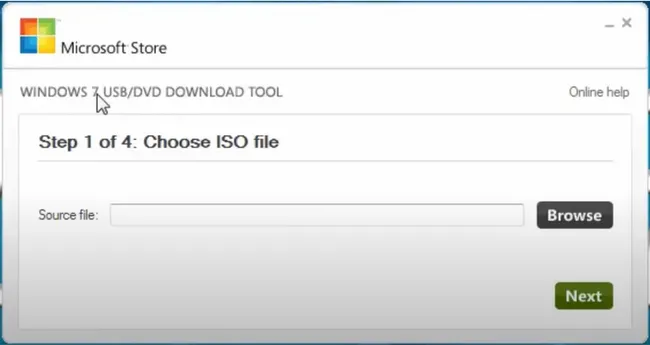
2. Open up the utility from Start menu under All Programs. Select Windows 7 ISO image file using the Browse button in Source File and press Next.
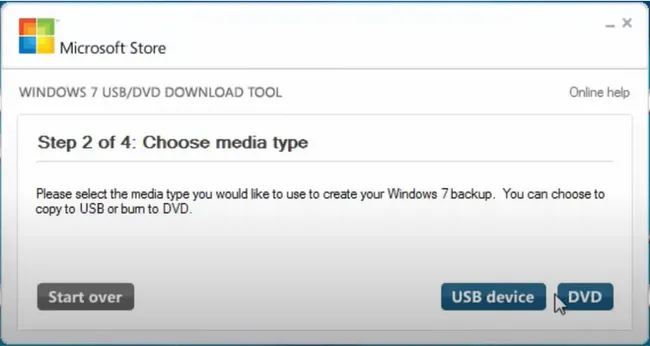
3. There are two ways to create Windows 7 bootable media. One is USB device and the other is DVD. Please pick up the right one. In our example, we choose USB drive.
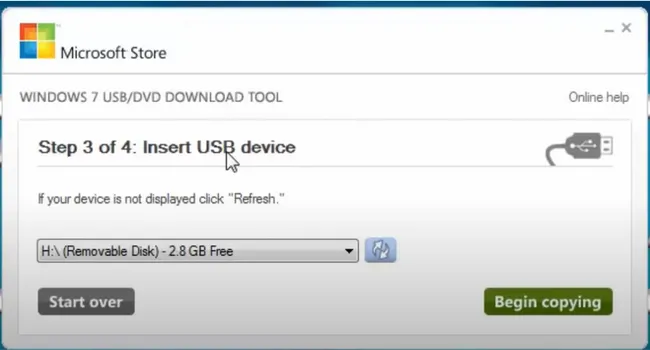
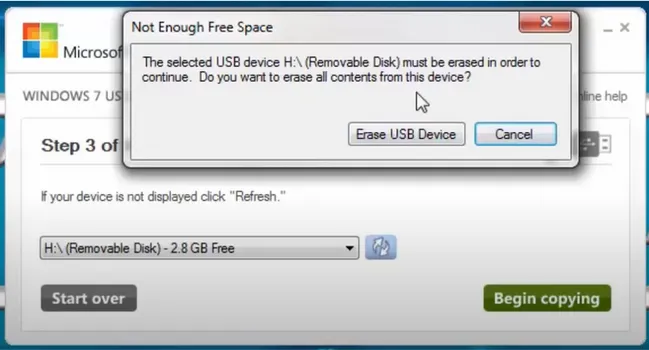
4. Now, select the USB drive from the dropdown box. Finally, press Begin Copying to start burning Windows 7 ISO to USB.
5. It will give you a warning that all data on the USB will be erased. Press Erase USB device to move ahead.
That's it, once the process completes, a Windows 7 bootable USB is ready for use.
Conclusion: The best tool ever for making Windows 7 bootable USB or DVD but the day has gone forever. Microsoft discontinued the support and only available for download from other sources, which may bring up secure issues.
Test Result Comparison
You might be confused and still do not know which tool is the best for you. Please don't worry. We will show a direct comparison table for those tools. This will definitely help you make the final decision!
Test Environment
- ThinkPad X1 Carbon Laptop
- Windows 7 ISO Image (3.4 GB)
- SanDisk Extreme Pro (USB 3.1)
Comparison Table:
|
|
CMD |
ISO Editor |
Etcher |
Windows 7 Download Tool |
|---|---|---|---|---|
| Duration | 41 Mins | 7 Mins | 25 Mins | 36 Mins |
| Level | Difficult | Easy | Easy | Medium |
| OS Platform | Windows | Windows& Mac | Windows, Linux & Mac | Windows |
| ISO File Type | Windows only | Window and Windows PE | Windows, Linux and Rescue CD | Windows only |
| UEFI Boot | Yes | Yes | No | No |
| GPT Partition | Yes | Yes | No | No |
| Pricing | Free | Free | $29.95 | Free |
| Customer Support | No | Yes | No | No |
Now, it is easy to choose the best tool you like for creating a Windows 7 bootable USB based on the stats listed above. There is not a perfect tool that works for everyone. And when one tool failed, please don't be discouraged. You can try other tools instead. I dare to say there is at least one tool that will work for you.

Petty is editor in chief at UUByte and writes various topics about Windows and Mac to help people make the most of current technology.