
A bootable USB is an important device that is loaded with all the important files and folders required to run the OS burned within that USB. It is of extreme importance for system reinstallation and computer troubleshooting. Sometimes you need multiple bootable devices at the same time to get one jobe done. So you may be looking for solutions on how to clone a bootable USB to another USB at minimal effort. Although burning ISO to the new USB is an option to create bootable USB but it takes a lot of time. That's why people prefer cloning a bootable USB instead.
However, you must know that making a clone of bootable USBs is not like copy-paste. The target USB won't be bootable even you copied all files and folders from original bootable USB. The reason is that the booting information is not written to the USB during the copy process. It may seem frustrating but don't you worry, here are a few methods to help you to clone a bootable USB to USB.
Method 1: Clone Bootable USB to USB Using ImageUSB
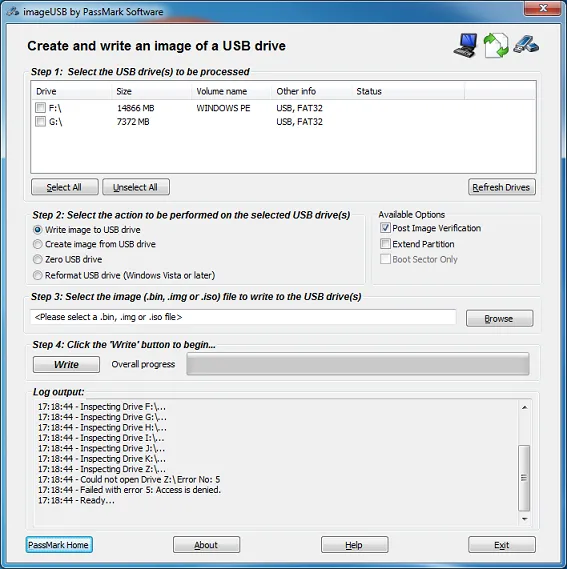
ImageUSB is a well-known free app that can effectively be used for mass duplication of bootable USB. The free utility is created by PassMark software, one of the best companies for data investigation. The best part of ImageUSB is that it can keep all visible and hidden information obtained from original USB, including Master Bootable Record, GPT entry, which is used for booting. What's more, it is also capable of cloning multiple USB flash drives at the same time from a target USB. It is currently ranked as No.1 in USB cloning field.
Step 1: Download ImageUSB on your computer and unzip the folder at a desired location.
Step 2: Insert the bootable USB you want to clone to another USB. Now go to the location where you have unzipped the ImageUSB folder and double click on the imageusb.exe to launch the software.
Step 3: Select the USB drive and check "Create Image from USB" under Step 2. check in "Post Image Verification" from the right side before moving onto Step 3 to select the location where you would write the image to. Finally, hit the "Create" button under and wait for the progress bar to turn green. After that, remove this bootable USB from computer.
Step 4 : Now insert a blank USB and tap on the "Refresh Drive" button on the ImageUSB interface and then select "Write the image to USB". Now, import the image file you created in Step 2 and hit "Write" button to copy the image file to blank USB.
After completion, you can boot the computer from that blank USB. In above example, we only clone one bootable USB to another. Actually, you can clone multiple USBs at one time. However, one thing to keep in mind is that the blank USB should be the same or larger than the size of the USB to be cloned. And on some non-English Windows computers, the text on ImageUSB interface is blurred a bit. But it won't have any negative impact on functions.
Method 2: Clone Bootable USB to USB Using USB Image Tool
USB Image Tool is a personal project developed and maintained by Alex. It is a popular free tool that is capable of creating images from USB flash drives for backups. Unlike ImageUSB from Passmark software, USB Image Tool also supports MP3 Players. This can help users creating a backup of music library and be able to burn to external CDs.
Step 1: Download USB Image Tool Zip file (the latest version is 1.76) and decompress the file to local hard drive. Double-click on the executable file (usbimagetool.exe) to run the utility.
Step 2: Insert the USB that needs to be cloned and wait for the app to recognize it. Select the USB and hit "Backup". Now select a location to store the file and create a new name for it. Now, the backup process starts and wait for the ghost image to be created. After that, eject the USB from computer.
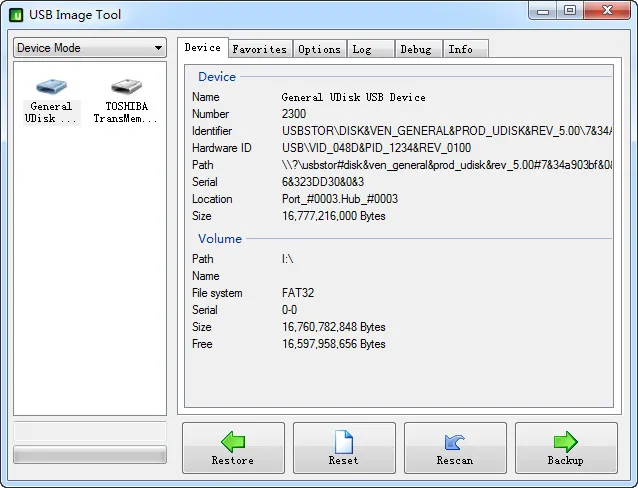
Step 3: Insert one or multiple blank USBs and wait for the program to recognize them. Select one or multiple USB drive names from the left section and hit "Restore" button. Now select the ghost image file and confirm that you want to restore the file to target USBs.
Step 4: Un-plug the USB flash drive when the cloning process is finished and you can use the USB for other tasks.
There are more features from USB Image Tool and a lot of advanced options are available in Options tab. Only check the options if you knew what it meant for. Otherwise, leave it alone and let the software do the rest for you.
Method 3: Clone Bootable USB to USB Using DD for Windows
DD is an useful command for writing ISO file to USB in Linux or Unix alike operating system. DD for Windows is the Windows version of dd command. It is a light-weighted utility that is capable of reading and copying the raw data presented on USB drive. As a command-based tool, DD for Windows can be used to clone a bootable USB to USB.
Step 1: Download DD for Windows and then extract the zipped folder and keep a copy of it on the desktop.
Step 2: Insert the USB to your computer that needs to be cloned and open the DOS shell or Command Prompt (cmd). Enter the command to list all the devices connected to your computer: dd --list
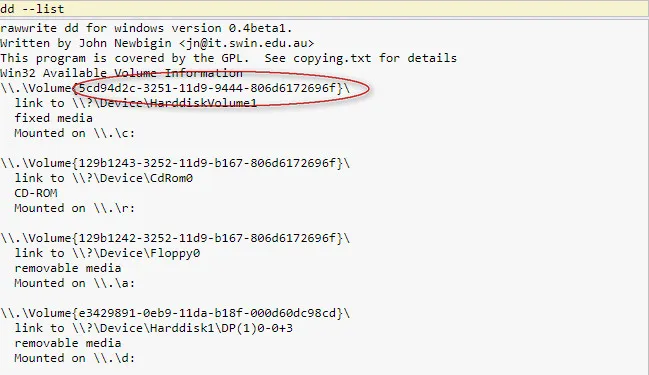
Step 3: Find removable drive from the list and copy the volume number. Now type this command to clone data from one USB to another:
dd if=\\.\Volume{the copied volume number of the removable drive from the list above} of=c:\usb.img bs=1M
This step creates a copy of the entire content of the USB and thus takes some time to complete. Eject the USB after the process completion.
Step 4: Insert a blank USB and wait for your system to read it. Now enter the command 'dd--list' again and copy the volume number of removable drive to replace the volume number in the next command:
if=c:\usb.img of=\\.\Volume{the copied volume number of the removable drive from the list above} bs=1M
Again, the step is a little time taking but on completion makes the blank USB a clone of the bootable USB. Eject the USB and verify it. Though the cmmand is pretty simple, DD for Windows could get complicated for people who are not comfortable with text commands.
Conclusion
While all the methods are useful for cloning a bootable USB to another USB, DD for Windows, in particular, could get a bit complicated for the non-techy people. Given that it is a command-based utility and one wrong word can create an uninvited mess. On the other hand, both ImageUSB and USB Image Tool offer user-friendly interfaces and complete the process to clone a bootable USB to a new USB without taking much time.
P.S if the above method did not work, then you have to use create a bootable USB with UUByte ISO Editor, which is a great toll for making bootable USB from ISO file.

Petty is editor in chief at UUByte and writes various topics about Windows and Mac to help people make the most of current technology.