
Boot Camp or Boot Camp Assistant is a cool app that comes bundled with macOS, and is designed to help Mac owners create a bootable USB drive for Windows operating system, download Windows drivers, and create a partition on their hard drive for use with Windows.
While Boot Camp is a handy tool for those who want to dual-boot macOS and Windows on their machine. One major drawback is that Boot Camp is not stable in a modern macOS and Windows 10. In reality, a lot of users have reported that they can not install Windows using Boot Camp due to certain reasons, like Boot Camp not loading bootmgr, Boot Camp not recognizing ISO file, or USB does not have enough space.
In this guide, we are going to walk you through the steps on how to fix Boot Camp not recognizing ISO. Actually, there are no permanent fixes for Boot Camp problems, so we are going for an alternative way to install Windows on your Mac, which makes a lot of sense.
Boot Camp Not Recognizing ISO Fix 1 : Verify the Integrity of ISO Image
If the downloaded Windows ISO was broken, then Boot Camp will not recognize the file for sure because it won't pass the verification process. Make sure the ISO image is downloaded from legit website like Microsoft.com, CNET or Softpedia.
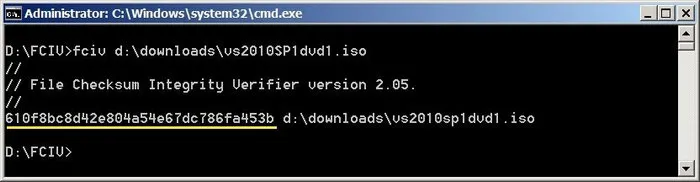
You have to verify the integrity of Windows ISO file downlaoded out side of Microsoft website.Please get a Windows computer and install Microsoft File Checksum Integrity Verifier tool, which is command line tool. Now, go to the folder where ISO file sits and open command prompt from there. Copy fciv.exe to the same folder and type this command to get the checksum value: fciv iso_file_name -sha1
It will generate the checksum value and you can use it to compare to the original value from the website you downloaded the ISO file.
Boot Camp Not Recognizing ISO Fix 2: Rebuild USB Installer
If you receive an error telling you Boot Camp fails to recognize your ISO file, then we recommend creating your own bootable USB installer. Another problem is that there is not enough space on your disk. This is due to the fact that Boot Camp supports the FAT32 file system, which cannot store files larger than 4GB, while the latest Windows 10 ISO image file weighs in at 5GB or more. In this case, it's a good idea to download Windows Support Software and then create your own bootable USB installer.
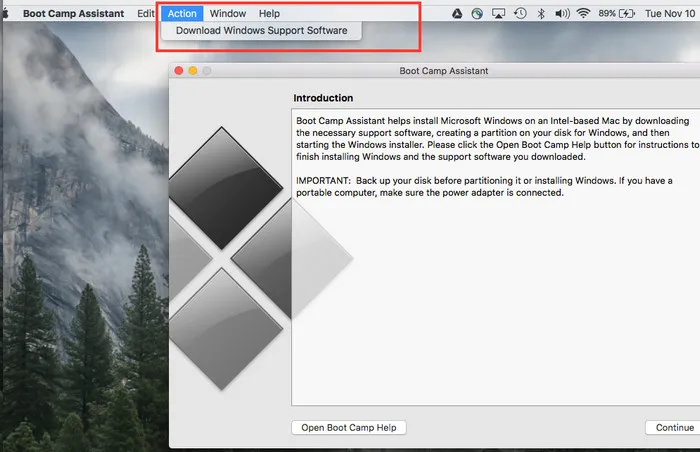
Step 1: To do this, launch Boot Camp Assistant on your Mac, then click Actions and select Download Windows Support Software. Once you are done, insert your USB drive and open Disk Utility on your computer. From here, select the drive from the list and click Erase (this step is to format your drive). After that, select ExFat as your format file and enter a name for your drive.
Step 2: Now mount your Windows ISO image file, then select all the Windows installation files and then copy them. Once you are done, paste the files onto the USB drive you created earlier.
Step 3: Navigate to the WindowsSupport folder and copy its files to the root folder of your USB installer. Once you have a bootable USB drive for Windows, then you now can install Windows on your Mac.
In short, Boot Camp is a built-in option for those who want to dual boot macOS and Windows. However, if this still does not work, then you should find an alternative to replace Boot Camp app for creating bootable Windows Install USB.
Boot Camp Not Recognizing ISO Fix 3: UUByte ISO Editor
UUByte ISO Editor is a great alternative to Boot Camp Assistant out there. It can do a lot more than Boot Camp does, but you are going to need to spend some cash if you want to unlock the premium features. With UUByte ISO Editor, you can easily burn Windows ISO to an USB to make it bootable. You can also create an ISO image from files or folders. All you need to do is to drag and drop the files from your computer and hit the Create button. Besides, you can add or remove files from your ISO file.


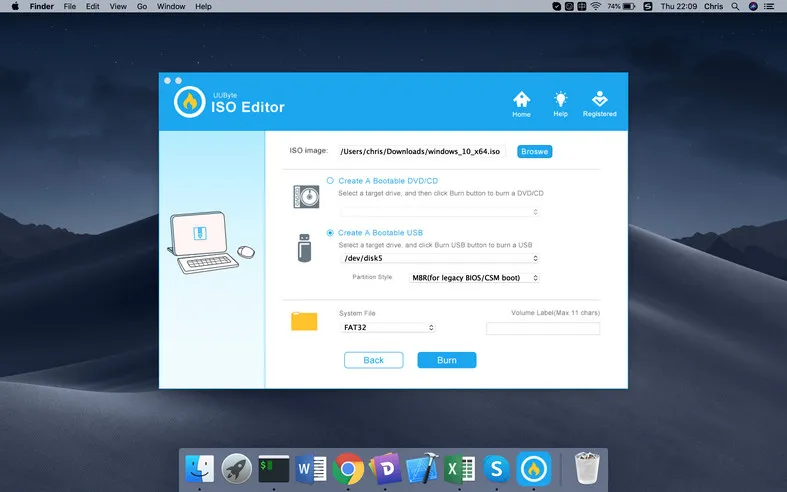
Step 1: Download the Windows 10 ISO file from Microsoft's download page. Open Boot Camp on Mac, then select Actions, and click on Download Support Software.
Step 2: Launch UUbyte ISO Editor and then burn ISO to USB drive. After that, open Disk Utility and select Partition. Select the USB drive that contains Windows installation files and name it.
Step 3: Now restart your computer while holding down the Option key. From the list of drive options, select the USB drive and then select the partition you created earlier. After that, select Delete, then hit New to select the space for Windows 10.
Step 4: Boot your computer from your USB drive and run the following file: WindowsSupport/BootCamp/Setup.exe
Summary
In short, UUByte ISO Editor is one of the top recommendations when it comes to installing Windows on Mac, as it is fast and cheap. If you are in the market for a great alternative to Boot Camp, then give UUByte ISO Editor a try.

Petty is editor in chief at UUByte and writes various topics about Windows and Mac to help people make the most of current technology.