Table of Contents
Sonoma is the most-recent macOS version that was published by Apple of WWDC23. We can see a lot of Mac users already upgraded their Mac to Sonoma. Unfortunately, some of the old hardware or apps does not work as device driver or app update is not published yet. That’s the reason why people are seeking a reliable way to downgrade Sonoma to Monterey, a modern and well-support macOS version by hardware manufactures and app developers.
Reasons Why You Should Downgrade Sonoma to Monterey
First, older software or applications might not be compatible with the latest macOS. This is especially true for apps that the developer don’t update the app for a long time. Downgrading to an old macOS version ensures these applications continue to work properly.
In addition, new macOS release has more bugs or stability issues at the early stage. This is a hug barrier that prevents the users running the latest of macOS. If these affect critical workflows, downgrading to a more stable version can be a practical choice.
Lastly, new updates may remove features that users relied on in previous versions. Bootcamp is one example. The bootable USB creation function is removed since macOS Big Sur. Downgrading to Catalina or old versions can restore these missing features.
Can You Directly Install Monterey from macOS Sonoma?
No. macOS downgrade does not work the same way as upgrade. You can directly install a newer macOS version from an old version by simply downloading and running the macOS installer app. However, this is not the way for downgrade. You will receive an error message, saying "This copy of macOS can’t be installed on the selected drive." if you are trying to install macOS Monterey directly on a Sonoma powered Mac. You have to erase the current drive and reinstall macOS Monterey from a bootable USB drive.
Back up Your Mac Before Downgrade
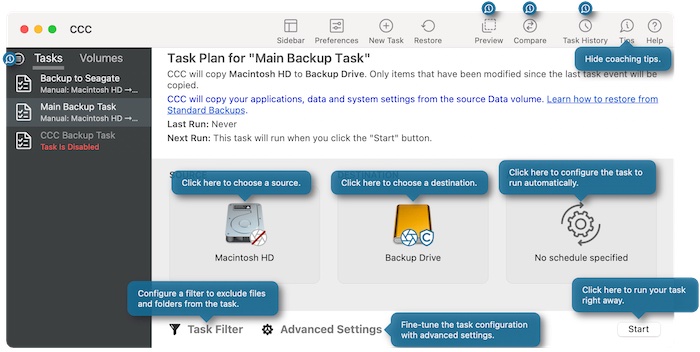
Time Machine is great but it is not a proper solution for downgrade purpose. Simply put, Time Machine restore does not support from a higher macOS version to a lower one. You can either drag and drop the files to external drive manually or use a third-party backup software like Carbon Copy Cloner.
Manually backing up involves copying your important files and folders to an external drive or cloud storage. This process is straightforward but requires regular attention and discipline to ensure all necessary data is backed up. You can manually select files such as documents, photos, music, and videos, and drag them to your chosen backup location. This method gives you full control over what is being backed up, but it lacks the convenience of automated backups and might not be as comprehensive.
Alternatively, using a backup program like Carbon Copy Cloner offers a more robust and automated solution. Carbon Copy Cloner is a popular third-party tool that creates a complete, bootable clone of your Mac’s hard drive. This means that in addition to your personal files, it also duplicates your operating system, applications, and system settings. The advantage of using a tool like Carbon Copy Cloner is its ability to schedule regular backups. This makes sure your data is consistently updated without manual intervention. Furthermore, in the event of a hard drive failure or other system problems, you can boot directly from the cloned drive, minimizing downtime and data loss.
Prepare for a macOS Monterey USB Install Media
A bootable Install media is an important tool being used for OS reinstallation or troubleshooting. To downgrade Sonoma to Monterey, you have to erase the internal SSD drive and reinstall macOS. Hence, a bootable USB for macOS Monterey is required. In this section, we will show you how to do that with detailed steps with the assistance of UUByte DMG Editor.
UUByte DMG Editor is a popular application for creating bootable USB from macOS DMG image files, a common format for macOS installers and applications. With its user-friendly interface, UUByte DMG Editor simplifies the process of creating a bootable macOS Monterey USB install media, making it accessible even for those without advanced technical knowledge.
Step 1: Download and install UUByte DMG Editor on your Mac.

Step 2: Obtain the macOS Monterey DMG file from our Google account:
https://drive.google.com/file/d/1ABWiurUKu7hipmXZyk9SpiUI_Yl-xhOi/
Step 3: Insert a USB drive into your Mac. The drive should have a minimum capacity of 16GB and be formatted correctly.
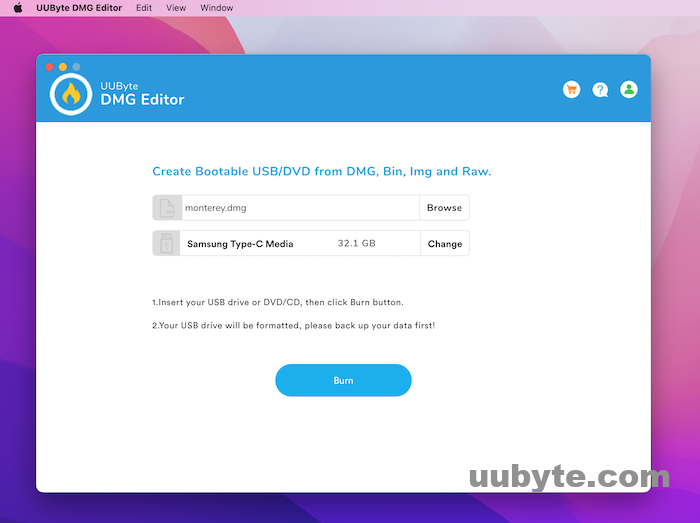
Step 4: Launch UUByte DMG Editor and import the downloaded macOS DMG file by clicking on the “Browse” button.
Step 5: Select the inserted USB drive as the destination for the bootable media and click on the “Burn” button. The application will start creating the macOS Monterey install media on the USB drive.
Creating a macOS Monterey USB install media with UUByte DMG Editor is a straightforward process, thanks to the app’s intuitive interface and efficient operation. This method not only simplifies the installation of macOS Monterey but also provides a reliable solution for system recovery or upgrades. The ability to create a bootable USB drive is an essential skill for Mac users, especially those who frequently update or troubleshoot macOS systems.
Start Downgrading Sonoma to Monterey
To downgrade macOS to a lower version, it involves four tasks. Please follow the guidance listed in below to complete the task.
1. Boot Your Mac in Recovery Mode
Booting your Mac into Recovery Mode is a crucial step for troubleshooting and resolving various system issues. Recovery Mode provides access to essential tools and utilities like Disk Utility, the option to reinstall macOS, and more.
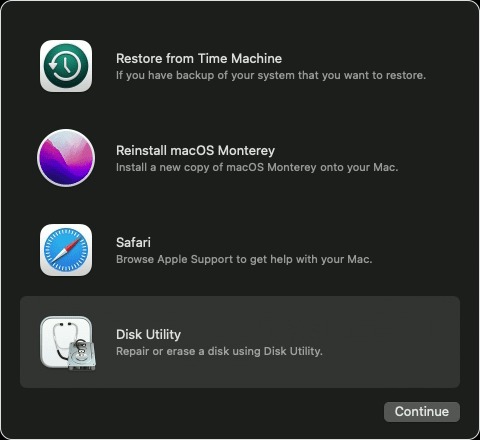
To boot your Mac into Recovery Mode, restart the device and immediately hold down the Command (⌘) and R keys together until you see an Apple logo or a spinning globe. Release the keys when the startup screen appears. You will see the following options in Mac’s Recovery Mode.
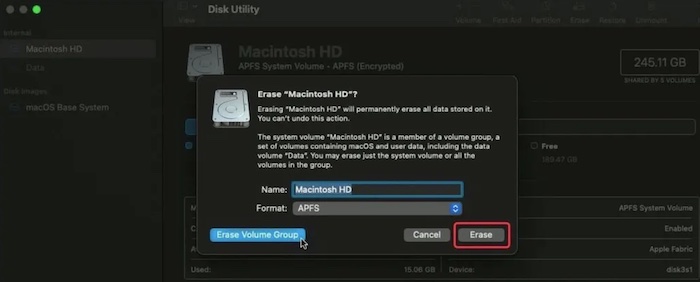
2. Erase Mac’s Internal SSD with Disk Utility App
Erasing your Mac’s internal drive using the Disk Utility app is a critical step, often undertaken when you’re preparing to sell your Mac, facing significant system issues, or simply starting fresh with a new macOS installation.
Once in Recovery Mode, select Disk Utility from the macOS Utilities window and click Continue. In Disk Utility, choose your Mac’s internal drive (typically named Macintosh HD) from the sidebar. Then click the Erase button, select the desired format (for most users, APFS or Mac OS Extended (Journaled) is appropriate), and click Erase. Wait for the process to complete before exiting Disk Utility.
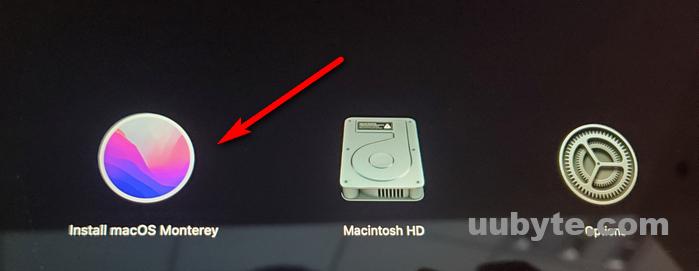
3. Boot Your Mac from USB Drive
Booting your Mac from a USB drive is an essential technique, particularly when installing a new operating system or troubleshooting. This process allows your Mac to start up from a macOS installer or other system utilities stored on an external USB drive.
To boot your Mac from a USB drive, first insert the USB drive containing the macOS installer. Then, restart your Mac and immediately hold down the Option (⌥) key. Release the key when you see the startup manager window showing available startup disks. Select the USB drive and hit Enter. This will boot your Mac from the selected USB drive.
4. Reinstall macOS from Monterey USB Drive
After booting from the USB drive, you will be presented with the macOS Utilities window. Here, select Install macOS (or Reinstall macOS) and click Continue. Follow the on-screen instructions to select your Mac’s internal drive as the destination for the macOS installation. The installer will then proceed to install macOS on your Mac. This process may take some time, depending on your Mac’s specifications and the version of macOS you are installing.
Alternative Solution (Using DFU and Apple Configurator)
Downgrading macOS using DFU (Device Firmware Update) mode and Apple Configurator is a specialized process often used for Macs with Apple Silicon chips. This method requires a second Mac with Apple Configurator 2 installed, a USB-C or Thunderbolt cable, and the IPSW file for the macOS version you wish to downgrade to.
Start by downloading and installing Apple Configurator 2 on the secondary Mac from the Mac App Store. Then, download the appropriate IPSW file for your target macOS version from a reliable source. Ensure that the target Mac is turned off and unplugged from any power source. Connect the target Mac to the secondary Mac using the USB-C or Thunderbolt cable.
To enter DFU mode on the target Mac, follow the specific steps for your model (these can vary, so it’s important to refer to Apple’s official guidelines for entering DFU mode on your specific Mac model). Once in DFU mode, the target Mac should appear in Apple Configurator 2 on the secondary Mac.
In Apple Configurator 2, select the target Mac and choose ‘Restore’ while holding down the Option key. This allows you to select the downloaded IPSW file for the downgrade. The downgrade process will start once you choose the file. It’s crucial to keep both Macs connected and undisturbed during this process. After the downgrade is complete, the target Mac will restart with the older version of macOS installed. Note that this process will erase all data on the target Mac, so it’s important to back up any important information before proceeding.
Final Words
Downgrading from macOS Sonoma to Monterey on a Mac involves a detailed and careful process, especially considering the advanced hardware and software integration of newer Mac models. This downgrade requires specific tools like UUByte DMGE Editor or Apple Configurator 2 with the appropriate IPSW file, and often a secondary Mac. It’s important to remember that this operation will erase all data on the Mac being downgraded. Successfully reverting to Monterey can be beneficial for users needing compatibility with certain applications or preferring the older operating system’s environment. However, this should be weighed against losing the advancements and features offered by macOS Sonoma.