Table of Contents
macOS Sonoma, as the successor to Ventura, has introduced a variety of new features that enhance the overall user experience. Yet, installing an operating system, particularly a new one, can sometimes come with apprehensions and risks. That’s why installing it on an external SSD drive first could be a good approach. This method allows you to test the waters without disturbing the current system setup. We will show you how to install macOS Sonoma on External drive in this article.
Pros of Running macOS Sonoma from External Drive
Non-Destructive Testing: You can test and explore the features of macOS Sonoma without making any changes to the current operating system. This ensures that your primary work environment remains undisturbed until you decide to fully migrate to the new version.
Troubleshooting and Recovery: A bootable external drive with an operating system installed can be a lifesaver. If your Mac’s main hard drive fails, or the operating system becomes corrupted, you can boot from the external drive and potentially resolve the issue, or at least recover important data.
Safeguard Against Incompatibility Issues: If you have essential applications running on your system, there might be compatibility concerns with a new OS. By installing the new macOS Sonoma on an external drive, you can verify the compatibility of all essential applications before making a permanent switch.
Convenience and Portability: With macOS Sonoma on an external SSD, you can carry your operating system, with all your files and applications, in your pocket. This is convenient for those who often switch workstations, as you can simply plug your external SSD into any compatible Mac and start working.
System Requirements for Running Sonoma from External Drive
Running macOS Sonoma from an external drive has essentially the same system requirements as a regular installation on your Mac’s internal drive, including:
1. A Compatible Mac: Not every Mac can run Sonoma. Here are the compatible models official suggested by Apple:
- iMac: 2019 and later
- Mac Pro: 2019 and later
- Mac Mini: 2018 and later
- MacBook Air: 2018 and later
- MacBook Pro: 2018 and later
2. External SSD: You will need an external SSD with enough space for the macOS Sonoma and extra storage for applications and files. It’s recommended to have at least a 64GB drive, but if you plan on using this as a regular working system, a larger drive will be necessary.
3. macOS DMG File: This is the disk image file you can use to create a bootable macOS Sonoma USB for installation.
4. Internet Connection: A stable internet connection is necessary to download the macOS Sonoma installation package.
5. Power Source: As the process can be time-consuming, it’s recommended to have your Mac connected to a power source to prevent any interruptions.
6. Backup: Though not a requirement, it’s strongly recommended that you have a recent backup of your data. When performing major operations like this, it’s always possible that something could go wrong, and you don’t want to risk losing important files.
Choose the Best External SSD Drive for Mac
Using an SSD (Solid State Drive) over a traditional USB flash drive when running macOS from an external drive has several advantages. The most important one is the speed. SSDs are significantly faster than traditional USB drives. This speed is crucial when running an operating system as it can drastically affect performance. Tasks such as booting up the system, launching applications, and transferring files will be much faster on an SSD.
Another reason is the volume. SSDs are available in larger capacities compared to USB flash drives. This is beneficial if you plan to install more applications or store more files on the drive.
Below is the best 3 portable SSD drives designed for Mac in 2023:
Samsung T7 Shield 1TB ($89.99): This SSD is highly regarded for its combination of performance, security, and durability. It offers impressive read/write speeds up to 1050/1000 MB/s, and features AES 256-bit hardware encryption for added security. It uses a USB 3.2 Gen 2 interface (compatible with Thunderbolt 3 ports) and is available in 500GB, 1TB, and 2TB capacities.
Seagate One Touch 1TB ($107.99): The SanDisk Extreme Portable SSD is popular for its ruggedness and speed. It offers high-speed transfers with up to 1050MB/s read speeds and uses USB 3.1 Gen 2 interface (also compatible with Thunderbolt 3). It’s designed to withstand rough handling and extreme environments, and is water and dust resistant.
Crucial X6 1TB ($59.99): This portable SSD offers read speeds up to 1050 MB/s and write speeds up to 1000 MB/s. It uses a USB 3.2 Gen 2 interface, and it’s compatible with both USB-C and USB-A ports. Additionally, it features password enabled 256-bit AES hardware encryption to help protect your valuable data.
How to Install macOS Sonoma on External SSD Drive
Step 1: Format SSD Drive on Mac
Connect your SSD to the Mac. Open Disk Utility, select the SSD from the list of drives, and then click "Erase." Choose "Mac OS Extended (Journaled)" if your Mac uses HFS+ or "APFS" if it uses APFS. Give your drive a name and click "Erase."
Step 2: Download macOS Sonoma DMG File
The DMG file is a disk image similar to ISO, which is the ideal format to package the OS installation files. You can download the macOS Sonoma DMG file from the following links:
https://drive.google.com/file/d/1xKRhy9gi3Ujr8OC3Lp52sesvB4V_u9Dc
https://www.mediafire.com/file/macOS+Sonoma+Beta+DMG
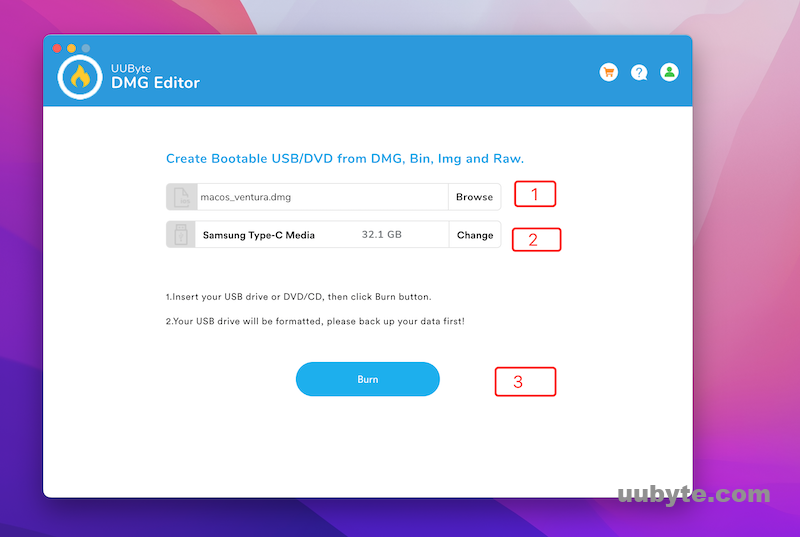
Step 3: Create a Bootable Installer with UUByte DMG Editor
Download UUByte DMG Editor and insert a blank USB drive into your Mac.
Click ‘Burn’ on the main interface and then click ‘Browse’ to import the Sonoma DMG file. Select your USB drive from the drop-down menu and then click ‘Burn.’ The program will start to create a bootable macOS Sonoma USB drive. This process will take a while.
Step 4: Install Sonoma on External Drive
Restart your Mac and hold down the Option key as it boots up to enter the Startup Manager. Select the USB drive, which should have the Sonoma installer. When the installer boots up, select your SSD as the installation destination and follow the on-screen instructions.
Why My External Hard Drive Not Showing up during Installation?
There could be several reasons why your external hard drive is not showing up during macOS installation. Here are some common ones:
Improper Formatting: Your Mac may not recognize the drive if it’s not formatted correctly. macOS uses a file system known as APFS (for newer macOS versions) or HFS+ (for older versions). If the drive is formatted with a different file system like NTFS or exFAT, it may not show up. You can use the Disk Utility tool to reformat the drive with the correct file system, but be aware this will erase all data on the drive.
Faulty Connections: Check to see if your external hard drive’s connection is secure. This could be a loose cable, a faulty USB port on your Mac, or even a broken connector on the drive itself. Try using a different USB port or a different cable to see if this solves the problem.
Insufficient Power Supply: Some larger external hard drives require more power than a single USB port can supply. If you’re using such a drive without an external power source, it may not function properly.
Incompatible Drive: Some drives may not be compatible with the macOS version you’re trying to install. This is more common with older drives. Check the drive manufacturer’s documentation to ensure compatibility.
Drive Not Detected by the Mac: If the drive isn’t appearing at all on your Mac (not just during macOS installation), it may not be detected by your system. You can check in the Disk Utility tool to see if the drive appears there. If it doesn’t, the drive could be damaged or faulty.
Outdated System: Sometimes, an outdated system might have trouble recognizing an external drive. Make sure your current macOS version is updated to its latest version before proceeding with a new installation.
Video Tutorial: How to Install macOS Sonoma on External Drive
Frequently Asked Questions
Can I install a Mac operating system on an external hard drive?
Yes, you can install a Mac operating system on an external hard drive. This process involves downloading the macOS installer from the App Store, formatting the external drive using Disk Utility, and then creating a bootable installer on the drive.
Why my Mac can't read external hard drive?
There could be several reasons why your Mac can't read an external hard drive. It could be due to improper formatting, faulty connections, insufficient power supply, incompatibility issues, or the drive not being detected by the system.
Is my Mac too old for Sonoma?
macOS Sonoma supports many Mac models from 2018 and later. However, some older models may not be supported. Always check the specific system requirements for any macOS version before attempting to install it.
How to install macOS Sonoma without Internet?
To install macOS Sonoma without an internet connection, you will need to create a bootable installer on another Mac. This requires downloading the Sonoma installer from the App Store and then using Terminal to create a bootable USB drive. Once the bootable installer is created, you can use it to install Sonoma on the target Mac without needing an internet connection.
The Bottom Line
In the above content, we showed you how to install macOS Sonoma on external drive. Actually, running macOS Sonoma from an external SSD provides a safe and flexible way to experience the latest features that Apple offers, without disrupting your current system setup. This method offers a great solution to test the OS before completely switching over, and it also serves as a handy tool in the event of system crashes. Remember to choose a reliable and compatible SSD for the task and follow the provided steps carefully. Enjoy exploring macOS Sonoma!