Table of Contents
Unzipping files is a common task when working with compressed files on a Mac. While you can use third-party software with a graphical user interface, using the Terminal provides a quick and efficient way to unzip files directly from the command line. In this tutorial, we will guide you through the steps to unzip files on Mac Terminal.
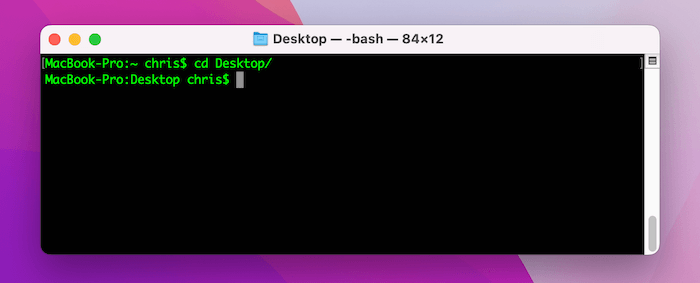
Step 1: Launch the Terminal application. You can do this by searching for "Terminal" using Spotlight or by navigating to Applications > Utilities > Terminal.
Step 2: Navigate to the folder where your compressed file is located. You can use the "cd" command followed by the desired directory path. For example, if your file is on the Desktop, you can enter:
cd ~/Desktop
Step 3: Once you’re in the correct directory, use the "unzip" command followed by the name of the file you want to extract. For example, if your file is called "archive.zip," you would enter:
unzip archive.zip
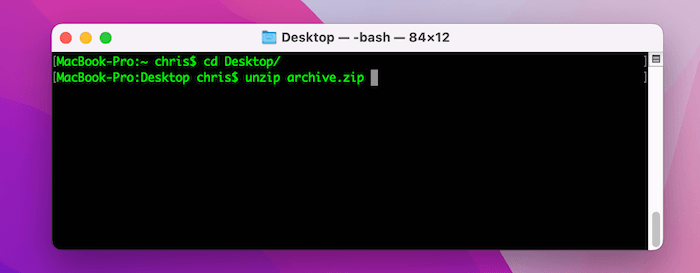
Step 4: Press Enter. The Terminal will begin extracting the contents of the compressed file to the current directory.
Step 5: Wait for the extraction process to complete. Depending on the size and complexity of the file, this may take some time.
Step 6: Once the extraction is finished, you will see the uncompressed files in the same directory where the original compressed file was located.
Step 7: If you want to extract the files to a different directory, you can specify the destination path using the "-d" flag followed by the desired folder location. For example, to extract the files to a folder called "destination" on the Desktop, you would enter:
unzip archive.zip -d ~/Desktop/destination
Now that you know how to unzip files using the Terminal on Mac, you can efficiently manage your compressed files without the need for additional software.
| Pros | Cons |
|---|---|
| 1. Provides a quick and efficient way to unzip files. | 1. Requires familiarity with the Terminal and command-line interface. |
| 2. No need to install third-party software. | 2. Terminal commands can be intimidating for beginners. |
| 3. Allows for customization and advanced options. | 3. Limited graphical user interface and visual feedback. |
Best Solution to Unzip Files on Mac without Terminal
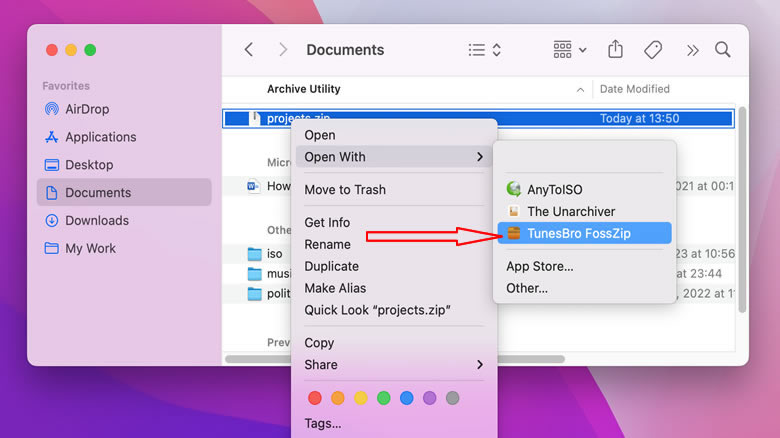
Terminal is free and you don’t have to install additional app to unzip a file on Mac. However, it lacks advanced features and does not come with a GUI. This is very inconvenience for novice. If you dislike the command approach, please download and try FossZip, one of the best apps for unzipping files on Mac.
Step 1: Download FossZip app on your Mac and drag the app icon into the Application folder.

Step 2: Right click the .zip and choose Open with -> TunesBro Fosszip.
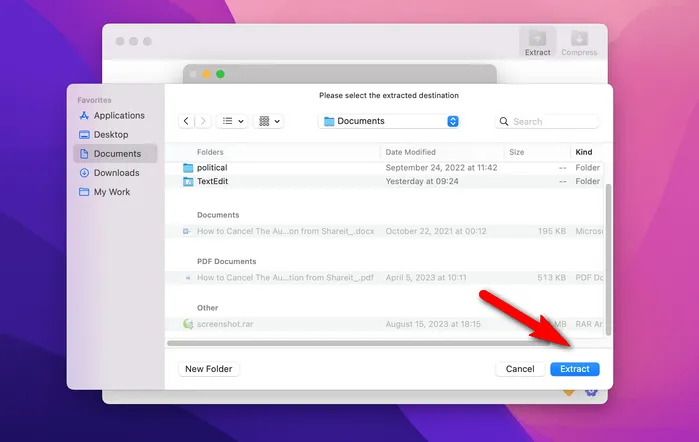
Step 3: Select a location to save the unzipped files. That’s!
Besides .zip file, FossZip is also able to unzip .rar and .tar.gz files. In addition, you can use this app to create a new zip file as well.
Video Tutorial: Where is unzip in macOS terminal?
Does Mac have unzip?
Yes, Mac computers have built-in functionality to unzip or extract compressed files. Here are the steps to unzip a file on a Mac:
1. Locate the zip file you want to unzip.
2. Double-click the zip file. This will automatically extract the archive and create a new folder with the same name.
3. If the zip file contains multiple files or folders, you can access them from the newly created folder.
Alternatively, you can also unzip a file using the Terminal application. Here’s how:
1. Open the Terminal application. You can find it in the Utilities folder within the Applications folder, or you can use Spotlight search to locate it.
2. In the Terminal, navigate to the directory where the zip file is located. You can use the "cd" command followed by the directory path. For example:
cd /Users/YourUsername/Downloads
3. Once you are in the correct directory, use the "unzip" command followed by the name of the zip file. For example:
unzip filename.zip
Replace "filename.zip" with the actual name of your zip file.
4. The Terminal will extract the contents of the zip file to the current directory.
It’s worth mentioning that if you have a more advanced need for file compression and extraction, there are third-party applications available for macOS that offer additional features and formats. However, for most basic uses, the built-in functionality should suffice.
How do I unzip a folder in Mac command line?
Unzipping a folder in the Mac command line is a straightforward process. Here are the steps to unzip a folder using the command line:
1. Open the Terminal application on your Mac. You can find it in the Utilities folder within the Applications folder, or you can use Spotlight search to quickly locate it.
2. Navigate to the directory where the zipped folder is located using the "cd" command. For instance, if the zipped folder is on your desktop, you would enter the following command:
cd ~/Desktop
3. Once you are in the appropriate directory, use the "unzip" command followed by the name of the zipped folder and its file extension. For example, if the zipped folder is named "example.zip," you would enter the following command:
unzip example.zip
4. Press Enter to execute the command. The command line will unzip the folder, and you will see the contents extracted to the same directory.
That’s it! The zipped folder has now been successfully extracted in the directory specified. You can access the unzipped files by navigating to the directory or opening them with relevant applications.
Please note that the commands and steps mentioned here apply specifically to Mac command line usage and may vary slightly on different operating systems.
What is the command for zip in terminal?
In the terminal, the command for compressing files and directories into a zip archive is "zip." Here’s how you can use it:
1. Open the terminal application on your computer.
2. Navigate to the directory where your files or folders are located using the "cd" command followed by the directory path. For example, if your files are located in the "Documents" folder on your Desktop, you can use the command: cd Desktop/Documents.
3. Once you’re in the desired directory, you can invoke the zip command followed by the name you want to give to the archive and the files or folders you want to include. For example, to create a zip archive named "myarchive.zip" containing two files named "file1.txt" and "file2.txt," the command would be: zip myarchive.zip file1.txt file2.txt.
4. If the files or folders you wish to include are in a different location, you need to provide the full path to each file or folder. For instance, if "file1.txt" is in the "Documents" folder on your Desktop, you can use the command: zip myarchive.zip ~/Desktop/Documents/file1.txt.
5. You can also include entire directories by specifying the directory name instead of individual files. For example, to include the "Documents" folder in the archive, the command would be: zip -r myarchive.zip Documents.
6. Once you’ve entered the appropriate command, press Enter. The zip utility will compress the specified files or folders into a zip archive with the given name in the current directory.
7. You can verify the creation of the archive by listing the contents of the directory using the "ls" command or checking the file explorer on your computer.
Remember, the zip command offers various options and additional flags that can be used for modifying the compression process. To explore these options, you can refer to the manual page of the zip command by entering "man zip" in the terminal.
Keep in mind that the provided steps are general and may vary depending on the operating system and the version of the terminal software you are using.
How do I unpack a tar GZ file on a Mac terminal?
To unpack a tar GZ file on a Mac terminal, follow these steps:
1. Open the Terminal application on your Mac. You can find it in the Utilities folder within the Applications folder or use the Spotlight search to locate it quickly.
2. Navigate to the directory where the tar GZ file is located. You can use the "cd" command followed by the directory’s full path, or you can use the "cd" command followed by a space and then drag and drop the folder containing the file into the Terminal window. This will automatically fill in the directory path for you.
3. Use the "tar" command combined with the appropriate options to unpack the tar GZ file. Here’s the command structure:
tar -xzf file.tar.gz
Replace "file.tar.gz" with the actual name of your tar GZ file. This command will extract the contents of the tar GZ file to the current directory.
If you want to extract the contents to a specific directory, you can provide the path after the command, like this:
tar -xzf file.tar.gz -C /path/to/destination
Replace "/path/to/destination" with the actual path where you want the files to be extracted.
4. Press the Enter key to execute the command. The extraction process will begin, and you will see the progress in the Terminal window.
5. Once the extraction completes, you’ll have the unpacked files available for use in the specified directory. You can verify this by using the "ls" command to list the files in the current directory or the target extraction directory if you specified one.
Remember to replace "file.tar.gz" and "/path/to/destination" with the appropriate file name and destination path as per your circumstances.
That’s it! You have successfully unpacked a tar GZ file on a Mac terminal.
What is the command to unzip?
To unzip a file, you can use the following command:
1. For Windows:
Method 1: Using Windows Shell Command
– Open the folder where the ZIP file is located.
– Click on the ZIP file to select it.
– Right-click on the ZIP file and choose the "Extract All" option.
– Follow the on-screen instructions to specify the destination folder and extract the contents.
Method 2: Using Command Prompt
– Open Command Prompt by typing "cmd" in the search bar and selecting the Command Prompt app.
– Navigate to the folder where the ZIP file is located using the "cd" command.
– Once you’re in the correct directory, use the "unzip" command followed by the name of the ZIP file and press Enter.
– The contents of the ZIP file will be extracted to the current folder.
2. For macOS and Linux:
Open Terminal and use the following command:
unzip path/to/your/file.zip
Replace "path/to/your/file.zip" with the actual file path of the ZIP file you want to extract. Press Enter, and the contents of the ZIP file will be extracted to the current directory.
It’s worth noting that the availability of the unzip command may vary depending on your operating system and its configuration. Additionally, alternative tools like 7-Zip, WinRAR, or GUI-based file managers might provide different methods for unzipping files.