
Usually, there is only one hard drive on old PCs or laptops. It was a standard in the past where web was still not popular. However, things has changed dramatically in recent years and one hard drive is not enough for daily routine. That's why we need an secondary SSD or hard drive to imporve the performance. In addition, backups are always good to have, especially where important data is concerned.
Do you know how to install Windows 10 on a second SSD or hard drive ? The typical way is to clone your entire drive or take a system image but that might cause issues like duplication of data, etc. It's also more time-consuming and requires the help of a disk cloning utility. Additionally, it may also cause an OS conflict when you have both drives connected to the PC. The easier way is to hook up the new drive to your PC, create a bootable USB drive with Windows 10 ISO file, boot the second drive from this installation disk, and then install Windows 10 in that way.
Part 1: Why Installing Windows 10 on Secondary SSD or Hard Drive?
Installing Windows 10 on a secondary drive like an SSD or even another HDD is usually done in the following circumstances:
● The speed of current hard drive is too slow. The system will run much faster on SSD or branded-new hard drive.
● There is no enough disk space left on current drive. So a new SSD or hard drive is needed.
● When you want to replace your hard drive (full data backup is recommended).
● When you want two custom versions of Windows 10 to be accessible on the same computer.
In all such cases, we recommend that you follow the process shown below. It is one of the easiest methods to install Windows 10 on a second hard drive.
Part 2: Make a Windows 10 Bootable USB or DVD
If you want to run Windows 10 on any hard drive or SSD, it is mandatory to prepare for a Windows 10 installation media, which can be an USB flash drive or a blank DVD disc. The following section guides you through the entire process of making bootable Windows 10 USB. The steps are the same for DVD.
Step 1: Get a USB drive with at least 8GB capacity and downloaded Windows 10 from Microsoft's website.
Step 2: Once the ISO is ready, plug in the USB and download UUByte ISO Editor software for burning ISO image to USB.
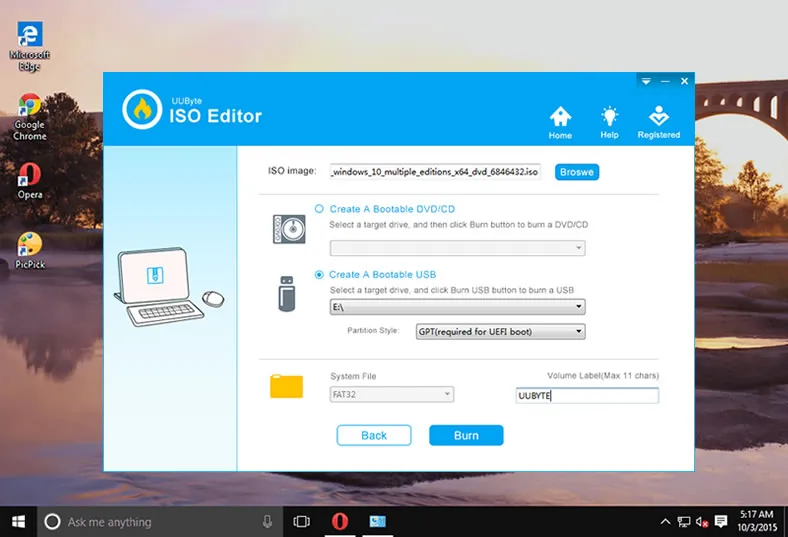
Step 3: Click "Burn" button at the main window and import Windows 10 ISO into the program. Now, select the USB name and click "Burn" button to start burning Windows 10 ISO to USB drive. Then wait for 10 minutes and a bootable USB is ready for future usage!
Part 3: Disk Partition
All physical disks, including hard drive, SSD and USB, should be formatted first before storing any data on it. Somtimes, the drive is formatted before shipment. Sometimes, it is not. Under this circumstance, you need to format the drive and create partition manually. Fortunately, this can be done with the built-in tool on Windows, which is called Disk Management.
Step 1: Connect your secondary SSD or hard drive to the PC and make sure the drive is automatically detected. If this was done correctly, you will see the drive name in BIOS settings.
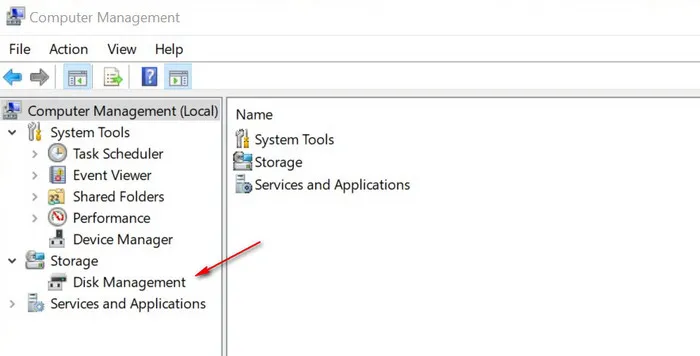
Step 2: It is time to create a new partition on the SSD or hard drive where Windows 10 can be installed. To do this, right click 'This PC' icon desktop and select "Manage" from the context menu. You will find several options under Computer Management window and click "Disk Management".
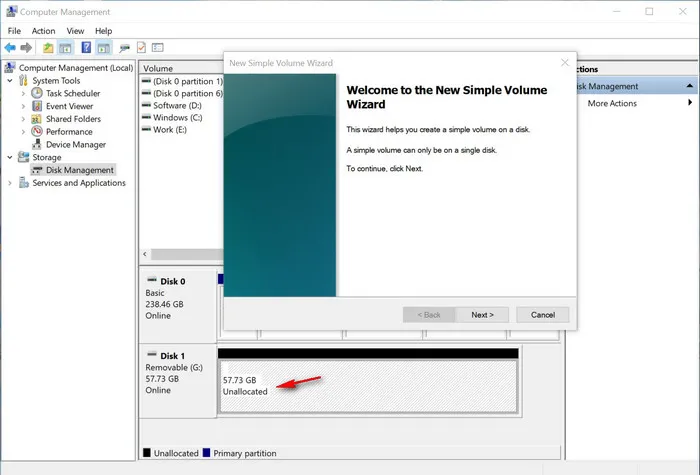
Step 3: All disks connected to this computer are shown on the right side. In the following example, Disk 1 is the new SSD we just attached. And you will see the capacity as well as a text "Unallocated". This means the drive is not formatted yet. Right click the blank space at the right side of disk name and select "New Simple Volume" to start the creation wizard.
Step 4: At this stage, you need to specify the volume size of new partition, the file system and a volume label. For Windows 10 installation, the volume size should be more than 70G and choose NTFS as the target file system. Once all the settings are done, click "Finish" to close the wizard and the system starts to format the drive with given settings.
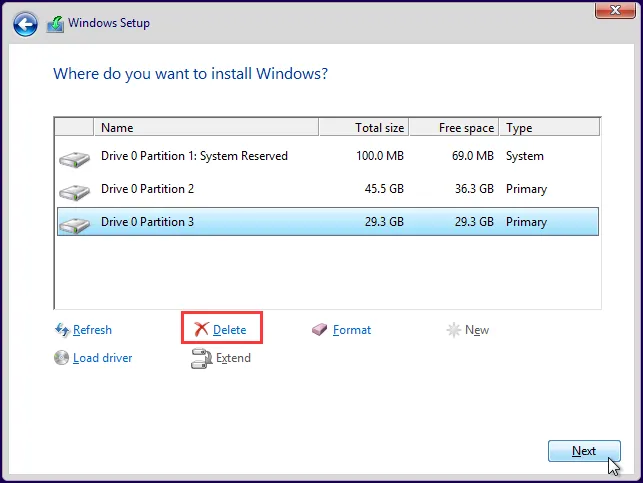
Note: If your drive was already formatted and had a volume, right-click to delete it. That volume should now show up as unallocated space on your new drive. Right-click again and create a primary partition..
One word of caution is called for at this point. When using Disk Management Tool, in case you don't create the new partition, Windows Setup will do that for you during the installation. However, it is recommended that you use the first approach because the second one puts you at risk of losing that primary partition.
Part 4: Boot from Install Media and Start Installation
When the Windows 10 bootable disk is ready and the secondary drive is properly formatted, it is time to boot your PC from the USB drive and do a custom installation of Windows 10.
Step 1: Restart the computer and hit some special keys to enter into BIOS Setup page. The key is platform related and you can see the key is displayed on the screen for 2-3 seconds during startup. If you could not make it, then do a search on Google and find out the key for your computer.
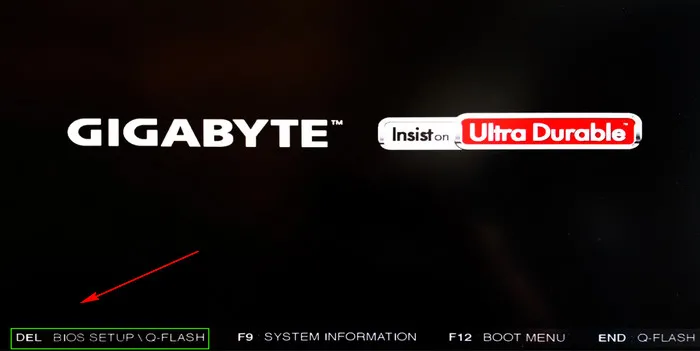
Step 2: Once getting into BISO settings, nagivate to Boot section and set USB as the boot device. Save the settings and restart the computer.

Step 3: When Windows Setup asks you where to install the OS (you'll see this when you choose custom installation), choose the new partition on the second drive, then follow the on-screen instructions to install Windows 10 on the new drive.
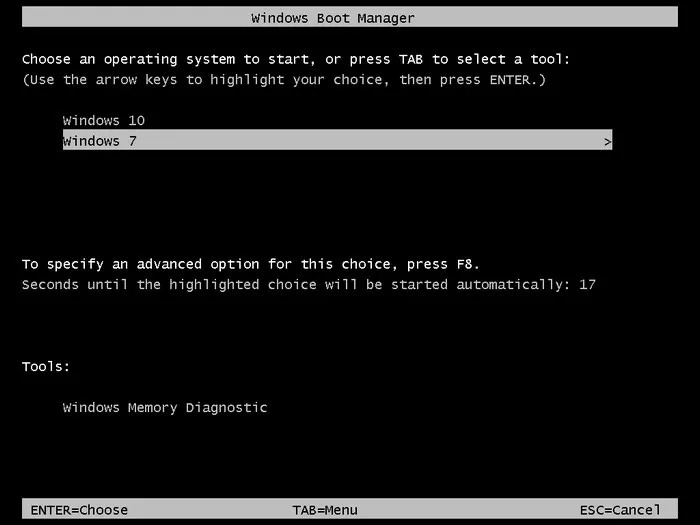
Step 4: When the installation is complete, restart your PC again. This time, you'll see an option to use either operating system. No matter which one you choose, you should be able to see and access both the primary and secondary hard drives. That means the data on both drives will be available no matter which OS you choose to boot from.
Part 5: Activate Windows 10
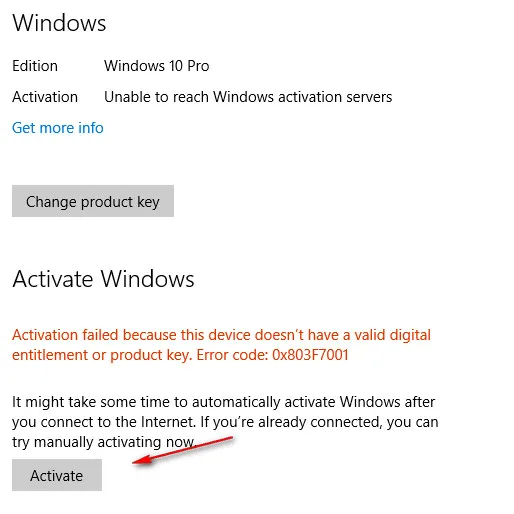
Under normal circumstances, installing Windows 10 on a new SSD or hard drive or a different machine will require a new product key to activate Windows 10 system. However, since you're doing it on a computer that's already running a licensed copy of Windows 10, that license will be used to automatically activate the new instance on the second drive. That's because your computer has already been registered on Microsoft's Activation Servers using a sort of digital signature or certificate.
To put it simply, the second instance of Windows 10 will be treated as a valid version as long as you're doing it on the same PC. There's no need to get into the complexities of this, but suffice it to know that your second Windows 10 will be automatically activated with the information stored on the Microsoft Activation Servers.
However, if the existing hard drive was running lower version of Windows such as Windows 8 or Windows 7, you have to purchase a new license to activate the new install of Windows 10 OS.
Summary
This is a lengthy article about installing Windows 10 on a second SSD or hard drive. It covers all the neccessary steps being involved in the entire process. From an expert view, this is not a rocket science and it is pretty easy once following the correct steps. Please kindly contact us or leave comment in below if you encountered any error for this task.

Petty is editor in chief at UUByte and writes various topics about Windows and Mac to help people make the most of current technology.