
Whether you are installing a fresh copy of Windows 11 on a new built PC, or upgrading the current computer from Windows 10 to Windows 11, it's always a good option to create a bootable Windows 11 USB and keep it handy for emergent cases.
In fact, there is an official software from Microsoft for making bootable Windows 11 installer and it is called Windows 11 Media Creation Tool. However, it has a few major drawbacks. For example, if you are installing Windows 11 on unsupported hardware, which is exactly what I did because I had an old laptop which failed to meet all the requirements requested by Windows 11 OS, then Media Creation Tool is totally useless in my case. This is because Microsoft does not officially support installing Windows 11 on unsupported hardware, such as no TPM 2.0 chip or unsupported CPU models.
What should you do in that case? Simple, go and get a third-party tool to create a Windows 11 bootable USB that supports to install Windows 11 on both supported and unsupported PC. There are a number of such tools available in the market, some of them are free to use, and then you need to pay for the others, so choosing such a tool can be confusing at times. Here in this tutorial, I will introduce a free tool that is extremely simple to use, and has many advantages over its competitors. It's called Ventoy.
What is Ventoy
Ventoy is a free and open-source tool that lets you create a bootable USB from ISO image files of various operating systems including the latest Windows 11 and other legacy OS images (Windows 10, Linux, Unix, etc.). The whole process is super user friendly and easy to follow, which you will find out in a short while. Also, it is extremely fast in comparison to other similar tools as it only loads end decompress ISO image at runtime.
The most noticeable advantage of Ventoy is that it can boot the computer directly from an ISO image file stored on a Ventoy USB.This means you can add many different ISO images in Ventory drive and boot from them on another computer with burning. So it is an ideal solution to create multiboot USB installer. You don't even need to extract and burn the ISO image like usual. And it supports both MBR and GPT partition style.
However, the best part about using Ventoy is that you don't need to reformat the USB drive to burn new ISO image files within the same USB drive. You can simply download the ISO image file, and then drag-and-drop them onto the USB flash drive where you have installed Ventoy. That's it. Next time you boot a computer from this USB, you'll be able to see this new ISO image listed as a bootable option, which is ready to be installed on this targe device. Isn't that great?
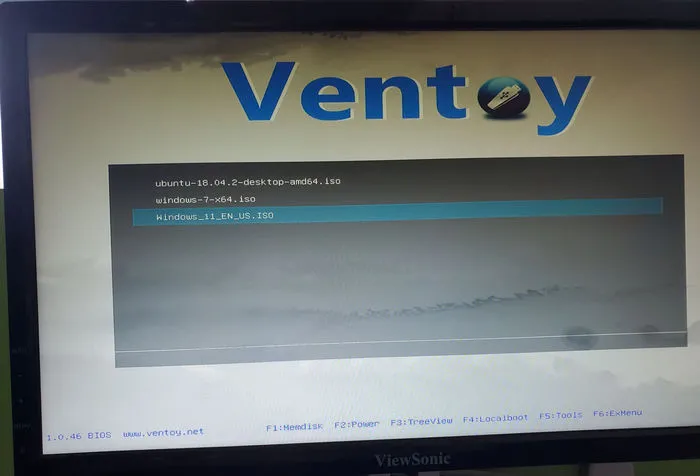
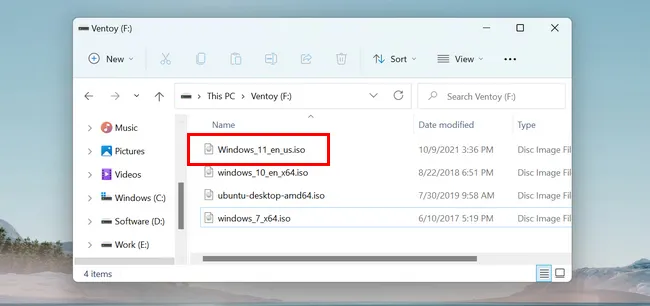
What's more, Ventoy is super customizable, doesn't destroy the data while updating itself, and you don't need to update Ventoy every time a new version of any of the distros is released. Saves you a lot of time this way, doesn't it? Which is why Ventoy is one of my most favorite tools to create a Windows 11 installation media. Below is a screenshot that shows a list of bootable OS images added in Ventoy USB.
Now let's see how we can create a bootable Windows 11 USB flash drive using Ventoy. There are two parts in this tutorial. The first part will show you how to create a standard Windows 11 bootable USB for installation on supported PC. This means the target PC meets all the requiremens of Windows 11.
The second part tells you how to create a bootable Windows 11 USB to be used to install Windows 11 on unsupported hardware.
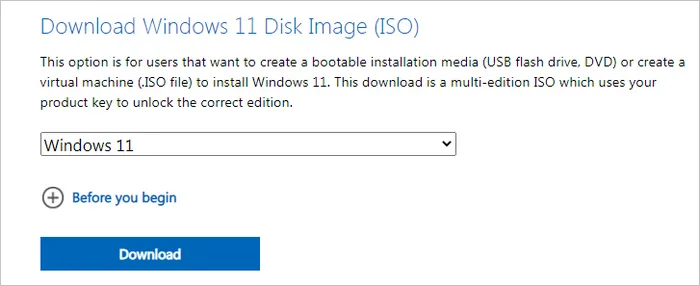
You'll need a blank USB flash drive for both the methods. Please ensure that these drives are blank, or you have taken a data backup since all the data will be deleted in both the processes. You'll also need a Windows 11 ISO image file which can be downloaded from this page.
Part 1: Create Windows 11 Bootable USB with Ventoy for Supported PC
First, we will go for the simpler situation where we have a PC which meets the minimum requirements to install Windows 11. Please check the follow tutorial to create a bootable Windows 11 USB using Ventoy for Windows 11 compatible computer.
Step 1: Get the latest version of Ventoy from the official GitHub repository. It is a portable application in ZIP format. Awhich you need to save on your computer and Unzip on your desktop.
Step 2: After download, unzip the file and connect a USB flash drive to the computer.
Step 3: Open the unzipped folder and double click on the Ventoy2Disk.exe file. This is the main file that would launch the program.

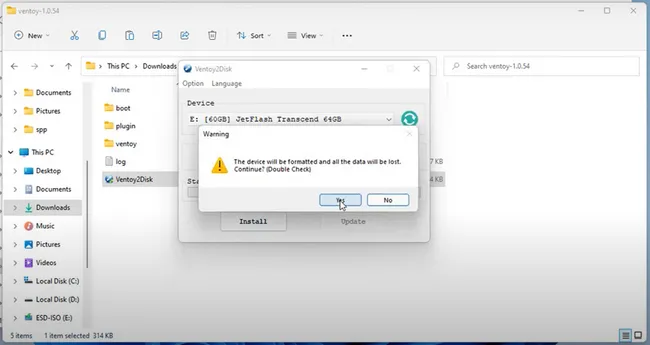
Step 4: In the main window of Ventoy, you'll be able to see the name of USB flash drive. If you are unable to view it, click on the refresh icon and then select your USB flash drive from the drop-down menu.
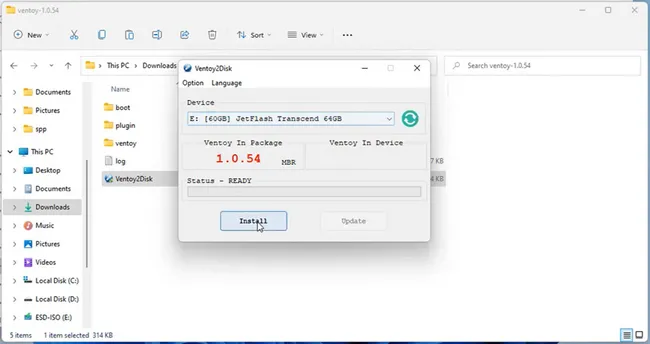
Step 5: Now click on the Install button. This will show you a prompt, twice, saying that it would delete all the data on your USB flash drive, click on Yes to continue.
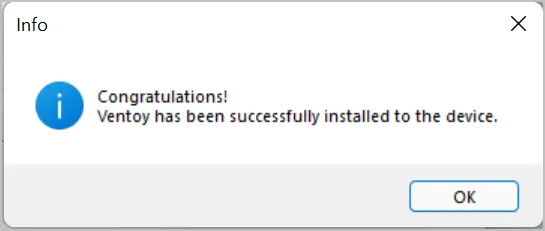
Step 6: Once done, you'll see a prompt saying Ventoy has been installed on the USB flash drive.
Step 7: Finally, close all the windows and copy paste the Windows 11 ISO image file you had downloaded earlier into the USB drive and that's it! In my example, I also add Windows 10, Ubuntu and Windows 7 ISO image into the Ventoy USB.
Step 8: Boot any computer from the Ventoy USB and you will see all the ISO images being listed as bootble options from Ventoy menu. Now, choose Windows 11 ISO to install Windows 11 OS on this computer.
So, we have created a bootable Windows 11 using Ventoy. As you saw yourself, it is a pretty straightforward process, and simple too. Now let's see how we can create a similar bootable Windows 11 USB for computer that does not meet the requirements for installing Windows 11.
Part 2: Create Windows 11 Bootable USB with Ventoy for unsupported PC
This method is quite similar to the previous method we used to create a bootable Windows 11 for computers for supported hardware, only with one small difference. So, I will not be repeating the similar steps, instead, you can refer to the previous method, such as download and install.
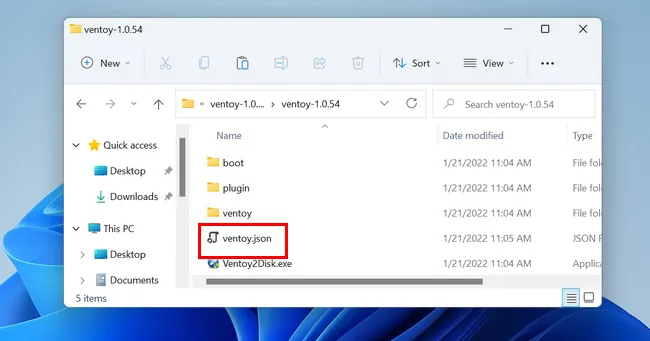
Step 1: Open the unzipped folder that contains the Ventoy2Disk.exe file. Open Notepad app and create a new file inside that folder named ventoy.json, whichis a configuration file for customizing and enhancing the performance of Ventoy.
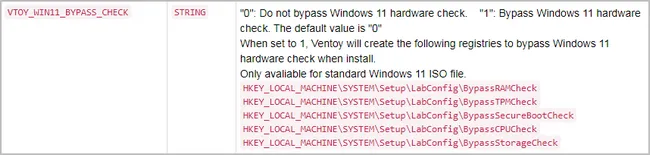
Step 2: In the Ventoy.json file, copy and paste the below code and then close the file after saving. You can also download this file from our website. Please pay attention to the last line. VTOY_WIN11_BYPASS_CHECK is a key to decide to bypass Windows 11 system check or not. The default value is 0, which means 'Do not bypass Windows 11 hardware check'. The value '1' indicates Ventoy will help you bypass Windows 11 check.
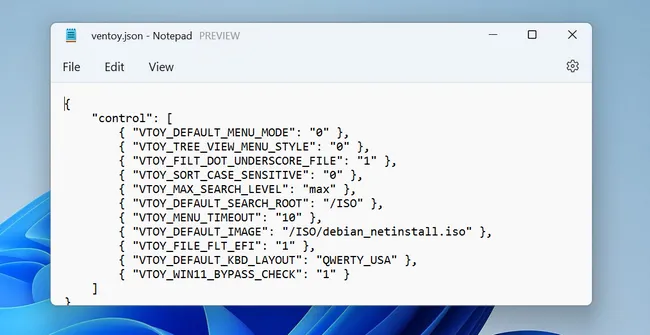
For reference, if this value set to 1, then Ventoy will create a few new registry entries to bypass Windows 11 RAM/TPM/CPU/Storage/Secure Boot check.
Step 3: Once done, double-click on the Ventoy2Disk.exe file to launch the app and follow the instructions from step 4 onwards from the previous method to create Ventoy bootable USB and put Windows 11 ISO into the USB drive.
Once the above steps are done successfully, you'll have a bootable Windows 11 USB flash drive using which you would be able to install Windows 11 on computers with unsupported hardware. That wasn't so difficult, was it?
The only drawbacks of Ventoy that I have found so far are that it does not have a dedicated support team to bail you out in case of any issues, and you must disable secure boot when booting from a UEFI computer. But those are very small drawbacks compared to the usefulness of this program.

Petty is editor in chief at UUByte and writes various topics about Windows and Mac to help people make the most of current technology.