
What is WinISO? A few people asked me about the program weeks agao. WinISO is a great ISO file management application for burning, creating, editing and mounting ISO image. However, it doesn't work well all the times. Users often report errors with file type detection, content extraction and many others. occasionally, your drive or disk may not be recognized by the software, or in extreme cases there may be an installation error at the very beginning, which means you can't use the application at all.
Whatever the reason, it's frustrating to pay good money for a piece of software and then find out that it doesn't serve the purpose at all. As one WinISO user said: "I have already wasted £20 on buying this WINISO which at the moment is as useful as a chocolate teapot." He said this after being unable to create an ISO file from a Blu-Ray disc, which should be a fairly simple process even with free ISO applications.
So what are the alternatives to WinISO If it doesn't work as promised? In this article, we've described a few free and one paid options as an alternative to WinISO. None of them is perfect, but you can try them to see which one works for you.
WinISO Alternative 1: Active ISO Burner (Only for ISO Burning)
This freeware application is recommended by many users that is relatively simple to use for burning ISO to CD/DVD. The burning utility is part of a family of applications from NTFS, the guys behind the NTFS file partitioning system. The software itself is easy to use, but with some disadvantages, as you'll see. Let's look at how it works:
Step 1: Download the Active ISO Burner software and the installer package from this location.
Step 2 : Open the application and add the ISO file to be burned. You can do this in the first section, which says "Source:".

Step 3 : Set a target optical drive and insert a writable disk into the drive. You have advanced settings when you click on Options, but don't do this if you don't have any experience handling ISO files. Just leave all the settings on their default values and click on Burn.
You may need to validate the disk to see if the files were burned properly. At times, files inside ISO files tend to get corrupted, which means the disk you created is useless. Another worry is that if you select the box for "Erase Read-Write Media", you may end up wiping out data that your disk might already contain.
Cons:
- Only ISO burning available.
- Not support burning ISO to USB drive.
- Never being updated for years.
WinISO Alternative 2: UUByte ISO Editor (Fully Replaceable)
Active ISO Burner is a great application for burning ISO to DVD and Blu-ray disc but it doesn't support USB sticks as mentioned above. Honestly, USB is more popular than DVD nowadays and a lot of computers don't come with a DVD drive. In addition, there is no other ISO functions available such as editing, extracting or creation. So the second alternative being suggested is called UUByte ISO Editor, a full ISO toolkit for all sorts of operations.
Key Features of ISO Editor
- Easily burn ISO to USB, CD and DVD.
- Create bootable USB or DVD to fix system issue.
- Extract ISO file to local folder in a minute.
- Powerful ISO editing (add, rename or delete files from ISO).


Step 1: Install and Run UUByte ISO Editor
Please first download and install UUByte ISO Editor from this page. Then open the program and you will see five tabs on the main screen. Each tab represents one action for ISO manipulation.
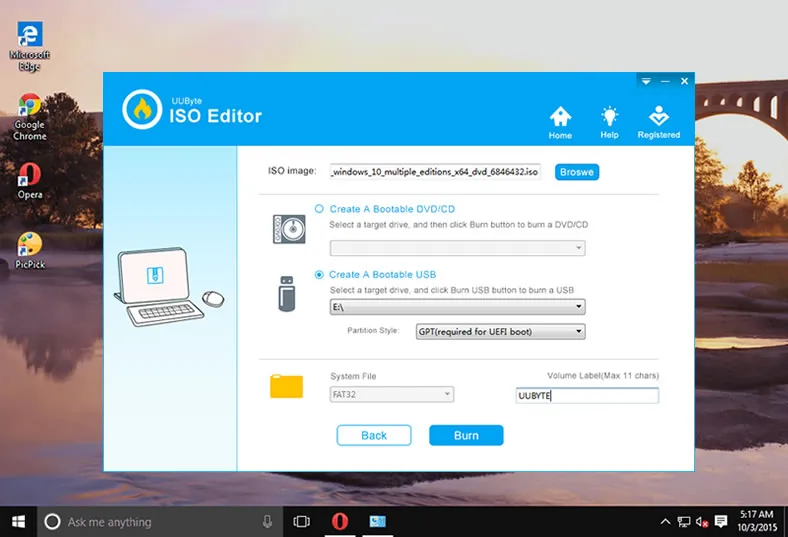
Step 2: Choose a Target Action
You can burn, extract, edit, create ISO image within the program as weel as disc copying. Taking burning as an example. Click on "Burn" button on the main interface. Then you will be lead to the next window. Now load ISO image file from computer and insert a disk to the computer. Finally click "Burn" button to start the ISO burning task.
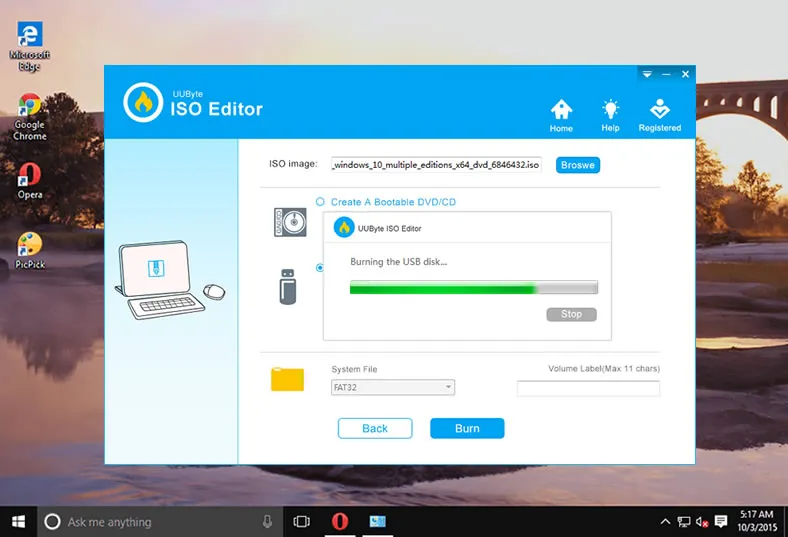
The steps are almost the same for other operations. The interface is very clean and easy to understand. Just select the function and follow the on-screen instructions.
WinISO Alternative 3: CDBurnerXP (For Burning and Copying)
This is quite an old utility that was originally used with Windows XP, hence the name, but it does support later versions of Windows as well. It's not very complicated to use, but since the software is really old, it might not always work on latest Windows version. Errors such as disks or ISO files not being recognized or files not being burned properly are quite common. If you don't know your way around ISO files, this could be a problem. Nevertheless, it's something you can definitely try.
Step 1: Download the application to your desktop and launch it. You'll see an Actions Selection screen, where you must select Burn ISO Image and click on "OK".
Step 2 : When the interface opens, it will look a little cluttered. That's because various features and functions have been added over time, but the layout has pretty much remained the same for years. From the upper-right-hand window, select the file you want to burn. You can navigate folders on the left panel. Now drag and drop that to the right-bottom window.
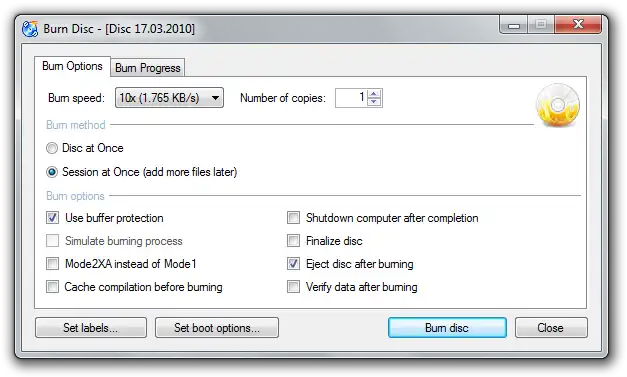
Step 3 : In the middle, above the left-bottom panel, you'll see a Burn option. Click on that.
Step 4 : An options window will pop up, where you can choose between Leave Disk Open or Finalize Disk. The first option can only be used with a RW CD, so select the second one if you're using a writable disk. There is also an option for advanced settings, but you can ignore that.
Your bootable disk will be ready in a few moments. Unfortunately, you can't check if everything is okay unless you mount it, and you can only do this natively on Windows 8/8.1 and Windows 10. Otherwise, you'll need an ISO disk mounting utility to validate the files.
Cons:
- Can't make bootable USB from ISO.
- Very difficult to figure out general settings.
WinISO Alternative 4: Nero Burning ROM
This is one of the most popular ISO burning utilities out there, but it does come with its own set of problems, we we'll show below. The software itself has been around for a long time, and there's even a 2018 version available. That means security updates will be present, and even users of older versions can upgrade to the latest version.
Step 1: Download Nero Burning ROM and activate the license.
Step 2 : Insert a blank disk into the drive and launch Nero Burning.
Step 3 :The wizard will give you step by step instructions to set up the software. If you're unsure of any setting, you can refer to the software's help manual once the setup is done. Users find this useful because there are several burn parameters that novice users may not be comfortable with. If you follow the wrong steps and don't change the settings later on, it could lead to several different types of errors.
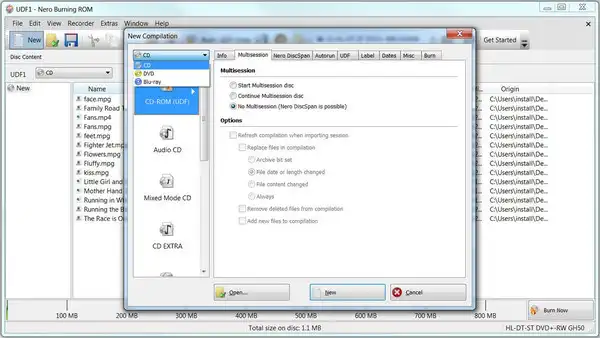
Step 4: In the File menu, you'll see Burn Image. Click on that option.
Step 5 : In the popup dialog box, navigate to your ISO file and click on it, then click on Open. Click on Burn to initiate the ISO burning process. When complete, remove the disk and shut down the application.
Cons:
- Expensive for a single license ($55).
- Not easy to get started for normal users.
- Bad customer support.
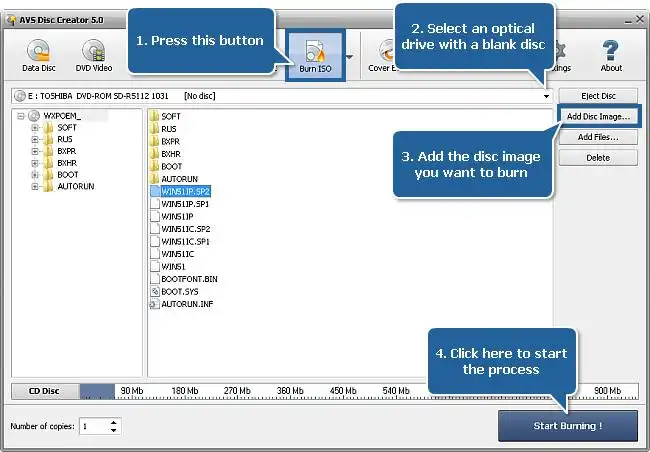
WinISO Alternative 5: AVS Disc Creator
This utility works well with most Windows versions, but you may need to know a little bit about burn settings and ISO burning in general to ensure that you don't end up with an error that prevents you from burning your image files to disk. There are several other functions in this software, such as creating ISO images and writing Blu-Ray data, but for our purpose, let's look at how to burn an ISO image to a disk.
Step 1: Download AVS Disc Creator to your PC and launch the application.
Step 2 : In the toolbar, you'll see an option called Burn ISO. Click on this. Now insert a writable disk into the optical drive. If you have multiple drives, use the dropdown in the Drive Selection list to pick the right one.
Step 3 : Make sure that the CD Disc Meter at the bottom shows adequate space on the disk to burn the ISO file, or you'll get an error later on.
Step 4 :On the right side, click on the option that says 'Add disc image…'. When the explorer opens, navigate to your ISO file, select it and click Ok to add it to the program.
Step 5 : Go into the Settings section by clicking on it, and check if all the burn settings are as you want them. You can also make multiple copies of the disk, in which case select the number in the relevant box. You will be guided to insert another disk when this one has been burned.
Step 6 : Finally, click on ‘Start Burning!' and the process will be initiated. You will need to review the burn settings once again before the burning starts.
Although this looks like a straightforward software, there are a lot of subtleties you need to be aware of. For example, if you change any of the settings before burning, you may end up getting a disk that doesn't work for your purpose or has compatibility issues.
Cons:
- Only support burning DVD and Blu-ray disc.
- No ISO editing features.
- Lowe success rate for creating bootable disc.
Summary:
Though it looks straightforward, if you look at the Nero forum, you'll see a lot of people reporting different types of errors with the software. Some of the common ones are installation and upgrade problems, user unable to launch program, serial number validation when activating and so on. Even if it works, you might have other issues like burn process failing, dual layer burning errors for Blu-Ray, etc. If your ISO file is corrupted or damaged in some way, you won't get an alert that something is wrong. This could cause a wastage of disks before you discover the problem. So UUByte ISO Editor is a better way to go with for ISO management.

Petty is editor in chief at UUByte and writes various topics about Windows and Mac to help people make the most of current technology.