
NTFS stands for New Technology File System, which was specifically created for Windows OS to solve the issue with FAT32 file system. If you now have a Mac machine and want to read or write NTFS drive, then it is not possible to do that by default as NTFS is not natively supported by macOS.
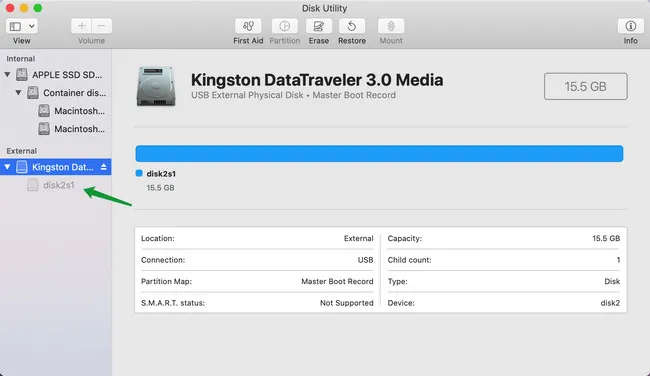
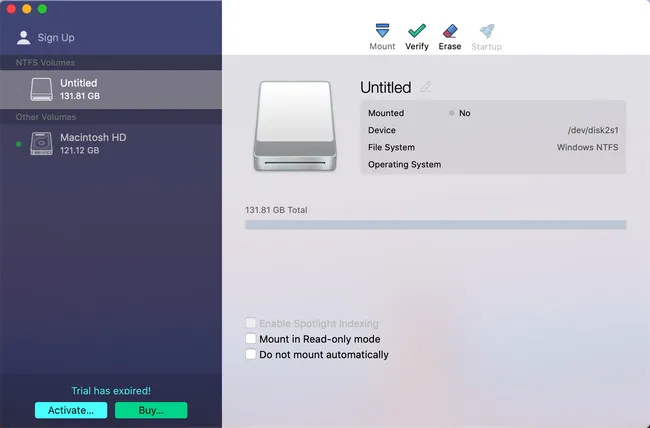
When you plug a NTFS removable drive on Mac, it won't show up in Finder sidebar as normal because the partition is not mounted, which is grayed out in Disk Utility app.To fully read or write NTFS drive on macOS, you need a special software to unlock this limitation.
On modern Macs, you can only open and view NTFS drive but you cannot write or modify it at all. However, the process of opening a NTFS-formatted drive is not straightforward to Mac users as you might need a little help from third-party solutions. In this guide, we are going to show you how to open NTFS drives on your Mac for further reading and writing.
Notice: For Apple Silicon Mac (M1), please choose Tuxera NTFS or Paragon NTFS software instead.
Method 1: Write NTFS on Mac with NtfsGeeker
NnfsGeeker is a lightweight app that allows Mac users to mount NTFS external drives as a writable volume on their Mac. The tool features a simple, easy-to-use interface and sits on your Mac menu bar, thus providing a quick way to mount or unmount NTFS drives as read/write without damaging your data.
Mounty now supports macOS Sonoma and runs smoothly on the latest version of macOS. The coolest part is that it is super easy to use and does not contain any malware or ads.
Step 1: Download and install NtfsGeeker on your Mac. After that, open the app from the Launchpad.

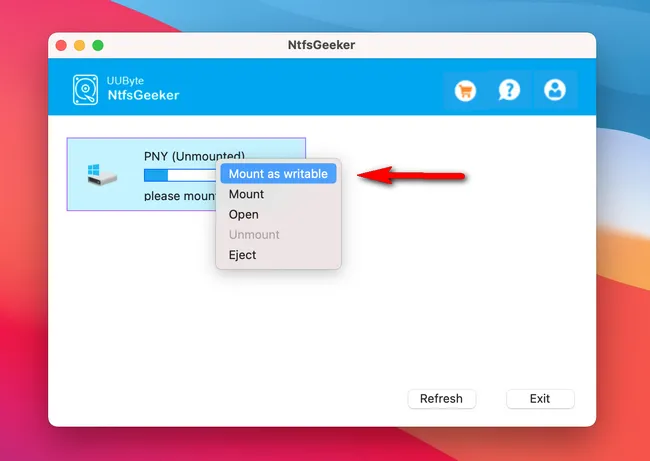
Step 2: Connect a NTFS drive to Mac and the tool should detect and prompt you to re-mount with read/write access via a notification on your machine.
Step 3: When everything is ready, NtfsGeeker will start mounting your drive to make it readable or writable on your Mac machine. Once it is done, you will be able to copy, move, create or delete files on your drive.
In short, NtfsGeeker is a good option when it comes to mounting or unmounting a NTFS drive on Mac. It can stand in line with most of the paid NTFS solutions after hours of testing. Currently, it is one of best NTFS for Mac software you can find out from the Internet!
Microsoft NTFS for Mac by Tuxera
Microsoft NTFS for Mac by Tuxera is a premium solution that allows you to open, read or write NTFS files on a Mac at a fast speed. Basically, Tuxera does the same thing as Mounty does but comes with more features and is not free. In fact, the tool costs $31 for a lifetime license, a good deal for what you will be getting from the tool.
Tuxera now supports macOS Big Sur, but it sometimes crashed during our test. We hope the upcoming patches will address the performance issues.
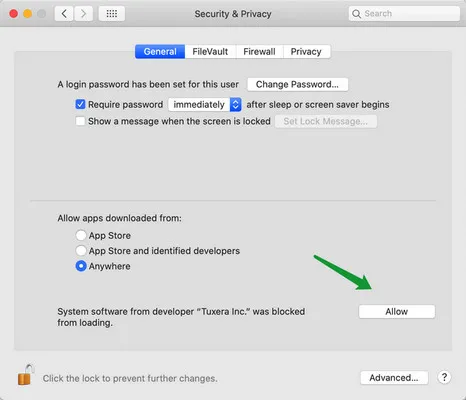
Step 1: Download Tuxera NTFS software (shown as Tuxera Disk Manager) and follow the installation wizard to install this app on your Mac as usual. At the end of process, you should allow Tuxera Inc system plugin in System Preferences -> Security & Privacy. Once it is done, your Mac will be restarted.
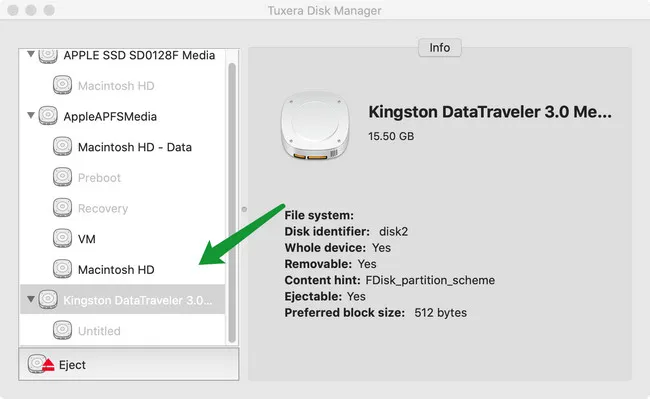
Step 2: Plug Windows NTFS-formatted drives on your Mac. From here, the tool will automatically detect your drive. After that, you can create a new folder on your NTFS drive or drag and drop files from your Mac to the drive.
Step 3: If you are using a certain app like Photoshop, you can easily save your photos from the app directly to the drive. Once you are done, safely unplug the drive and insert it into a Windows or Mac and you can see all the files in the NTFS drive.
Paragon NTFS for Mac
Paragon NTFS for Mac ($19.95) is one of most popular tools for reading and writing an NTFS drive on Mac. It allows Mac owners to write, edit, copy, move and delete files on Microsoft NTFS volumes from their Mac while preserving the content. What sets it apart from Tuxera lies in speed, as it is much faster than its competitors.
The tool offers a ten-day free trial and works on the latest version of macOS, Big Sur. It also provides unlimited read/access to any NTFS-formatted drive from your Mac machine. Other features include the ability to disable or uninstall NTFS drives, repair, and format drives.
Step 1: Download and install Paragon NTFS for Mac.
Step 2: Once you have it installed on your device, connect a NTFS drive onto Mac and restart your Mac.
Step 3: When your Mac finishes booting up, your drive should show up in the NTFS for Mac and you can open it for reading and writing.
NTFS-3G (Command Line)
macFuse is an open source library for mounting NTFS partitions in read-write mode on Mac. This command line based utility may be a little bit confusing to some folks, so make sure you follow our guide below. You also need Apple's command line tools installed on your Mac to make this work.
To do this, open Terminal > > Applications > Utilities and run the following command:
xcode-select –install > Click Install
You need to install homebrew on your Mac if you have not already done so. To do this, run this command:
/usr/bin/ruby -e "$(curl –fsSL https://raw.githubusercontent.com/Homebrew/install/master/install)"
Hit the Enter button and type in your admin password to download and install Homebrew on your Mac. Now, you need to install ntfs-3g. To do this, run this command in Terminal:
brew install ntfs-3g
Once you are done, run this command from the Terminal to create a mount point at /Volumes/NTFS on your Mac:
sudo mkdir /Volumes/NTFS
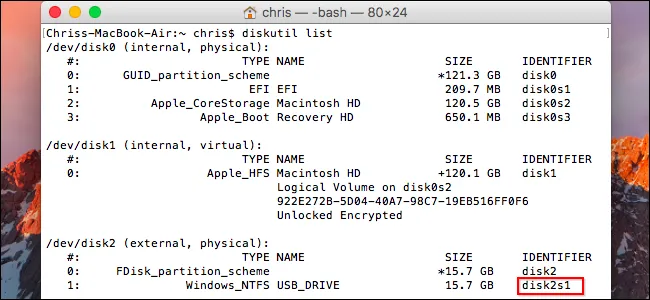
Step 3: Connect NTFS drive onto Mac and run this command: diskutil list and locate the partition with the Windows_NTFS file system. It should be something like /dev/disk2s1 (pic below).
You now need to unmount the NTFS first. To do this, run this command:
sudo umount /dev/disk2s1
Now you can mount the drive using this command:
sudo /usr/local/bin/ntfs-3g /dev/disk2s1 /Volumes/NTFS -o local -o allow_other
That's it! Your drive now becomes a normal mounted drive on your Mac. After that, you read file from or write file to this NTFS drive now!
Summary
For normal cases, Mounty is fairly enough to help you open a NTFS drive on Mac. Most importantly, it is free and no other annoying pop-up. However, if it failed to work, then we suggest giving a try on Paragon NTFS for Mac software, which is an amazing user interface and easy to operate. Lastly, if you prefer command line option, then NTFS-3G should be your best choice for that.

Petty is editor in chief at UUByte and writes various topics about Windows and Mac to help people make the most of current technology.