
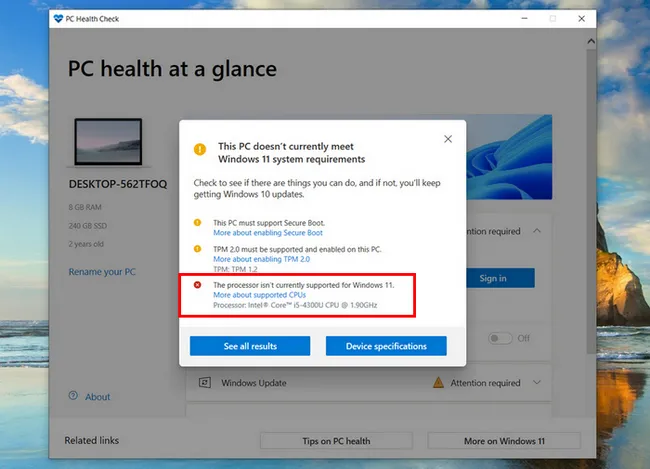
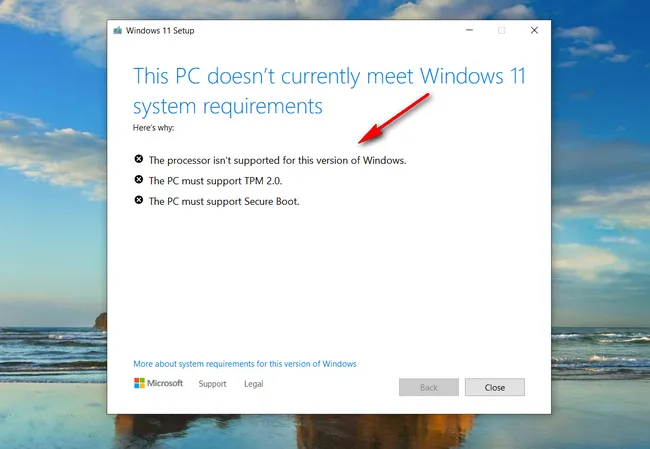
Windows 11 is free, and Microsoft has put a hefty price tag on it by giving it a long list of hardware requirements. If your computer fails to comply with those requirements, Windows 11 simply refuses to get installed. Below is a screenshot taken from my Lenovo laptop, showing the processor isn't currently supported for Windows 11 and unable to install Windows 11 on this device.
The good news is that there is a catch to fix it. This means even the computer has an unsupported CPU, there is a workaround to help you bypass CPU check and install Windows 11 successfully on unsupported hardware. Read more if you want to know the details.
Table of Content:
CPU Requirement for Windows 11
To upgrade to Windows 11 from Windows 10, your PC has to meet a list of requirements. Some of the most notable ones are:
- Minimum 1 GHz of dual-core CPU.
- 4 GB of RAM.
- 64 GB of free space.
- TPM 2.0 chip.
- UEFI compatible motherboard.
- Secure Boot
However, these are the minimum requirements. To be honest, its not easy to meet most of these requirements if you have an old computer, especially for supported CPU, which should be Intel Core 8th-Gen or later, AMD Ryzen 3 2rd-Gen or later. The full supported list of CPU can be found in here (Intel and AMD).
However, many online users reported that they had installed Windows 11 on computers which do not support some or any of these requirements, and yet, Windows 11 runs fine on their system! So, even if your computer has an unsupported CPU, it is still possible to install Windows 11 on it and take it for a ride.
It has been seen that even if your computer has an Intel i5 (3rd, 4th, or 5th gen), or an Intel i7 (6th, or 7th gen) CPU, your computer will still be able to install Windows 11 on those unsupported CPUs even if they are not on the official compatibility list.
Get Windows 11 ISO Image File
To run Windows 11 on a computer with unsupported CPU, the first thing you need to do is to create Windows 11 installation media. For that, you need 3 things: Windows 11 ISO image file, a blank USB flash drive and a utility to make bootable USB from Windows 11 ISO image file.
If you have a Windows 11 ISO at hand, please move to next section. If not, please follow the steps in below to download Windows 11 ISO file from Microsoft.
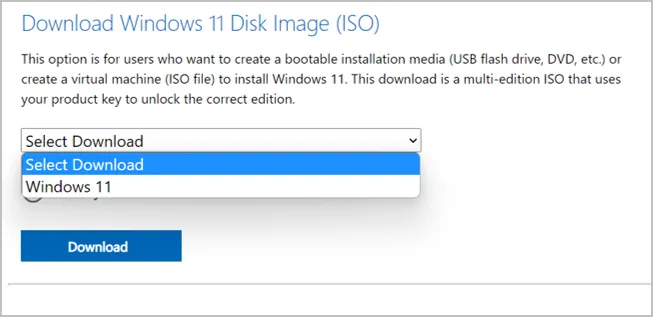
Head over to Windows 11 Download page from Microsoft website. Scroll down to the section that shows Download Windows 11 Disk Image (ISO). Now, select Windows 11 from drop-down list, and then click on the Download button.
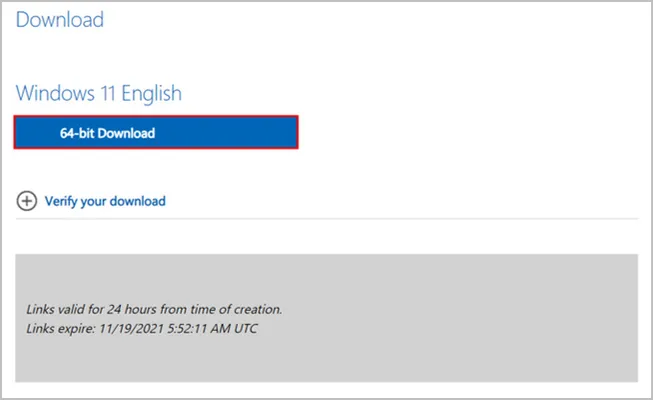
A new dropdown will come to view asking you to select the product language. Here, we have selected English. Then click on Confirm.

Now you'll be able to see the Download section. Click on the button that says 64-bit Download and save the Windows 11 ISO image file on this computer.
Prepare for a Windows 11 Bootable USB
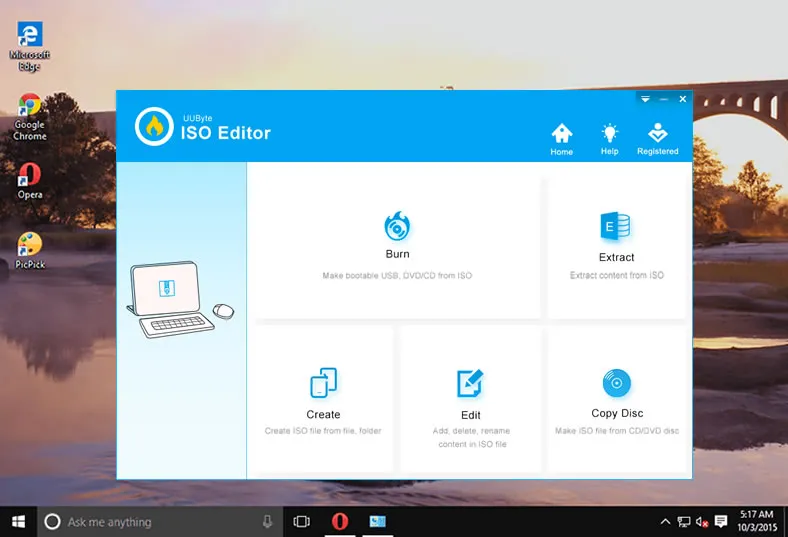
After ISO download, the next step is to make a Windows 11 bootable USB. In this part, we will be using UUByte ISO Editor to create a bootable Windows 11 USB since it is one of the easiest utilities for this task. You won't be able to find any alternative for simplicity. The full tutorial is convered in the following content.
Now, download their ISO Editor and install this app on a PC or Mac.


fire up ISO Editor utility from desktop shortcut and insert the blank USB flash drive into the computer. There is Burn tab on the screen. Please click on it to move to the next step.
On the next window, click on the Browse button and select Windows 11 ISO image file that you downloaded, then click to enable Create A Bootable USB menu and choose the blank USB flash drive from drop-down list. Under Partition Style, choose MBR and provide a meaningful name to this USB flash drive by writing it in the Volume Label text box.
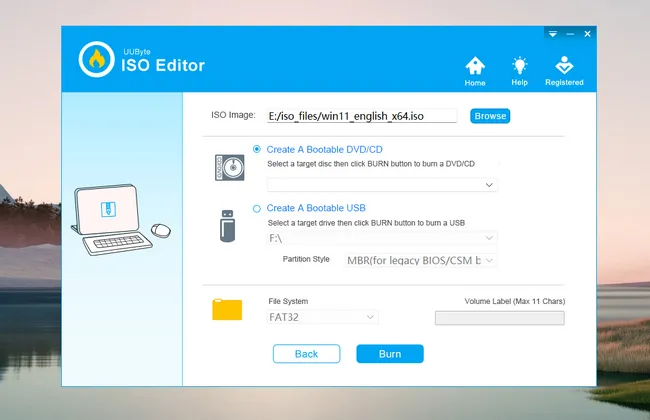
Finally, click on the Burn button to start the process. This will take 7 minutes or so. Once done, you will have a bootable Windows 11 USB flash drive.
Create Registry Hack File
Normally, you will get this error (This pc doesn't currently meet Windows 11 system requirements) when you are trying to install Windows 11 on unsupported CPU.
To bypas CPU check, we need to modify the registry entries by importing a new registry file into Registry Editor during installation. For your convenience, you can download this file from UUByte website without the need to create it by your own.
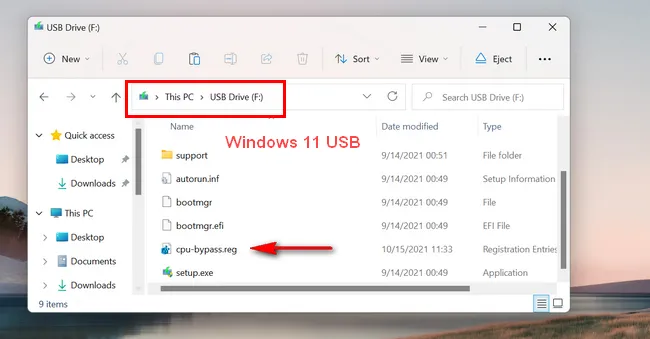
Please click this link to download zip file of registry hack file and save it on the computer. After download, unzip the file and you will get the prepared reg file named cpu-bypass.reg.
Now, copy this registry file to Windows 11 bootable USB flash drive in the same location where setup.exe file is located. That's it, now moving on to installing Windows 11 on unsupported CPU!
Install Windows 11 on Unsupported CPU Using Registry Hack
All the preparation work has been done. Now it is time to install Windows 11 on unsupported CPU by applying registrick hacks. This will bypass hardware check during Windows 11 installation after importing registry file we downloaded earlier.
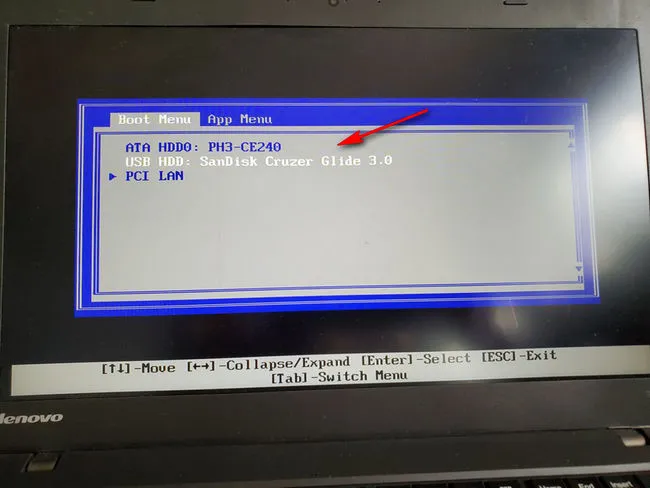
Boot the computer from Windows 11 USB flash drive and open Boot Menu. It will show all bootable devices connected to the computer. In my case, it is SanDisk Cruzer Glide.
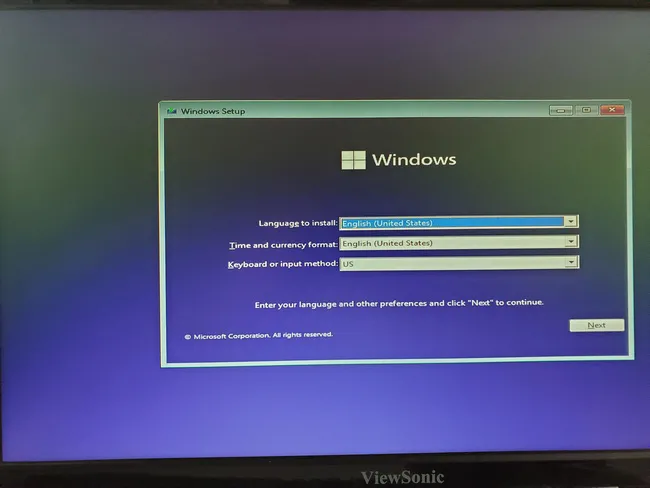
Wait about one minute, you will see Windows 11 setup window where it would give you the option to choose the language and time zone settings. Once you have made the necessary selection, click on Next.
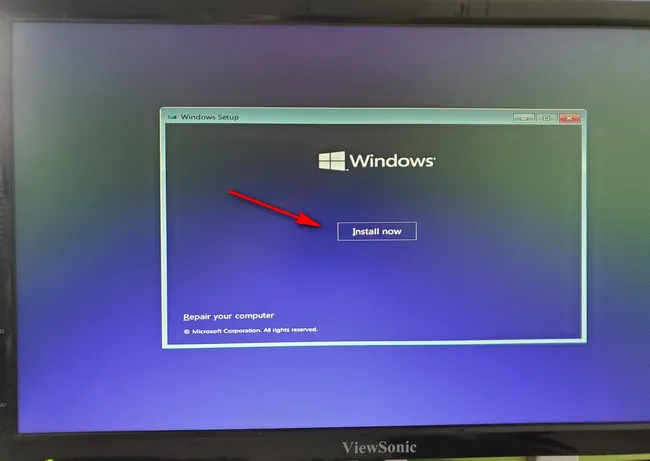
Now you are at Install Now screen.
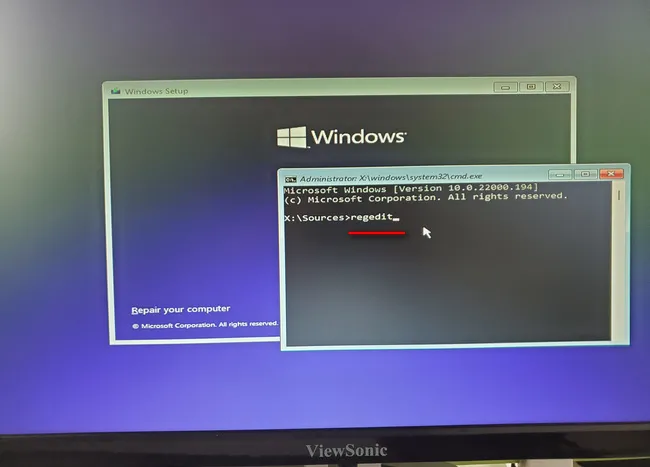
Press the two keys ( Shift + F10) simultaneously and this will open a Command Prompt window. Type "regedit" to run Registry Editor from there.
Click on File menu at upper left corner, and then choose Import.
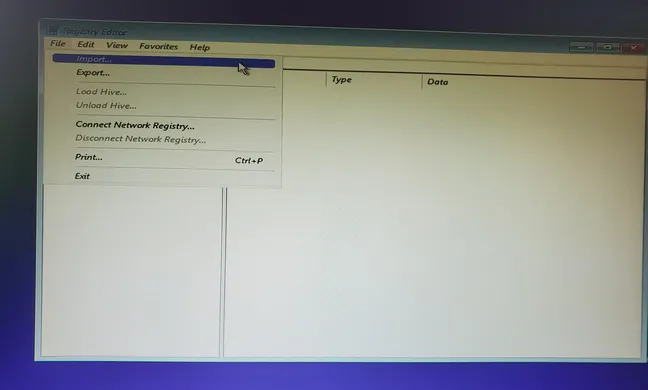
Now browse and select the cpu-bypass.reg file, then click on Open. This should show a pop-up confirming that the registry keys have been added successfully.
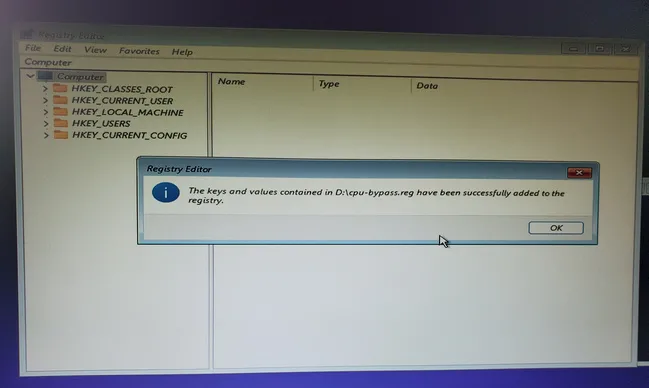
Close Windows Registry Editor as well as Command Prompt and you will be back to Install Now window. Click on Install Now button and then follow the instructions on the screen to continue installing Windows 11 on this computer with unsupported CPU. You will get no more error this time.
The Bottom Line
From what we have learnt, it is fully possible to install Windows 11 on unsupported CPU, you can give it a spin now. However, this machine won't receive Windows 11 update and it might run into issues on unsupported hardware. Also, remember to keep the bootable USB handy, just in case you need to install Windows 11 on another computer in future.

Petty is editor in chief at UUByte and writes various topics about Windows and Mac to help people make the most of current technology.