
Linux has been around for years, serving a reliable operating system for both newcomers and professionals. What sets it apart from other OS out there lies in its open-source ecosystem, which is ideal for testing purposes. Linux includes multiple distributions that are designed to suit all your needs.
Kali is one of the most popular Linux distributions aimed at security testing. Like other Linux distributions, Kali contains hundreds of tools than can perform various security tasks. The best part is that you can create a bootable Kali Linux USB on Windows and macOS, so you can boot from it without installation. And we will show you how in the section below.
There is no built-in Windows tool for creating a bootable USB drive of Kali Linux, which is why you are going to need a little help from a third-party tool. In reality, there are tons of service providers that are willing to create a bootable Kali Linux Live USB, but keep in mind that not all of them can be trusted, as there are a lot of spammers out there. Some of them may use some kind of hacking software to get the job done, which results in data loss.
Note: Make sure you have downloaded Kali Linux ISO. If not, please grab a copy from Kali Linux official download page.
LiteBoot
There are tons of tools and software available for making bootable Kali Linux USB. But not all of them are easy to get started. Hence, we sort out the available tools and list them in order based on the functions and user friendly.
UUByte LiteBoot is one of the top options when it comes to creating a bootable USB drive. The coolest part is that UUByte Boot Pro is not just about making a bootable USB from ISO image file, as it can do a lot more things. One such thing is the ability to backup and restore the entire system. You can also download Windows ISO within the tool thanks to a built-in download engine. Besides Linux, it is also capable of creating bootable Windows USB from ISO image.
Step 1: You can download UUByte LiteBoot from above link. The program will be opened automatically when the installation process is finished. After that, the main user interface appears on the screen.
Step 2 : Insert an USB drive into the same computer. It is recommended there are at least 8G free space on the USB. Before the creation process, you should make a backup of files sitting on the USB drive.
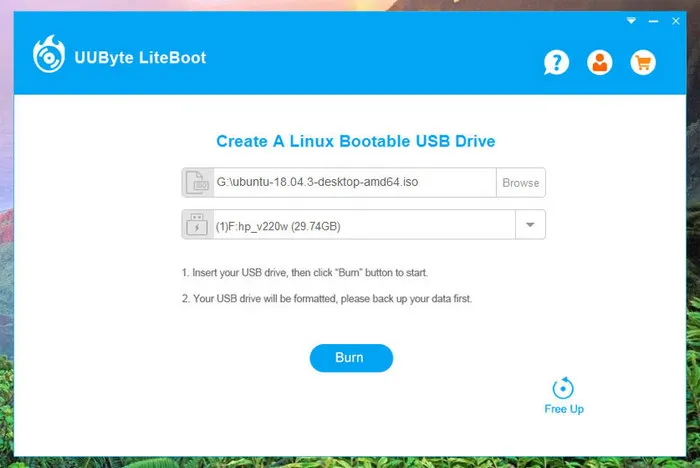
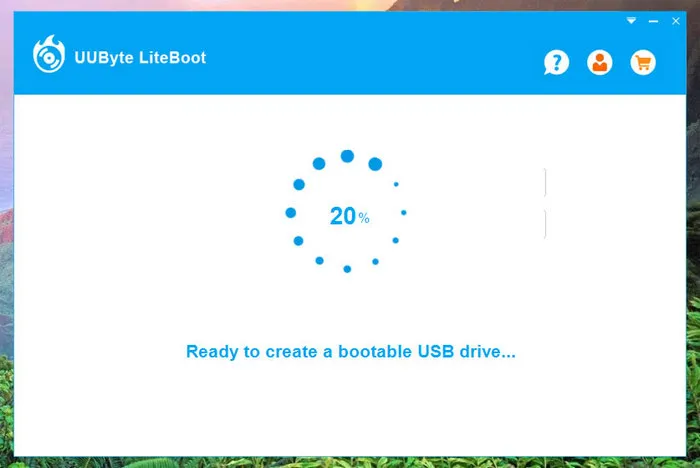
Step 3: Once you are done, click 'Browse' button to load Kali Linux ISO file into the program. And you will be asked to format USB drive before proceeding. When you are ready, hit the 'Burn' button to start the ISO to USB burning process.
Step 4: The final step is to change boot order in target computer and install Kali Linux on it by following the on screen instructions.

We have tested UUByte LiteBoot on several machines with different Linux Distros and the success rate is 100%. UUByte Boot Pro is a great burning software for both regular and professional users. It is cheap, fast, and reliable for creating bootable Live USB.
Easy2Boot
Easy2Boot is another great third-party solution that lets you create a bootable Kali Linux drive. With Easy2Boot, you can create a bootable drive from any ISO image file out there. Like UByte ISO Editor, Easy2Boot includes certain advanced options, including the ability to generate boot loaders and menu files, and set a password for your bootable CDs or flash drives.
Step 1: Download Easy2Boot setup.exe from official website and double click the file to install it on a computer. The setup is a compress file and the installation wizard only unzip the file and extract the content to a local folder. In default, the path is pointed to desktop.
Step 2: When you have the tool installed on your computer, open it and insert USB into your machine. Click 'Refresh' button if the USB drive is not found.
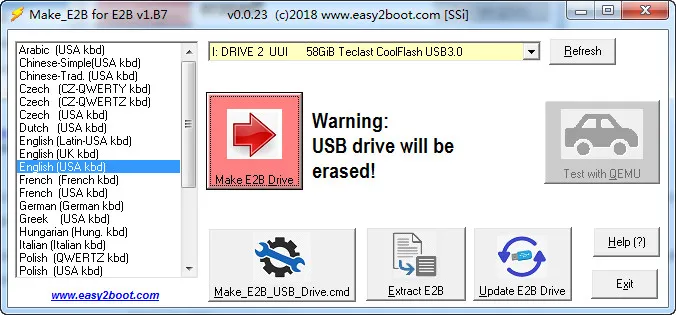
Step 3: From the main user interface, click on 'Make_E2B_Drive_cmd' . Now the command prompt window pops up and follow the on screen to select USB drive, format the USB and copy booting files to USB. Wait for the process to be completed.
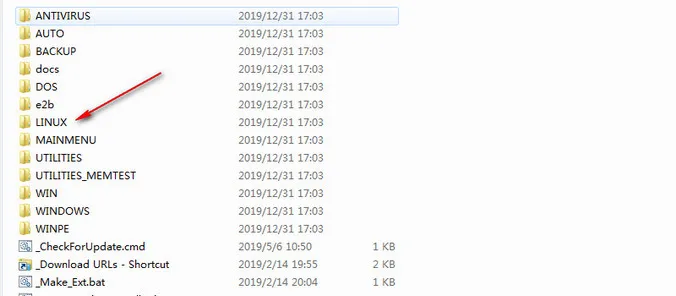
Step 4: The command prompt box will disappear automatically when the configuration is finished. Now move to USB drive in File Explorer and navigate to _iso folder. From there, copy the Kali Linux ISO image under LINUX Folder.
Unlike UUByte Boot Pro, Easy2Boot is a multiple boot program that supports booting multiple Linux OS on a single USB drive. This is a great for users who want to install different Linux operating systems. And they don't need to carry multiple USBs at the same time. However, it has issue with latest Linux kernal due to the delay of planned updates.
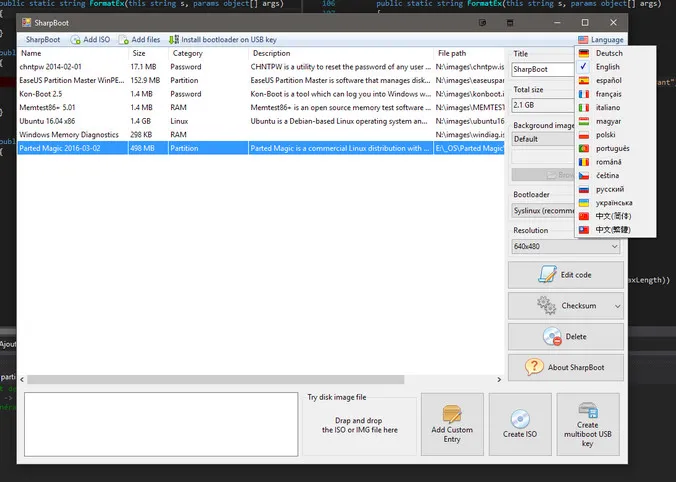
SharpBoot
If you are looking for a free solution, then give SharpBoot a try. With SharpBoot, you can easily create a bootable USB drive from all IOS files. The coolest part is that it is an open-source tool, which is ideal for developers. However, it has its own flaws which may annoy you. One such flaw is that it has not received a new update for three years. The last update came out in 2016 and included some bug fixes and performance stability.
Step 1: Download Shartpboot and open SharpBoot on your computer.
Step 2: Click 'Add ISO' button to locate the Kali Linux ISO image file you downloaded earlier. Now just simply drag the file and drop it into the user interface, and then hit the 'Burn' button.
Step 3: The tool will start burning Kali Linux ISO to desired USB drive and it becomes bootable after burning. You can now use the drive for Kali Linux installation.
SharpBoot is a complex software for creating Linux Live USB, but it only fits users with basic needs. If creating a bootable USB drive is all that matters to you, then SharpBoot is a solid option for you. However, it becomes unresponsive when using it on Windows 7 machine.
USBWriter
USBWriter is another open-source burning tool on the market. What sets it apart from SharpBoot is that it does not require an installation, meaning that it serves as a portable software that can run directly on your desktop. USBWriter is widely used to create a bootable USB drive from various Linux distributions, like Ubuntu, Fedora, and Kali. And the process is so simple.
Step 1: Unzip the tool yo downloaded from SourceForge. Click the .exe file to launch the tool on your machine and then insert a blank USB drive into the computer.
Step 2: Select the target ISO image file, then USB drive name, and click on the 'Write' button. If you don’t see your USB drive from the list, hit the Refresh button.
Step 3: The tool will start burning the ISO image file to the target USB drive you inserted into your PC. Once the progress bar goes to the end, it means Kali Linux Live USB is ready for use.

USBWriter is an simple option for regular users out there. It is free, trusted, and very easy-to-use. However, it lacks some important features that make its rivals more capable.
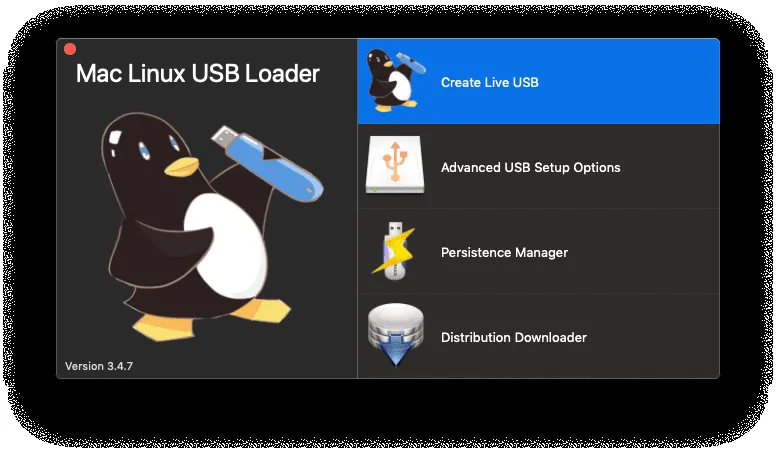
Linux USB Loader
If you now use a Mac machine, then give Mac Linux USB Loaded a try. This is a great burning option for all Mac models, which allows you to create bootable USB drives on Mac that contain a Linux distribution on your Mac. Mac Linux USB Loaded is not free as it costs $4, 99 to download. And the tool receives updates on a regular basis. Buy Mac Linux USB Loaded from here.
Step 1: When the download is finished, open it on your computer and then click on 'Create Live USB'.
Step 2: Select Kali Linux ISO image file and then choose USB drive name.
Step 3: Hit the 'Burn' button to start the burning process.
Mac Linux USB Loaded is one of the leading burning programs for Mac users. It is cheap and easy to use. However, one major drawback is that it is not stable in a modern macOS like Mojave or Catalina.
The Bottom Line
Creating Kali Linux bootable or Live USB is not a rocket science in 2020. The above ISO burning tools are great example that works on latest Windows and Mac. However, we suggest you are trying the tool based the order in this article. The front position is always a lot of easier and user friendly according to our test.

Petty is editor in chief at UUByte and writes various topics about Windows and Mac to help people make the most of current technology.