
Fedora is one of the most popular desktop Linux operating systems available these days. There are many advantages of using Fedora as the main workforce, like the fast boot, great virtualization, awesome graphics and, last but not the least, security. It providies the users with the latest software and driver updates and it has got one of the biggest communities in the world.
Due to its ease of use and features, many Windows and Mac users are switching to Fedora OS. Before you can do anything with Fedora, the first move is to create a bootable Fedora USB for installation. This souds easily but it does not work as expected if you chose the wrong software or followed the wrong steps. Below are 3 different approaches you can learn to create a Fedora bootable USB on Windows 10 and macOS.
Part 1: How to Use LiteBoot to Create Fedora Bootable USB on Windows 10
UUByte LiteBoot is a full toolkit to create bootable USB for installation. Currently, it supports creating bootable USB from Windows and Linux OS, of course including Fedora (KDE and GNOME). It has got tons of features like one-click installation, system backup, and restore. Besides the swift user interface, it just takes a few clicks to create bootable Fedora USB. It is also capable of freeing up USB drive after the installation procedure is completed.
Step 1: Download the official Fedora OS from their official Website. After the downloading is completed keep the file on Desktop for ease of access or in a folder of your choice. Now Download and install UUByte LiteBoot on a Windows operating system.
Step 2: Launch the software and then click on the "Browse" tab to import the Fedora ISO file and then insert a clean USB drive. The software will identify the USB drive automatically.
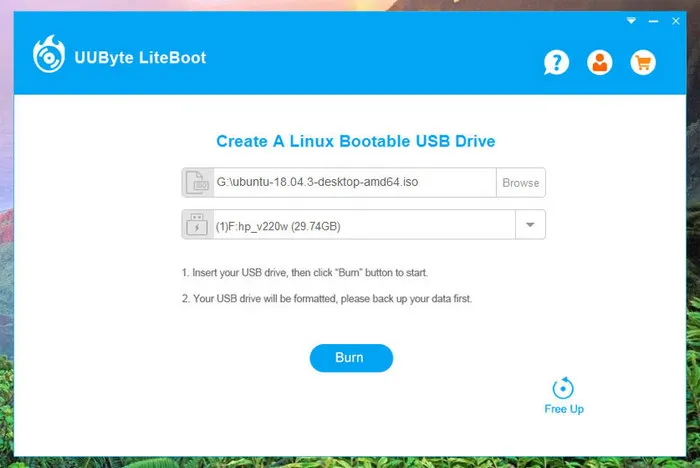
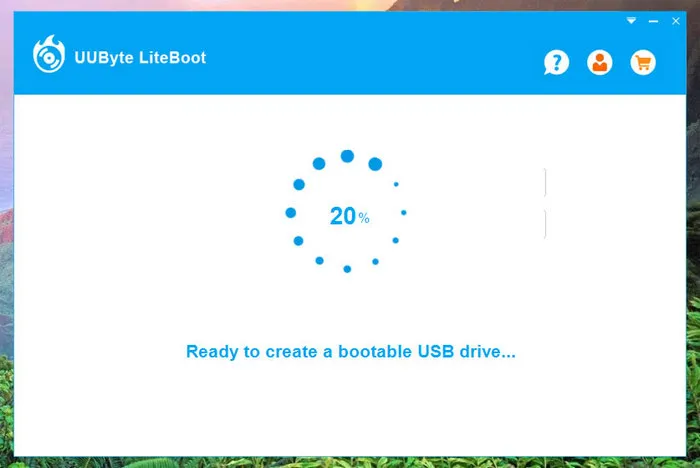
Step 3: That's it you are good to go. To start the burning process simply tap on the "Burn" button. It will just take a few minutes to complete. After completion, eject the newly created bootable Fedora USB drive.
Step 4: To install Fedora on a computer, you need to change the boot order in Boot Menu or BIOS. Once the computer boots from Fedora bootable USB, the installation will be started automatically.
UUByte LiteBoot also has a one-click USB clean up feature, which is very useful. Simply click on the free up icon at the bottom right to release the physical storage. It has been designed with a mind that not all of us are computer experts, so it has a very simple user interface and just takes a couple of minutes to create a bootable Fedora USB. Besides, it is a very lightweight software that doesn't take up too much space on your hard disk and even works on old systems.
Part 2: How to Create Fedora Bootable USB with RMPrepUSB on Windows 10
RMPrepUSB is another useful software that can help you create a bootable Fedora USB. The application is fast and the interface is self-explanatory. This software is updated regularly so make sure that you are installing the latest version. To follow this method to create a bootable Fedora USB, follow the steps below.
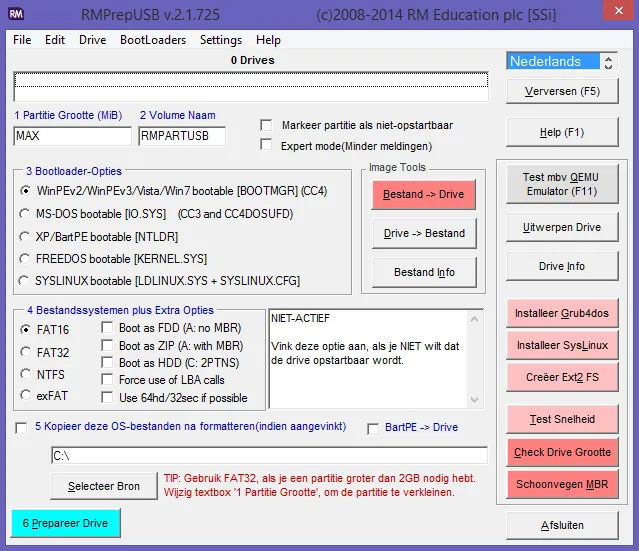
Step 1: Download and install the latest version of RMPrepUSB on your Windows computer and install a fresh USB drive. By default, the image tool setting is set for File to USB.
Step 2: Select the desired bootloader and then choose the file formatting system, which is below the "Boot Type" section.
Step 3: Now click on the "Prepare drive" button to initiate the process followed by the "Ok" button. That's it you have successfully created a bootable Fedora USB.
This method is good but requires you to have a good knowledge of drive partitions and file systems. Also, keep in mind that all the data will be erased if you are using a USB drive that has other files and applications.
Part 3: How to Create Bootable Fedora USB on Mac Using Terminal
Terminal is your Mac's built-in command line interface that can be used to create bootable Fedora USB. This method is a bit time-consuming but does the job efficiently. Follow the steps below to use this method to create a bootable Fedora USB for Mac. We are assuming that you have already formatted your Mac operating system.
Step 1: Launch the Terminal program and check where the Fedora ISO is located in Finder. Now, you need to convert the ISO file to a .IMG file. Use the hditul command to do it.
Step 2: Next, you have to identify the drive's mounted location so that Mac can use the correct drive. Use the command below to list all the connected drives.
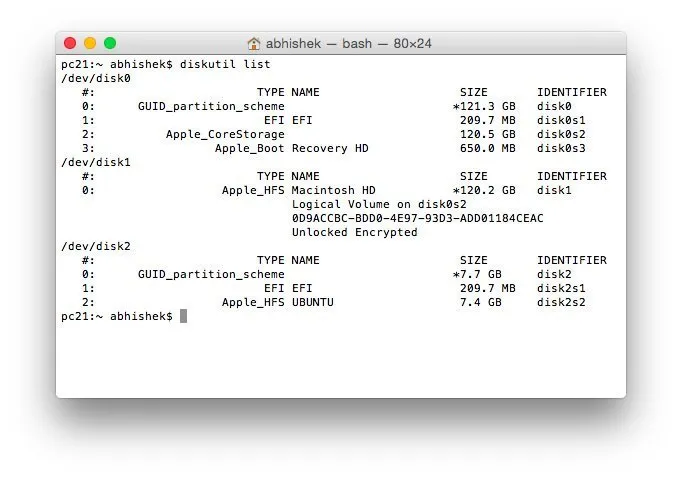
Step 3: You can identify the drive by its size or name. You need to take a note of it on the column under the IDENTIFIER. Now, simply unmount the drive by typing this command: "diskutil unmount Disk /dev/diskX". Replace the X with the disk number e.g. disk 2
Step 4: You have to write the image to USB drive by using the dd command. Make sure replace /path/to/newimage.img with the path on step 1. Now, authorize the step with admin password because sudo command is used here

That's it; your new bootable Fedora USB drive is ready to use. This method requires you to have a good knowledge of Terminal. If you typed any wrong command then your system might cause serious trouble, so make sure you are using the right command to burn ISO to USB on macOS or don't use this method at all.
Conclusion
You can try all the methods above to create Fedora bootable USB, but if you are looking for a software that is easy to use and less complicated than others, then opt for UUByte LiteBoot. It supports other Linux OS distributions like Ubuntu and Linux Mint as well as Windows OS.

Petty is editor in chief at UUByte and writes various topics about Windows and Mac to help people make the most of current technology.