
Virtual machine technology is now playing a very important role in both desktop and cloud computing fields. With a modern hardware architecture, the gap of actual performance becomes smaller and smaller. For many cases, it is recommended running a virtual machine instance instead of building a physical device. This could be much helpful when it comes to deal with old computers.
If there were important staff sitting on your old computer, which you plan to sell it, the it is a great ideal to convert this physical disk to a virtual machine disk VHD or VHDX so you can run it in virtual machine software on your new computer. All your apps and personal data are well kept on this virtual machine. You can pull the data off the VM at any time when it is needed.
In this tutorial, we are going to walk you through the necessary steps for convertting a physical disk to a virtual machine disk.
Disk2vhd
For physical disk to virtual disk conversion, Microsoft offers a free utility called Disk2vhd for this purpose. It is an useful system utility developed by Microsoft team. It includes the ability to convert a physical disk running Windows to a virtual disk for use Microsoft Hyper-V virtual machine, which is vailable for free in Windows Pro, Enterpreise and Edution editions..
The utility supports all Windows versions and does not require installation. The best part is that it is completely free to download from Microsoft Windows Sysinternals page.
Step 1: Download zip file of disk2vhd from this page (https://download.sysinternals.com/files/Disk2vhd.zip). The latest version is 2.0.1. After that, unpack zip archive and run disk2vhd.exe on a Windows machine, which physical disk to be converted.
Step 2: You will be welcomed with its simple, easy-to-use interface. From here, make sure you check the option (Use Vhdx) to create a VHDX disk.
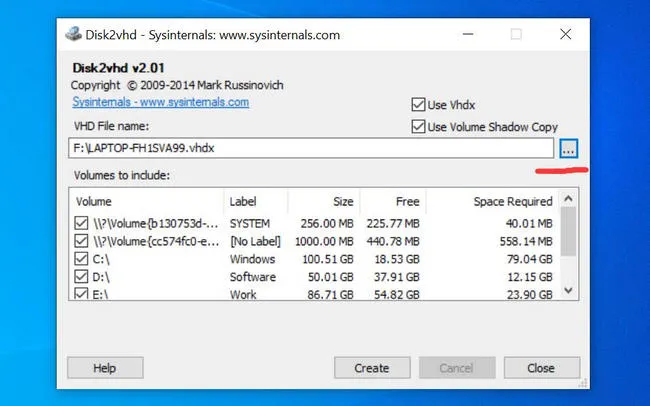
Step 3: Insert an external drive into the computer and click the three dots tab on the right side to pick up a location to store the converted VHDX file.
Step 4: Uncheck the volumes you do not need to copy. By default, all volumes on physical disk are selected. Just make sure the free space on target drive is larger than size of volumes to be copied.
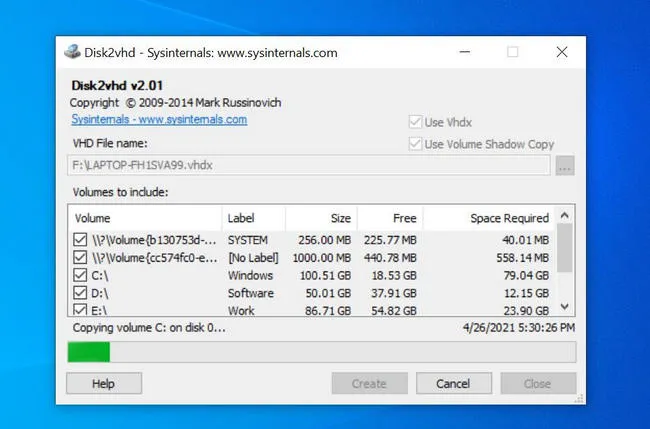
Step 5: After above settings, click Create button to convert physical disk to a VHDX file. You have to wait some time for this operation.
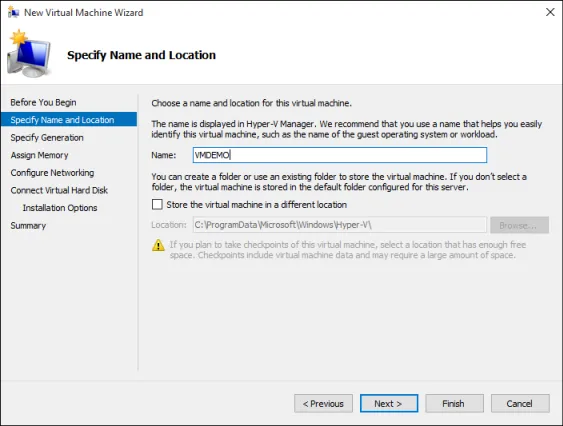
Step 6: Once you are done, you need to create a new virtual machine on your Hyper-V host. To do this, from Windows Hyper-V Manager, click on Action, then move your cursor over the New option and then select Virtual Machine from the pop-up menu.
Note: On the next screen, make sure you check the box next to the Generation 1 option. Hyper-V has two options include Generation 1 and Generation 2. The main drawback of the generation 2 lies in a lack of support for newer Windows version, as it only supports Windows 8.1 or older.
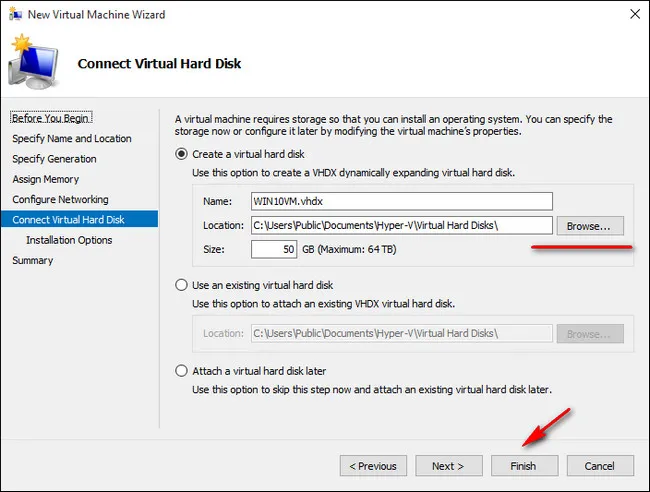
Step 7: Now, insert the disk that contains the converted VHDX file. From New Virtual Machine Wizard, select Connect Virtual Hard Disk from the left-side menu. After that, configure the virtual hard disk and select preferred disk.
Step 8: Once you are done, run a virtual machine on your computer. To do this, perform a right-click on a virtual machine, then hit the Run button, and right-click again and connect.
It may take several minutes to boot from a virtual machine so be patient. Once done, you should see the welcome screen and log into your system as usual.
Cons of disk2vhd
- Only compatible with Microsoft Hyper-V virtual machine technology.
- Hyper-V Manager not available on Windows 10 Home Edition.
- Disk copying speed a bit slow.
- Converted VHDX not being able to work on other virtual machine software.
- Not support VHD virtual disk.
StarWind V2V Converter
StartWind V2V Converter is a third-party tool for converting disk from one format to another. Currently, it supports virtual-to-virtual and physical-to-virtual conversion by default. Most importantly, it is completely free and support various virtual disk formats, including VHD, VHDX, VMDK, QCOW2, IMG and RAW. The converted virtual disk can be used by all desktop virtual machine software, VMware ESXi server, Microsoft Hyper-V server, Microsoft Azure and Amazon Web Service.
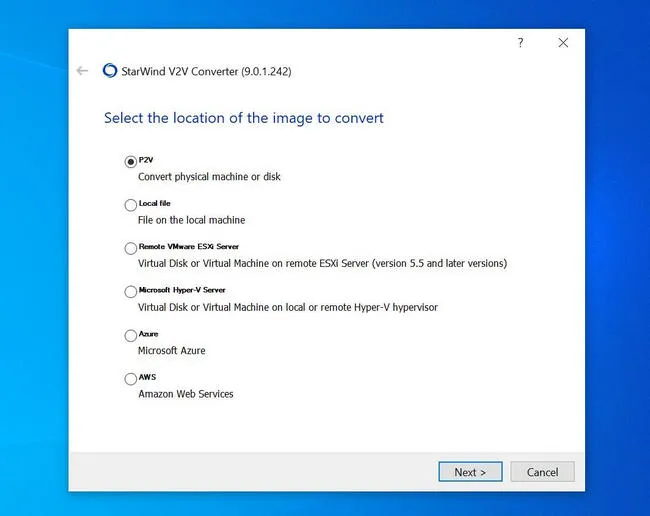
First, download and run StartWin V2V Converter. Click P2V option at first screen. This will convert a physical disk to a virtual machine disk.
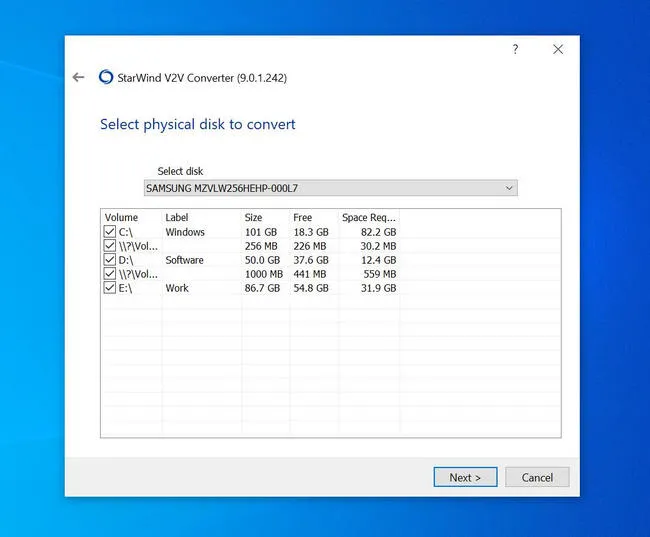
From the next window, please choose Physical Disk to proceed. By doning this, the physical disk will be converted to a virtual machine disk and the volume structure is preserved as the same. You can freely choose the volumes on physicial disk to be copied.
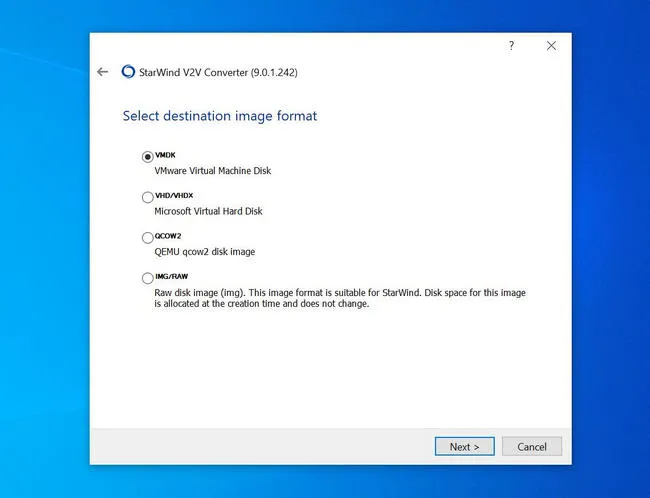
Now, it is time to choose a proper disk format. It depends on what kind of virtual machine software you wish to work with. For VMware software, please select VMDK. For VirtualBox or Microsoft Hyper-V, VHD or VHDX should be fine.
In the following steps, you need to choose a target location to store the virtual disk file. At the final step, click Convert button to start the process.
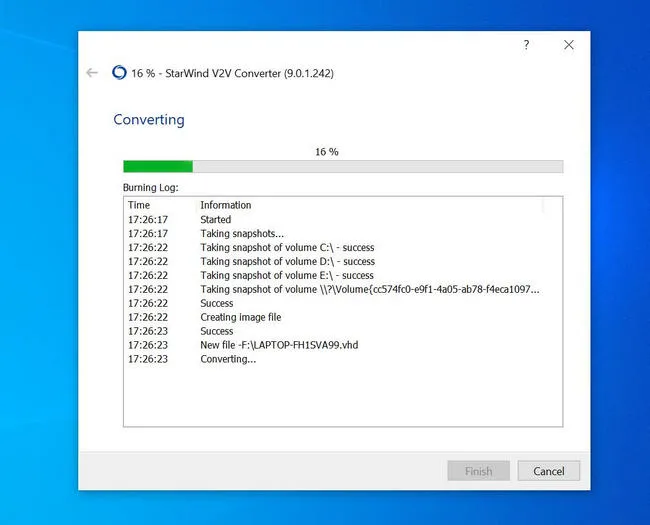
Wait about 20 minutes and you will see a virtual disk being created on target location.
Cons of StarWind V2V Converter
- Download link is not available on official website. Has to download from other sources.
- Prompted to other software download once cancelling the operation.
VMware vCenter Converter Standalone
VMware vCenter Converter Standalone is a dedicated utility for converting physical disk and virtual machine disk to VMware compatible disk format. This is an ideal solution if you want to work with VMware product in future.
The coversion process is not difficult. First, download the software installer and follow the instructions to install the software on your computer. You are forced to join VMware user experience improvement program. If not, the installation process will be ended with error.
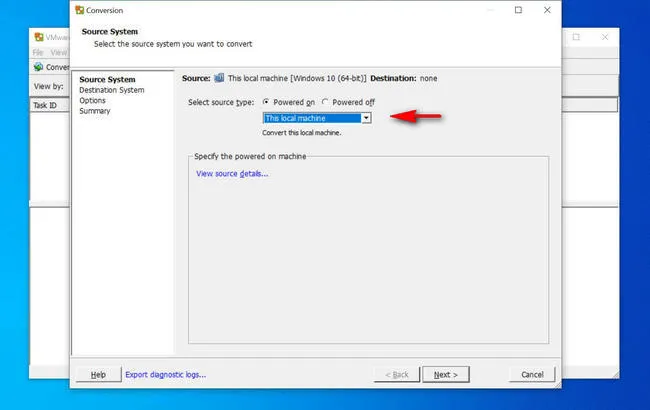
Once the program is opened, click Convert machine at the left upper corner to get started. For physical to virtual disk conversion, you should choose This local machine in Select source type column.
From Destination System page, please select VMware Workstation or other VMWare virtual machine in Select destination type column. Next, choose a VMware product and set a name for this new virtual machine.
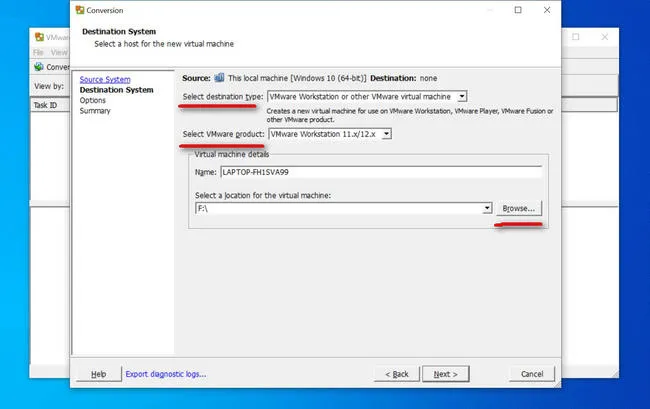
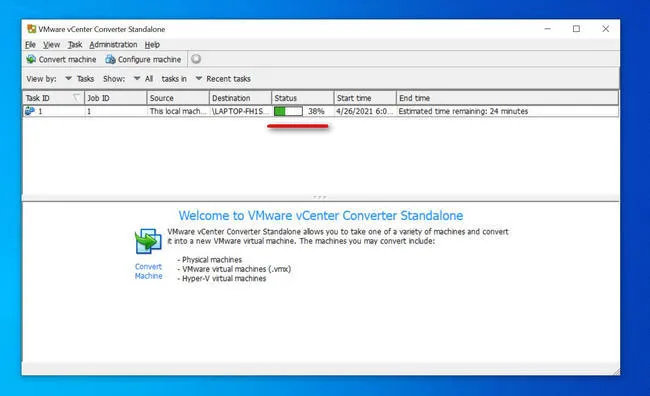
Finally, pick up a location to store the virtual disk file. After that, the conversion will start and you can see a progress bar on the screen.
It is easy to get started when the program is installed on the computer. There are only few settings to be configurated.
Cons of Microsoft Virtual Machine Converter
- Create VHD virtual machine disk only.
- Require more free space on destination host.
- Very complicated setup process.
- Only work with network computers.
- Converted VHDX not being able to work on other virtual machine software.
Parallels Transporter Agent
Parallels Desktop is the most popular virtual machine software on Mac platform. If you are a Mac user, Parallels Transporter Agent should be your best choice. It will help you transfer all Windows system files as well as personal data to external storage. After that, it is easy to create a new virtual machine with Parallels Desktop on Mac by restoring from the external storage.
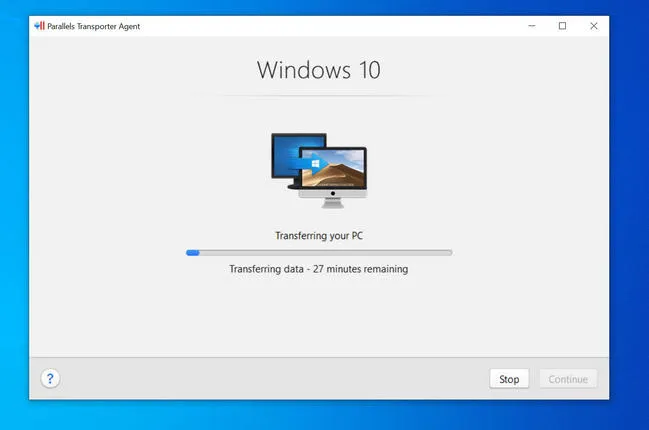
Working with Parallels Transporter Agent is quite simple as it has great user interface and the setting is straightforward. No complex staff at all! Just follow the screen prompt and make proper selections with the mouse. Then wait the task to be done. You will see a Windows 10.pvm file in external drive, which contains all the files for virtual machine creation.
Cons of Parallels Transporter Agent
- For Mac user only.
- Converted virtual machine disk can be only recognized by Parallels software.
- Require restart after installation.
- Auto start after getting into desktop.
Microsoft Virtual Machine Converter
Microsoft Virtual Machine Converter (MVMC) is a more advanced free tool than disk2vhd and it is also developered by Microsoft. It can not only convert physical disk to vitual but also convert VMWare virtual machine to Microsoft Hyper-V virtual machine. You can download this tool from here.

The process with MVMC is much more complicated. Fortunately, there is a graphics user interface you can follow during the setup wizard. You have to make sure there are enough disk space on destination host, double the size of source physical drive. However, it only supports network devices with an IP address or domain name.
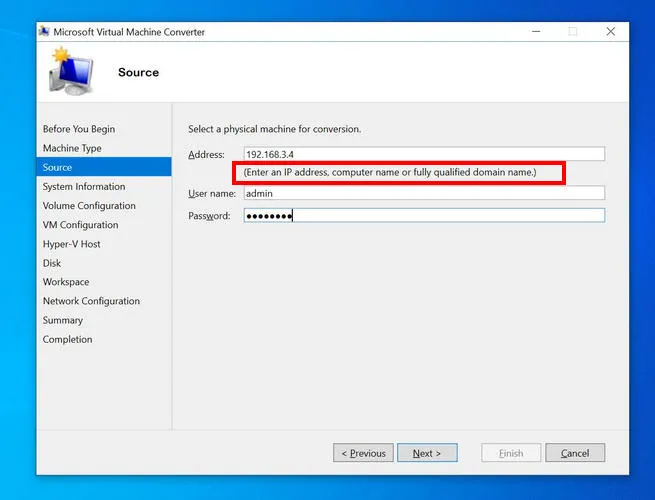
MVMC is more suitable for system and network managers who deploys virtual machines in bulk. It also has a powersheel interface to work with commands. For home users, disk2vhd is a better option.
Cons of VMware vCenter Converter Standalone
- Fill up a lot of information to get the download link.
- Old-fashioned user interface.
- Only compatible with VMware's own products.
For general purpose physical-to-virtual conversion, StartWind free tool V2V Converter is our top recommendation thanks to its various disk format support. And the user interface is well designed and easy to navigate. For virtual machine specific conversion, please choose the converter from the same brand of virtual machine software you are going to use.

Petty is editor in chief at UUByte and writes various topics about Windows and Mac to help people make the most of current technology.