
Creating backups for Windows 11 OS or the entire PC is crucial. Your computer might stop working and all your files would be gone if no backup had been made. This could be a huge disaster for you. However, if you have a backup, not only can you restore the files, but in case of a hard drive failure or a virus attack, you can restore Windows 11 back to a point where it was working fine.
In the past, it was super easy to create a image backup on Windows 10 and Windows 7 as there is a stock utility for doing this. However, this feature was officially deprecated by Microsoft in Windows 11. Instead, Microsoft recommends you to use a 3rd party backup and restore solution to backup Windows 11 PC.
In here, I have listed five backup tools for Windows 11 backup with pros and cons. Please read the review carefully and choose the best one based on your own needs.
Warm tip 1: Go and prepare for a portable SSD for storing the Windows 11 image backup. HDD is too slow!
Warm tip 2: For backing up Windows OS only, please choose System Backup. For backing up the whole PC, please choose Disk Backup instead.
Macrium Reflect Free
Macrium Reflect Free is one of the most popular software for system backup and clone. It should be your No.1 consideration because of powerful backup features and free cost. It gives an average use more than enough utilities for their backup and cloning requirements. Its interface might look a bit backdated, however, don't let the appearance fool you. It's an excellent tool that provides few but most used options that's all you ever going to need.
Macrium Reflect Free supports Windows 11, and you can not only create an image of a running Windows 11 OS, but you can also create a Win11 PE rescue media with its help. It is pretty fast as far as performance is concerned, and runs only a single background process while functioning so that it goes easy on the resources.
It too has its own set of drawbacks considering it doesn't support file level backups or syncs, nor does it have incremental backup features. However, if system image backup is all you want to do, then Macrium Reflect Free is your go to software.
Pros:
- Completely free for non-commercial use.
- Create disk image from selected disks and partitions.
- Make a full bootable image of Windows 11 OS (C drive and recovery partition).
- Flexible options for disk and partition backup.
- Easily restore data or Windows OS from image backup.
- Create bootable media for emergency case.
- Built-in tool for disk write performance testing.
Cons:
- File level backup not supported in free version.
- Incremental backup feature not available.
- Fail to detect NAS drive.
How to make a full Backup of Windows 11 PC with Macrium Reflect Free
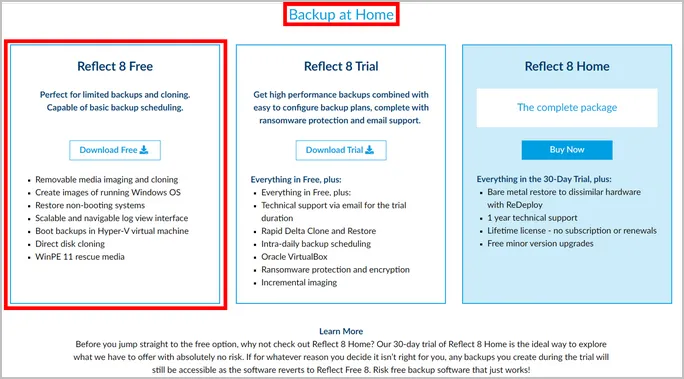
Step 1. Download the Macrium Reflect Free software from their website. You'll find the correct version below the Backup at Home section and it will be labeled as free.
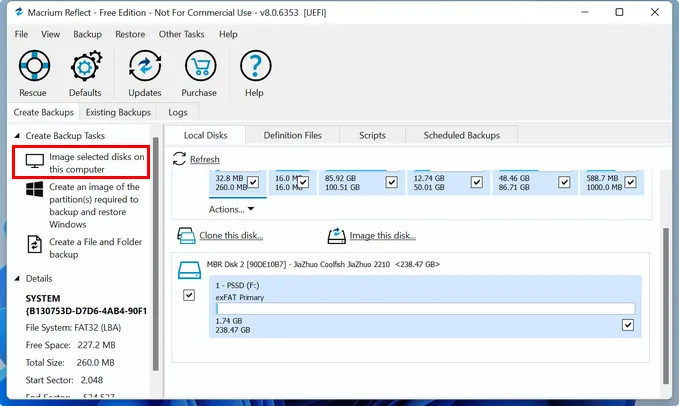
Step 2. Install the software on your Windows 11 computer and launch it. Select the tab on the left side of the panel that says Create Backup, then on the right side of the pane select the tab that says Local Disks. After that, check the box beside each of the drives, including the system drive, that you would like to backup.
Step 3. Now, move over to option located at the left panel that says Image selected disks on this computer. You can choose which partition to be backed up. If you want to backup Windows 11 partition only, please go to Backup -> Backup Windows ...
Step 4. Under Destination tab, check the radio button beside Folder, then browse and select a directory where you would like to save the image backup file.
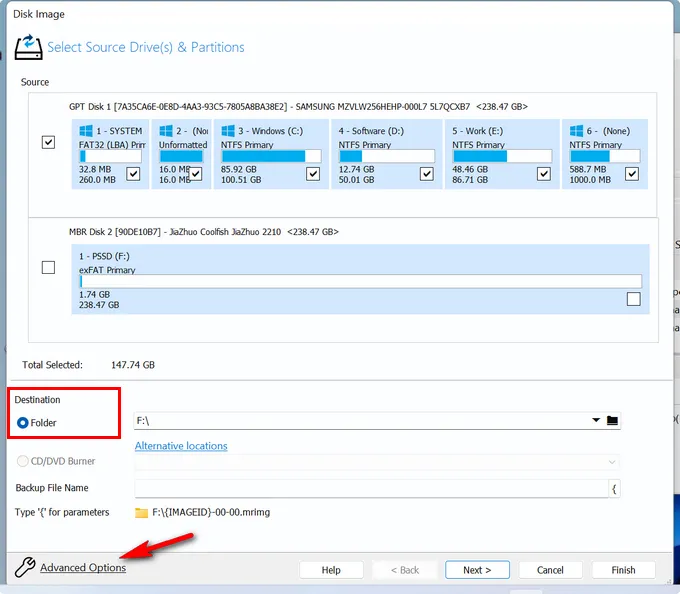
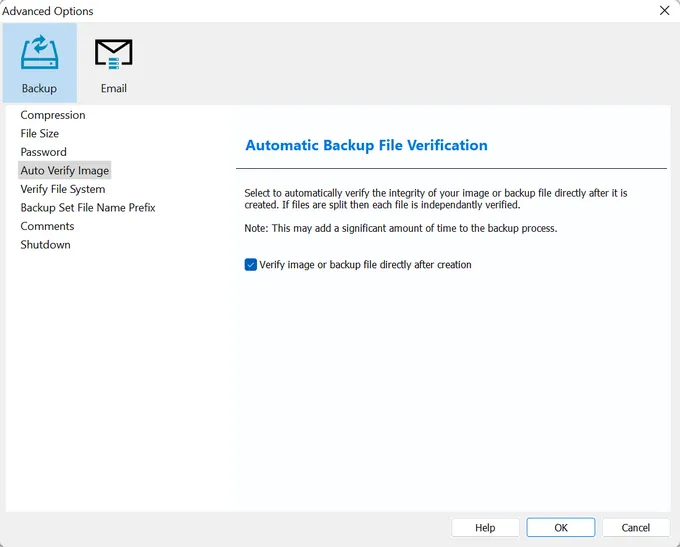
Step 5. Once done, click on the link that says Advanced Options at the bottom left corner. Then, under the Backup tab, select the option Verify image or backup file directly after creation, and click OK.
Step 6. You'll be taken back to the previous window, there, click on the Next button to continue. In the new window, under the section Add/Edit Schedules, click on the dropdown Add Schedule button, then select the Full option from that dropdown.
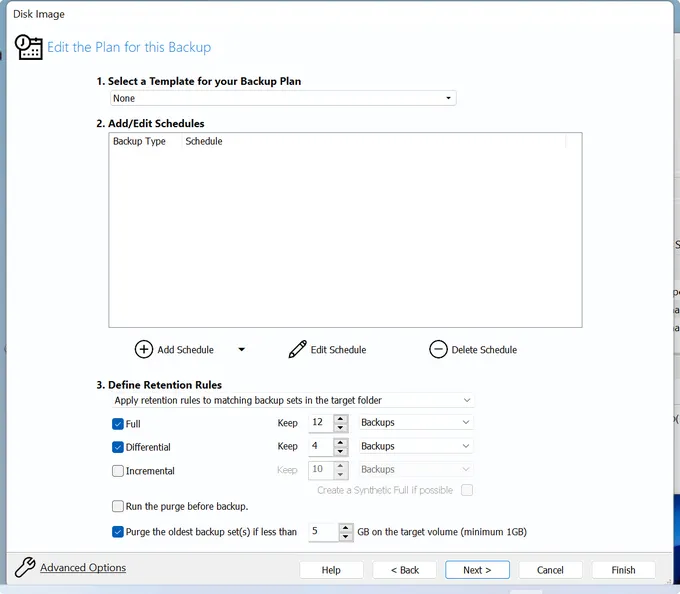
Step 7. Set a schedule for the backup and click OK. For example, you can select Weekly for a weekly backup.
Step 8. Below the Define Retention Rules section, mention the number of copies of the backups that should be retained before automatically deleting the old backups to free up space in the backup drive. Then click Next.
Step 9. Finally, click on Finish, and then OK. This should create a system backup of Windows 11 computer at the mentioned schedule. There is a progress bar indicating the backup process as you can see from the following screenshot.
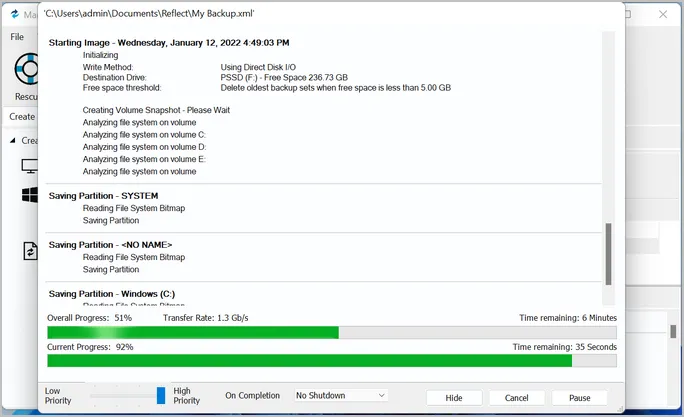
Once the backup is done, the name of Windows 11 backup file like this: E5163B280233FA85-00-00.mrimg.
Conclusion: If you are looking for a simple and fast disk backup software, then Macrium Refect Free is the best choice out there!
AOMEI Backupper Standard (Free)
If Macrium Reflect Free didn't work for you, thanks to not being able to backup files, then you can try AOMEI Backupper Standard. This is a free version of AOMEI backup tool that can be used for disk backup, clone, and restore. It supports all version of the Windows OS, starting from Windows XP, right upto Windows 11.
It supports most modern types of hard drives. With the help of this utility, you can do full disk, partition, and system-only backups. You can also do file level backups and syncs. It features a clean and easy to use interface.
And it is pretty fast, and does a decent job of compressing the data. However, it has issues with files having longer names. Also, at times the user interface might not respond properly, and you may have to press a button or two a number of times before they start working.
Pros:
- Free backup features, including system backup, disk backup and partition backup.
- Three backup modes available (Full, Increamental and Differential).
- Easy-to-understand UI.
- Explore files and folders in the backup.
- Restore data from previous backup.
- Clone system, disk and partitions.
- Create bootable media from Linux and Windows PE.
- Reboot Windows 11 in AOMEI Backupper Recovery Environment.
- Manage NAS devices.
Cons:
- Issue with longer file names.
- UI not responding at times.
- Detach image option is hard to find.
How to backup Windows 11 PC with AOMEI Backupper Standard
Step 1. Download the AOMEI Backupper Standard from their website, install it, and then launch the utility.
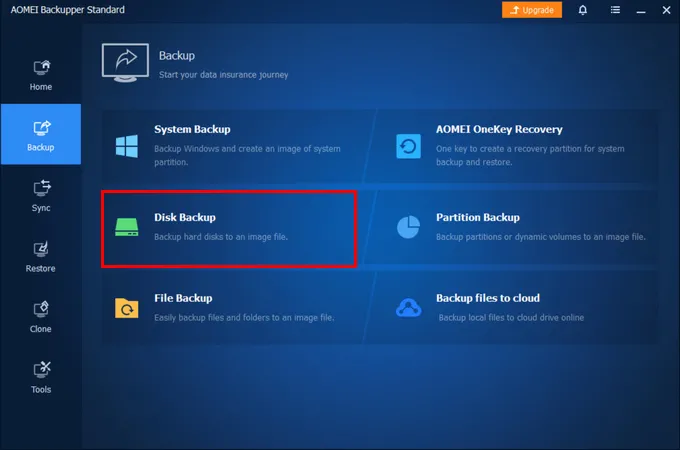
Step 2. Click on the Backup button from the panel on the left, then click on Disk Backup button on the right.
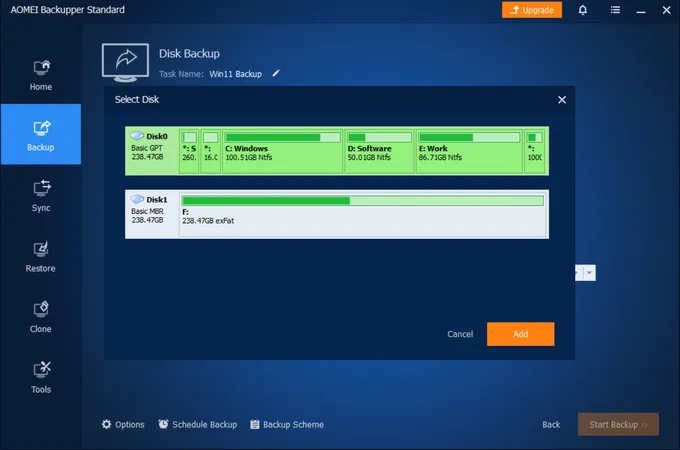
Step 3. At this time, click Add disk menu to choose which disk to be backed up..
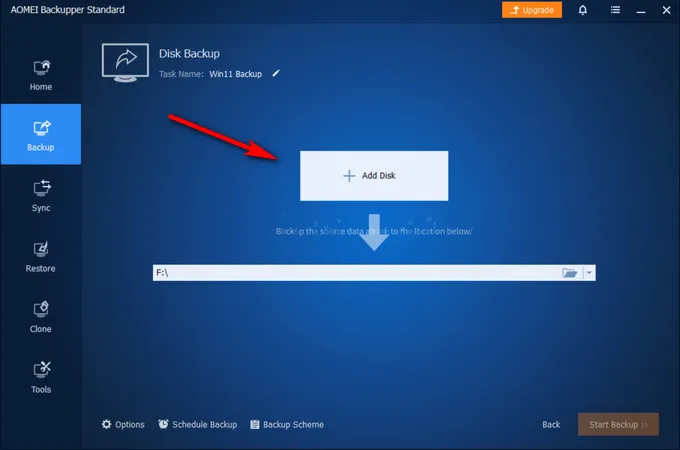
Step 4. You will see all disks connected to the current computer. Please choose the right disk to continue. In my example, it is Disk0, the internal disk where Windows 11 is installed.
Step 5. Once the source disk is choosen, the next move is to select an output folder to store backup image. You can do this by clicking the folder icon.
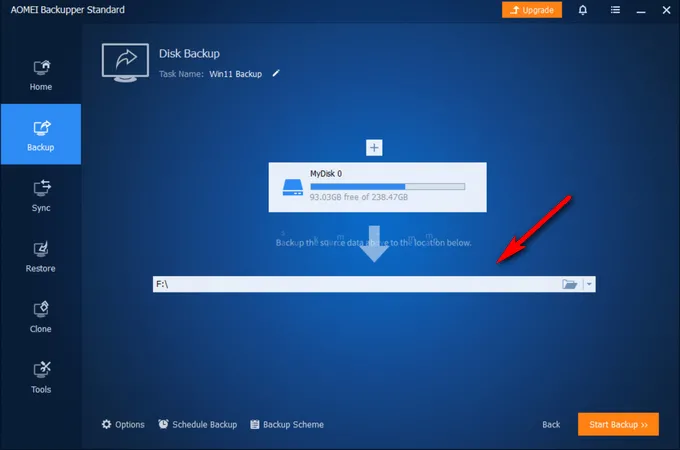
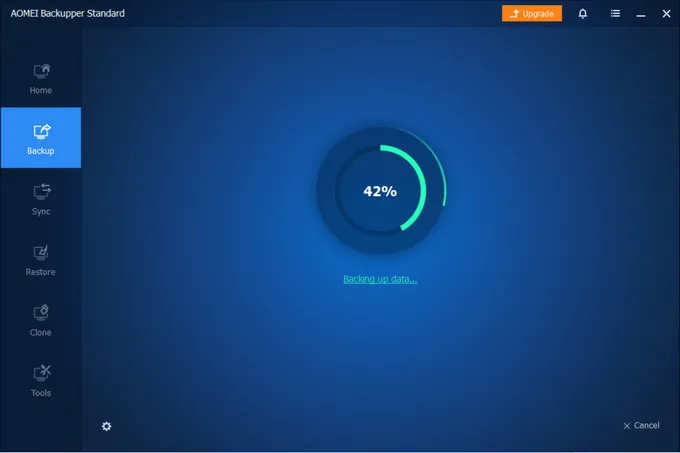
Step 6. Now, click Start Backup >> button at the bottom to start the backup process.
Conclusion: If you want a robust and user-friendly backup software with advanced options, then AOMEI Backupper Standard is the perfect choice.
Ashampoo Backup Pro
Ashampoo Backup Pro is another freemium backup software you can find over the Internet. It has great reputation and works great as a full backup solution, not only for local disk but also for cloud drives. In addition, it offers password protection option with AES-256 encryption for backup images. Only the one who has the correct password can view or restore the backup file.
The free version contains minimal options, supports incremental backups, and can be used to backup to another local drive or a drive on the network.
Ashampoo Backup can restore folders, files, or the entire image. It has the option to create a rescue disk. The backups can also be verified at any time to check for their integrity. File level backups are not possible, backups cannot be protected with passwords, and there are several other drawbacks to using this utility.
Pros:
- 30-day free trial.
- Support incremental/differential backups.
- Store backup image in local drive or network drive.
- Able to backup cloud drives (Dropbox, OneDrive, Google Drive, etc...)
- Encrypt backup with AES-256.
- Compress files and folders in backup to save more free space.
- Easy to view files in the backup image.
- Scheduled backup routines available (daily or weekly).
- Shut down computer after backup plan finished.
- Scan and repair local disk.
- Create resuce USB stick and CD/DVD.
Cons:
- Has to register a free account to start installation.
- No totally free.
- Pop-up ads each time it is opened.
- Too many settings before actual backup task started..
How to backup Windows 11 PC with Ashampoo Backup Pro 16
Step 1. Download Ashampoo Backup Pro 16 from here and install it on the computer.
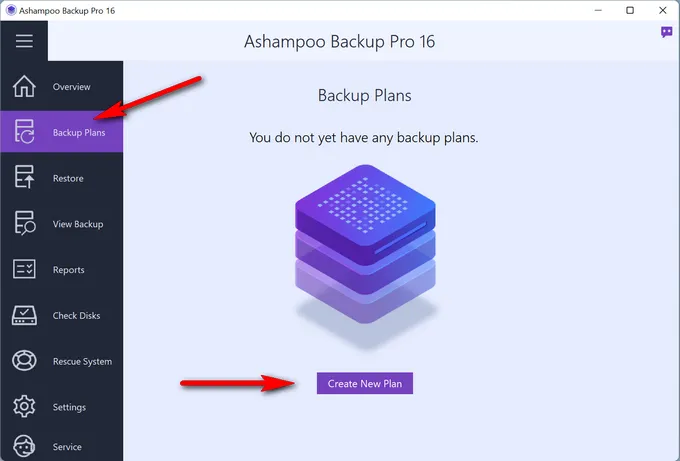
Step 2. Open Ashampoo Backup Pro from desktop shortcut and click the secord tab (Backup Plans) from the left sidebar. Now, continue by clicking the Create New Plan button.
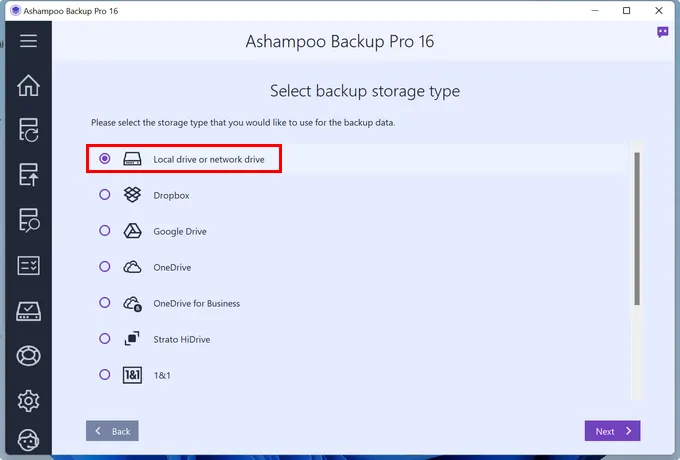
Step 3. The screen presents several types of storages type. For local disk backup, please choose Local drive or network drive. After that, this program will list all available drives on the computer.
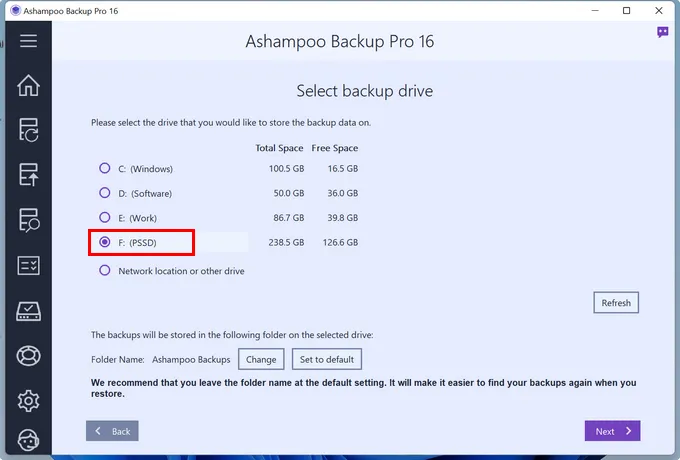
Step 4. Now, select a drive from the list to store the backup image. In here, I choose my portable SSD as the target location.
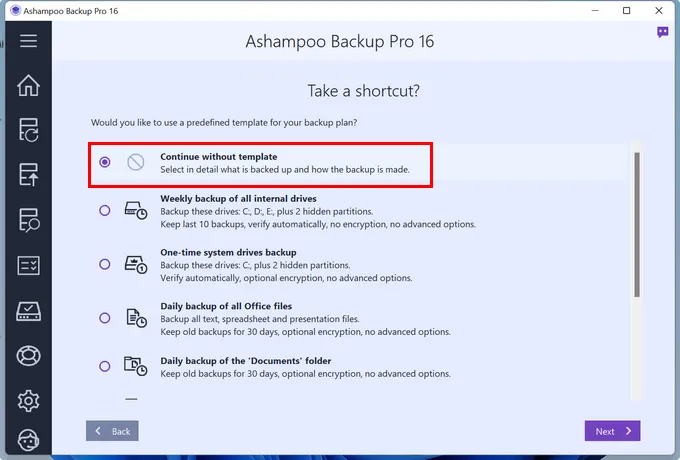
Step 5. In here, you need to set a name for this backup plan and select a backup template. If you want to backup the system drive, please choose One-time system backup to proceed. If you want to backup the entire drive, please go with Continue without template.
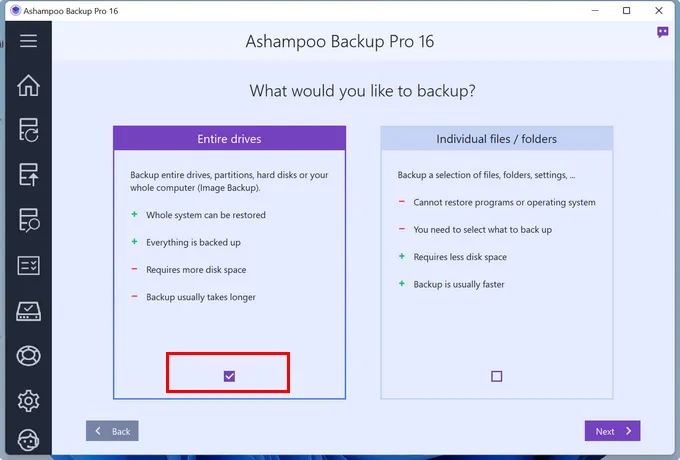
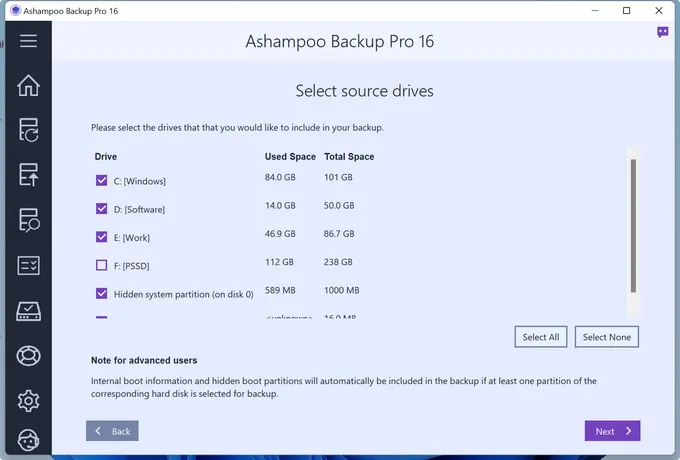
Step 6. In the next window, please choose Entire drives. This will backup everything on this drive.
Step 7. Please mark the drives you want to backup for this plan..
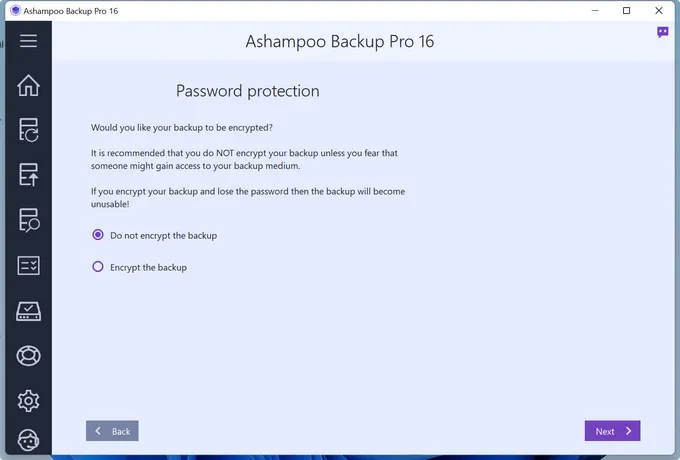
Step 8. In the following sections, you want to asked if you want to encrypt the backup, compress the backup and how many backups you'd like to keep on target drive. Please make the choice by your own.
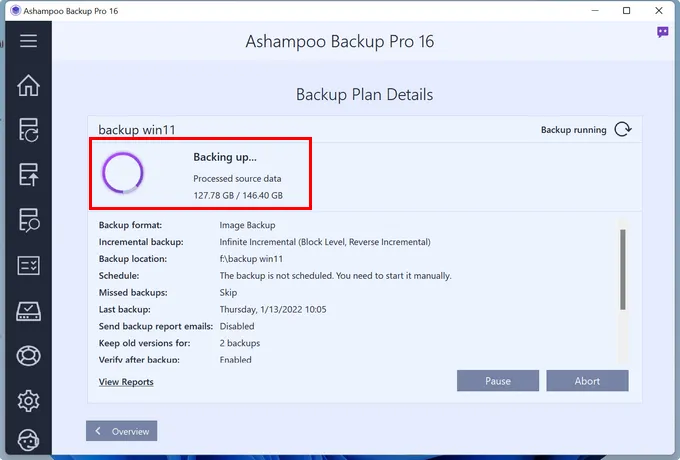
Step 9. After all settings, there is a detailed reported about this plan. Click the Start Backup Now button to backup Windows 11 PC.
Conclusion: If you want to create an encrypted backup image, then go with Ashampoo Backup Pro.
Acronis True Image
Acronis True Image, which is now known as Acronis Cyber Protect Home Office, is a free backup solution for individuals. It is pretty fast in creating and restoring backups, and works with Windows 11 and Mac devices.
It sports a bootable media creator tool, along with a drive cloning tools that does a fairly decent job for a free utility. However, the problem occurs if you have an old computer, since Acronis True Image is pretty heavy on system resources. The user interface is also not that intuitive, and the utility have been known to crash at times. The customer support too is not that responsive, and it may be weeks before help arrives.
Pros:
- Free for initial 31 days.
- Backup entire PC, disks and partitions, files and folder, and mobile devices.
- Backup protection support (AES-128, AES-192 and AES-256).
- Three Different compression levels.
- Split and save backup image into small parts.
- Exclude certain files or folders with advanced commands.
- Schedule backup available.
Cons:
- Huge installation file (nearly 1 GB).
- Request account creation before trial.
- Buggy and non-intuitive UI.
- Heavy on resources.
- Slow customer support.
How to backup Windows 11 PC using Acronis True Image
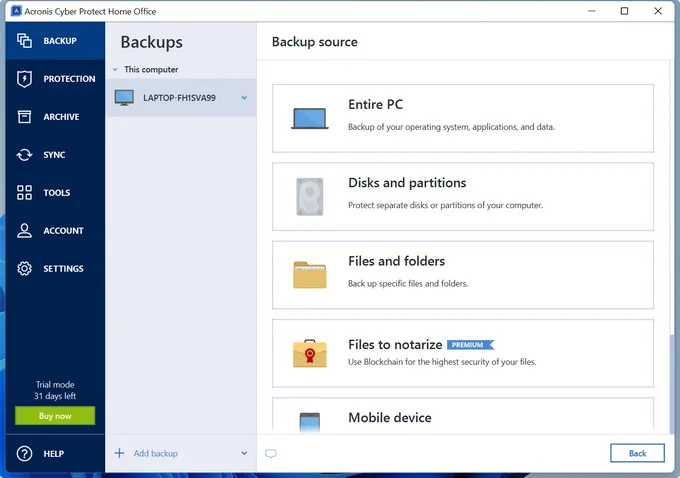
Step 1. After installing the utility, launch it, and click on the BACKUP tab on the left panel.
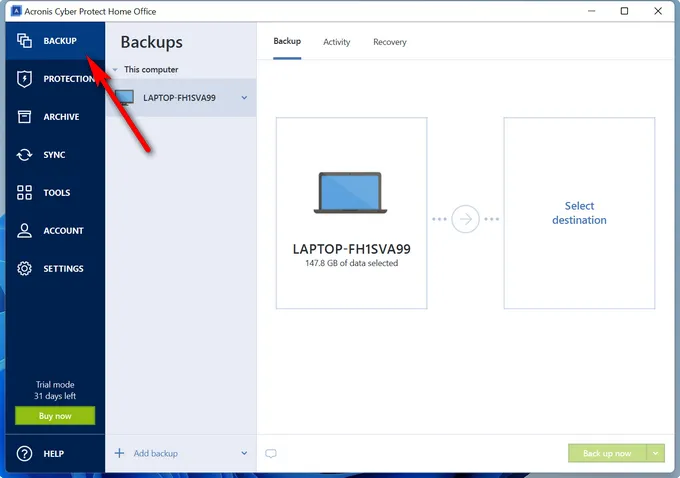
Step 2. Double click the device name (LAPTOP-FH1SVA99) at right side of window to choose a backup scheme. You can backup the entire PC, disks, partitions or folders.
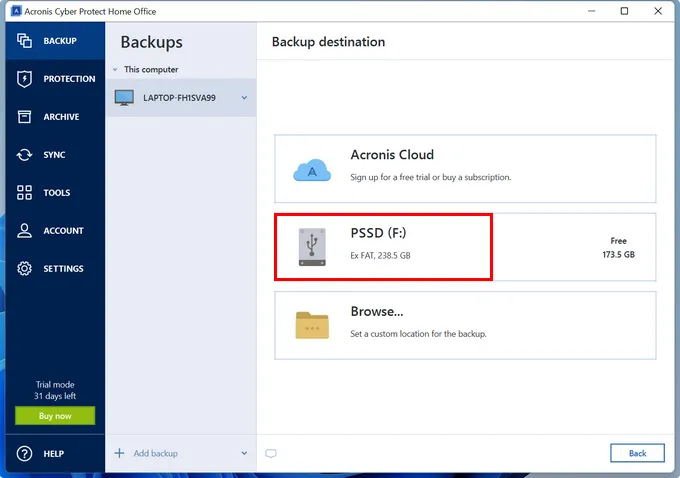
Step 3. Go back to the main window of BACKUP menu and select a destination place to keep the backup data. It can be Acronis Cloud, another disk or folder.
Step 4. After deciding the backup source and destination, you will see the following screenshot.

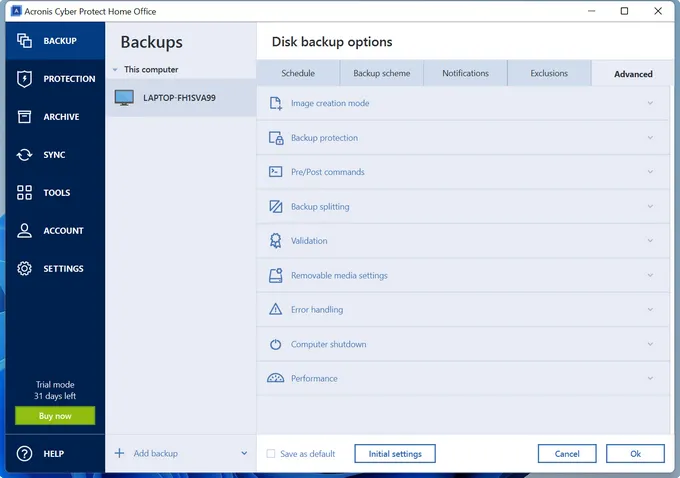
Step 5. For advanced settings, such as backup frequency, password protection, compression, please click the Options tab at the bottom.
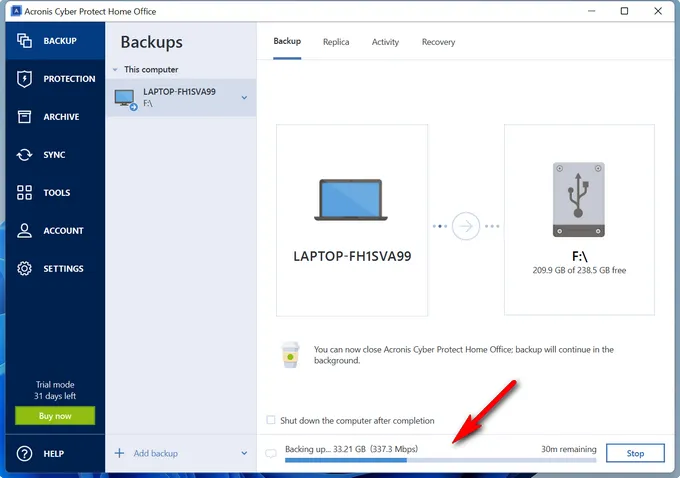
Step 6. When the configuration part is finished, click Back up now button to begin the backup task. You can now close the program and focus on on other tasks as the backup process is running in background.
Conclusion: Acronis True Image is now a full toolkit for various tasks. If you have other demands beyond backup, such as virus protection, cloud sync or system cleanup, then this is your best bet.
Clonezilla Live
Clonezilla Live is an open source and free solution for backing up personal computers. It supports Linux, Windows (including Windows 11), macOS, and Chrome OS. It is not dependent on the operating system running on your computer. It needs to be installed on a Live CD or can be run from a server.
Clonezilla supports various file systems. The GUI can be switched off to make it faster. It also features a large selection of compression algorithm. Although Clonezilla does not support incremental or differential backups. Also, file-level restoration from backups is not possible either, which is a big challenge.
Pros:
- Support a large number of file systems, such as NTFS, FAT32, HFS+, EXT,ESX .
- Deploy one backup image to multiple disks.
- Image encryption with encryptfs.
- Independent of the underlying operating system.
- Support macOS, Linux, Windows, and Chrome OS.
Cons:
- Unable to view files in backup.
- Incremental/differential backups not supported
- Complicated to use (Command-Line only).
How to backup Windows 11 PC with Clonzilla Live
If the target drive where you would like to clone Windows 11 system is of a lesser size than the source drive, then you need to shrink the source drive to the same size. You can do that by going over to the Windows 11 Disk Management by clicking on Search icon from taskbar, then searching for "disk management".
Once you are in the Windows 11 Disk Management utility, right click on the hard drive for which you would like to take the backup, then click on Shrink Volume from the context menu. The click on Shrink to reduce the volume as much as possible.
Step 1. Once done, download Clonezilla Live ISO from the official website, and create a Live USB from it.
Step 2. Now, insert the external drive where you would like to take the backup.
Step 3. Restart Windows 11 computer and boot from the USB created with Clonezilla.
Step 4. Once it boots up, start the wizard, select the language, then choose the option that says Don't touch my keymap, and finally select Start Clonezilla.
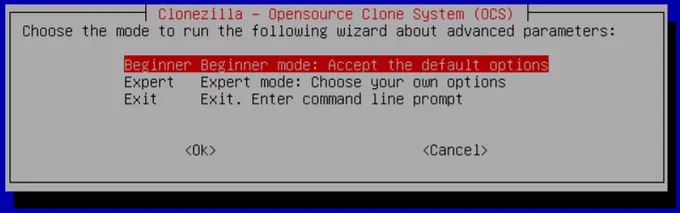
Step 5. Now it will ask you to select the mode, here, choose Beginner Mode using the up and down arrow keys on your keyboard, and press Enter to select.
Step 6. Choose the disk_to_local_disk and local_disk_to_local_disk_clone option and press Enter.
Step 7. Next, select the source drive and the target drive.
Step 8. It will ask you what would you like to do after the cloning process is completed. Please select Choose reboot/shutdown/etc when everything is finished.
Step 9. Press the Y key and then the Enter key, thrice to confirm the operation you had just requested. This should start the cloning of the hard drive, once complete it will show you with a message on the screen.
Conclusion: If you dislike the GUI tools suggested above or want to backup a sever, then choose Clonezilla as your backup option.
Comparison Table:
I did a full test for all backup software mentioned in this post on my Delll laptop that is currently running Windows 11 Home (OS build 22000.376). The local disk is a 250 GB SSD with 145 GB of data. I am going to backup the whole PC to protect the system and user data stored on this device for security concern.
|
|
Macrium Reflect |
AOMEI Backupper |
Ashampoo |
True Image |
Clonezilla |
|---|---|---|---|---|---|
| Used Time | 42 Mins | 46 Mins | 58 Mins | 43 Mins | 72 Mins |
| Image Size | 110G | 112G | 109G | 95G | 135G |
| Price | Free | Free | 30-Day Free | 31-Day Free | Free |
| Backup Entire PC | Yes | Yes | Yes | Yes | Yes |
| Backup Windows | Yes | Yes | Yes | Yes | No |
| Backup Files | Yes | Yes | Yes | Yes | No |
| Incremental Backup | Yes | Yes | Yes | Yes | No |
| Differential Backup | No | No | No | Yes | No |
| Create Rescue Media | Yes | Yes | Yes | Yes | Yes |
| Encrypt Backup | Yes | No | Yes | Yes | No |
| View Backup | Yes | Yes | Yes | Yes | No |
| Restore Backup | Yes | Yes | Yes | Yes | Yes |
| Clone Disk | Yes | Yes | Yes | Yes | Yes |
| Disaster Recovery | No | Yes | No | Yes | No |
| Schedule Backup | Yes | Yes | Yes | Yes | No |
| Batch Deploy | No | No | No | No | Yes |
I understand that this was a long post, however, considering the importance of the topic I though it best to list everything in detail so that you can make an educated choice. I would suggest you to create an incremental system backup for Windows 11 computer, and schedule it to run once a week. That sounds like a perfect backup solution, what do you think?

Petty is editor in chief at UUByte and writes various topics about Windows and Mac to help people make the most of current technology.