
Suppose you are doing something important on your laptop or computer. For example, you are watching an important video online, or you are playing a game online, or you need to download a very important file. Suddenly the Windows update starts and your internet speed and quality drop drastically.
You check and notice that Windows is being updated and this will greatly upset you. This situation gets worse when your internet is limited and a significant amount of it is spent on the not-so-necessary Windows update! What is the solution to turn off auto updates on Windows 11?
Why Turning off Auto Updtaes on Windows 11?
Potential Bugs in Windows Update. Windows updates are indeed meant to provide a better and more secure environment for the users. However, sometimes it backfires on the users. Suppose you remembered that when Windows 11 was released there was a bug specifically for the AMD processors. And each time Microsoft was releasing an update, the condition was getting worse than before.
Force Installation on Startup. Although I have noticed that the windows updates are being downloaded in the background, when you try to restart your PC, it is forcing you to install the updates. This sucks. I hope Microsoft installs Windows Update while your PC is running, or gives the users the manual option to update the Windows Update like Linux.
Take More Free Storage. How much storage does the Windows Update require? It is a hard question because it depends on the type of updates that you are getting from Microsoft. Some updates are 1GB, some of them are up to 5 GB, and more. So, it is hard to say.
Ship Bloatware. With the auto-updates enabled, you will get again those annoying applications on your PC. Believe it or not, try uninstalling one drive, then after installing an update you will see that it is downloaded once again. Microsoft has a record of pushing its product to the users. So simply put, they are providing ads through the Windows Update.
How to Delete Windows Updates in Windows 11
The update files (very big) will be downloaded on your Windows 11 PC before the update gets installed. Hence, it is very important to clean the disk from installed updates. This is one of the best way to free up disk space in C drive.
Apparently, there are a couple of methods that you can use to delete the installed updates or the unwanted updates on your Windows 11 computer. However, disk cleanup is the perfect option to delete Windows update files on Windows 11. Here we go!
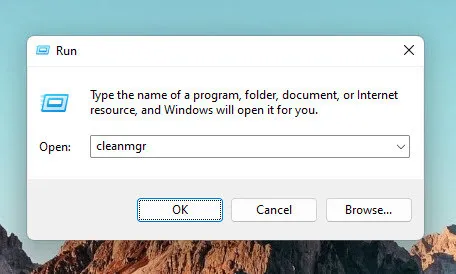
Step 1: The quickest method to open the disk cleanup is to type 'cleanmgr' and press enter on the run dialog box.
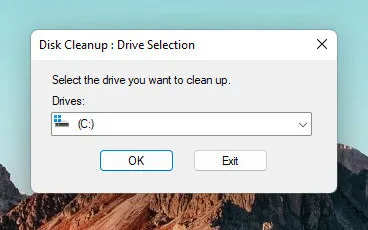
Step 2: After that select the drive that the Windows is installed.
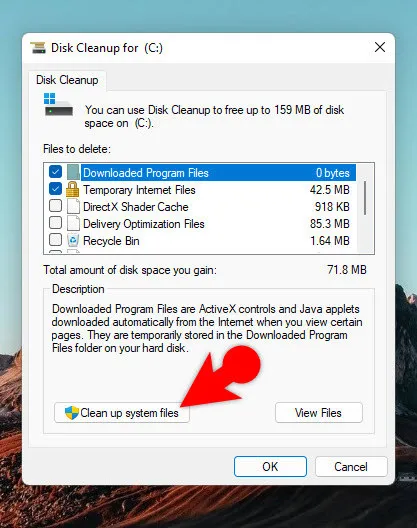
Step 3: To simply put, right now you can clean all the unnecessary temporary location files and the Windows Update. However, if you are looking to clean the system updates, then at the bottom click on the "Clean Up System Files".
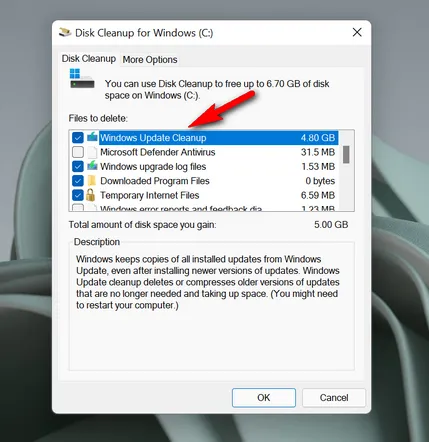
Step 4: Select the updates and click Ok to delete Windows update files from the PC. In my case, the Windows Update took up 4.8 GB space on my system drive.
The disk space could be eaten up again when a new update is available. You have to do this again and again. This is quite annoying, right? Don't worry. We will let you know how to turn off auto update on Windows 11.
Method #1. How to Turn off Auto Updates on Windows 11 Updates Using Registry Editor
Registry Editor is a very helpful utility that you can use to configure Windows settings not available in graphics user interface. All system and app settings are saved in this place. As result, it is easy to turn off auto update on Windows 11 with the help of this built-in tool.
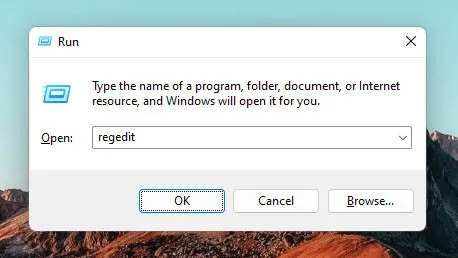
Step 1: Press the Windows icon key and R together to open the Run dialog box, then type 'Regedit' to open Registry Editor app on Windows 11.
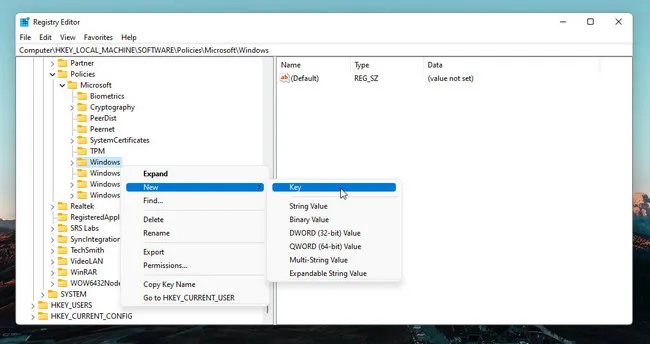
Step 2: Now in the Registry Editor from the left, follow the path below.
HKEY_LOCAL_MACHINE\SOFTWARE\Policies\Microsoft\WindowsStep 3: Create a new folder under the Windows directory. To do it right-click on windows and choose the key, then name the key anything that you want but for now, I'm naming it AU.
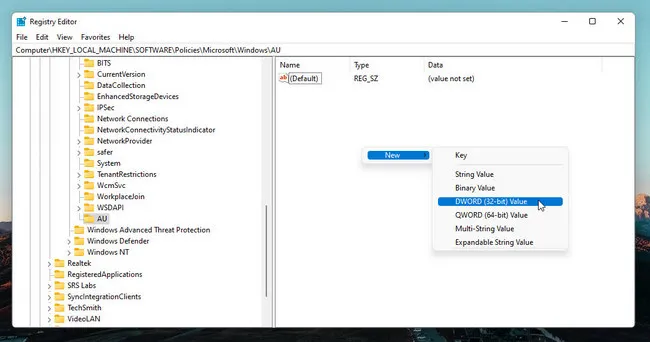
Step 4: Inside the AU directory, right-click and choose the DWORD (32-bit) value. Then name it to NoAutoUpdates.
Step 5: Open the registry that you created a moment ago and change its value from zero to 1.
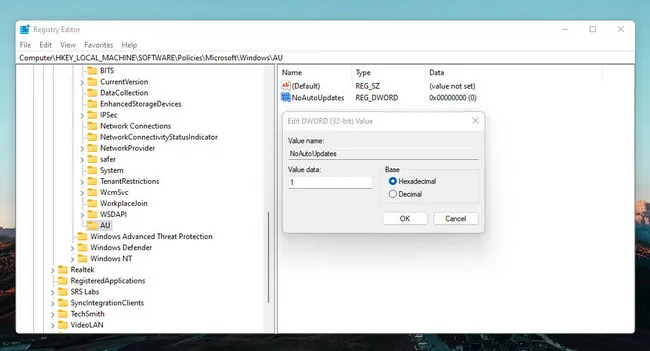
That is! No further update will be downloaded and installed on your Windows 11 PC.
Method #2. How to Turn off Auto Updates on Windows 11 from Group Policy
Group Policy is an advance system administration tool for managing Registery entries. You can configure a lot of settings for apps and Windows OS through this convenient interface. In here, we will tell you how to turn off Windows 11 updates using Group Policy.
Note: Group Policy is not available in the home version of Windows 11. It is only available in Professional, Enterprise, and Education versions.
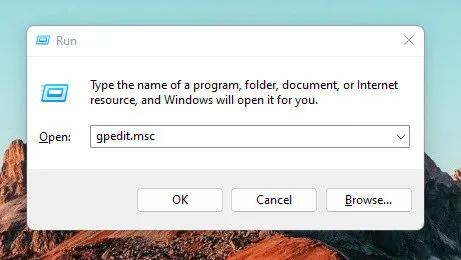
Step 1: To achieve this, press the Windows + r key together to open the Run dialog box. Then enter 'gpedit.msc' and click OK to open Group Policy Editor.
Step 2: Go to the following address on the left side of the page.
Computer Configuration > Administrative Templates > Windows Components > Windows Update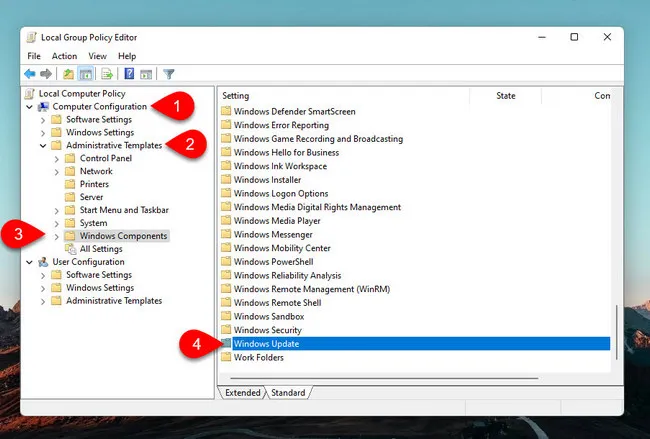
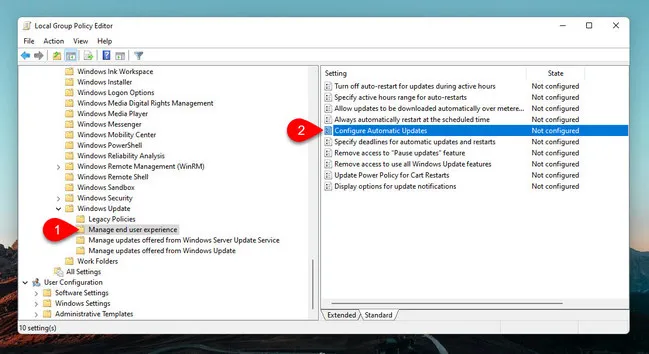
Step 3: Expand the Windows Updates and click on Manage End-user Experience. On the right panel, double click on Configure Automatic Updates.
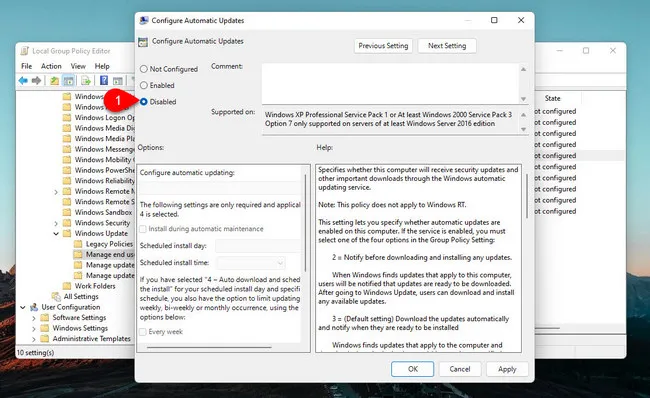
Step 4: On the opened page, select Disabled on the left panel, then click ok. This will turn off automatic Windows Updates on Windows 11. To enable Windows auto update in future, follow the same path and mark the Enabled button instead.
Method #3. How to Turn off Windows 11 Auto Update Service
Another way that can be used to turn off Windows 11 automatic update is to disable the update service.
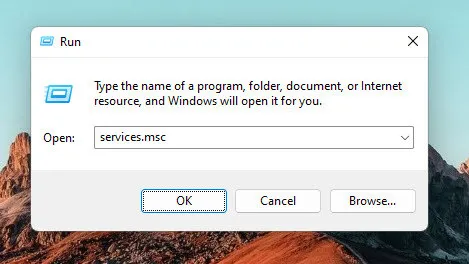
Step 1: To disable Windows 11 update service, you have to open the services utility. The quickest method to open these services is to type 'services.msc' on the run dialog box.
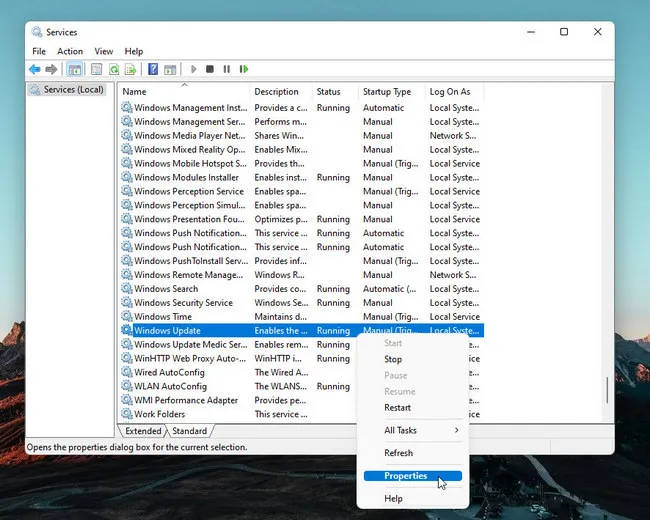
Step 2: You have to find the Windows Update service among the other services. After finding it right-click on it and choose properties.
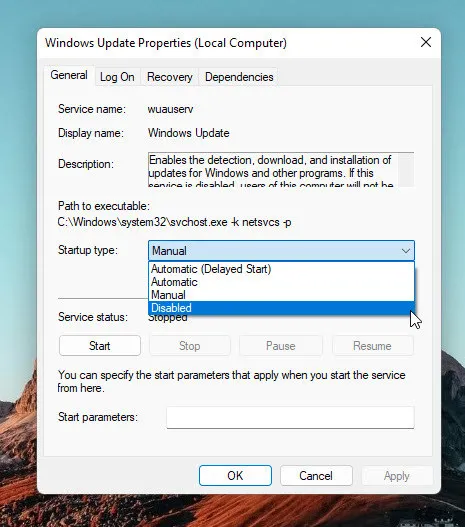
Step 3: First, you have to stop running Windows Update services, then click on the drop-down menu and choose disabled and then apply to the changes.
How to Pause Windows 11 Updates Temporarily
If you're not looking to permanently disable windows 11 updates, then disable it only temporarily. To put it in simple words pause it for a week or a month. This function is already provided within the windows settings, all you have to do is simply enable it.
Step 1: Open windows settings by right-clicking at the start menu and choose Settings.
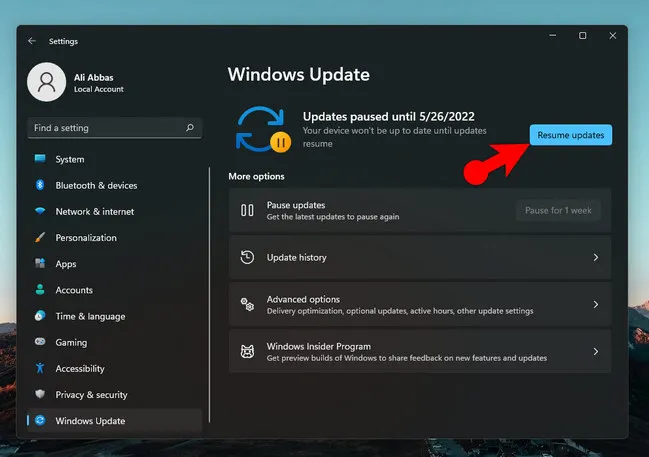
Step 2: Once you are inside the settings panel, move to Windows Update. There you will see an option by the name of pause updates. If you click on the triangle icon, you will more options for up to 5 weeks.
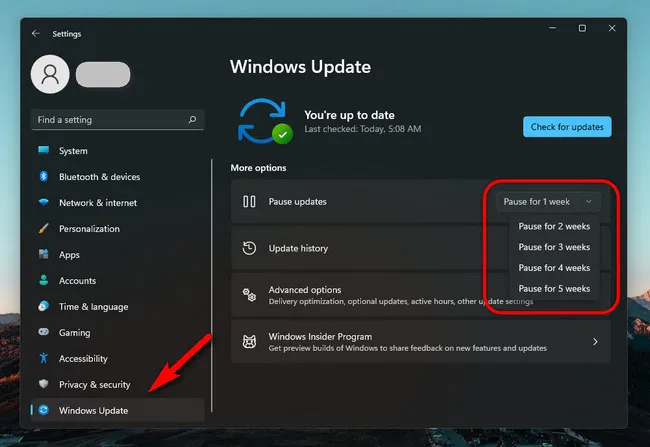
Step 3: To resume the updates of Windows 11, click on Resume updates.
Summary:
There are a lot of benefits to turn off auto update on Windows 11. However, we suggest turning it on once a year so you can install system patches and fix bugs after Windows 11 updates. The benefits of having an up-to-date computer cannot be stressed enough.
The downside of not updating your computer is that you will be putting yourself in harm'’s way by making it vulnerable to attacks from cybercriminals. Attackers will exploit bugs and vulnerabilities in your software to compromise your systems, steal your data or even take control of your computer.
The following are some of the main reasons why you should keep your operating system updated:
• Security: Not all security patches will be downloaded and installed automatically. Often, new versions of antivirus software are released that protect against new threats that have emerged on the Internet and need to be updated.
• Profiles: Updates often include fixes and improvements to existing features. If you want everything to work properly on your computer, you should regularly update Windows and all applications installed on it.
• New features: This applies primarily to operating systems, but also to applications where new features are added with updates. This can include new menu items, new search, discovery, sharing options, and more. You won’t be able to use any of these features until you update Windows to the latest version available for you.

Petty is editor in chief at UUByte and writes various topics about Windows and Mac to help people make the most of current technology.