
Windows 11 can be a pretty powerful operating system, but it is not free of crashes and glitches that you might encounter while using it. It can be caused by something as trivial as installing a new program on your computer, or updating a new driver. But if it happens, it can be quite annoying.
There are various ways to solve these problems with Windows 11, and you can find them searching on the internet. But irrespective of the method used, one step is common in almost all of them; booting into the Windows 11 Safe Mode. Safe Mode is the bare bones Windows 11 and it is used this way to eliminate hardware and software problems.
How Safe Mode Works in Windows 11?
Well, for one, Windows 11 does not load all of the drivers for Windows 11 computer. So, your desktop might not look as pretty as it usually does, the icons on your desktop might look larger, but you don't need to worry about it since this is normal in Safe Mode. This is because Windows 11, instead of loading the drivers for your graphics card, loads a generic VGA graphics device driver which works in almost all Windows-compatible video cards.
Next, Windows 11 skips most of the startup programs while booting in Safe Mode. It does this by not running the autoexec.bat or config.sys files while starting up. In Safe Mode, Windows 11 also runs with an extended memory by loading the himem.sys file with the /testmem:on switch.
If all of these sounds too technical for you, just know that Windows 11 does all of these, and much more, to ensure that whatever conflict Windows 11 was having earlier because of which it crashed does not follow it on Safe Mode. Now you know how useful starting Windows 11 in Safe Mode can be, so coming back to the original question.
How to start Windows 11 in Safe Mode? Booting into Windows 11 Safe Mode can be a bit tricky. There are multiple ways to start Windows 11 in Safe Mode. We have covered most of them here so that depending on how comfortable you are on performing those steps that would start Windows 11 in Safe Mode, you can narrow down on one of these methods and apply that on your own Windows 11 computer.
Method 1: Windows 11 Recovery Options
If you ever feel that your Windows 11 computer is really sluggish, or it is crashing every now and then, you have the option to reset Windows 11. This takes it back to the factory settings, it may or may not delete your personal files while doing so depending on the settings you choose. But once you have reset Windows 11 computer, it will be as good as new. And to do that, you need to go to Windows 11 Recovery Options page, just like you need to head over there even to start Windows 11 in Safe Mode.
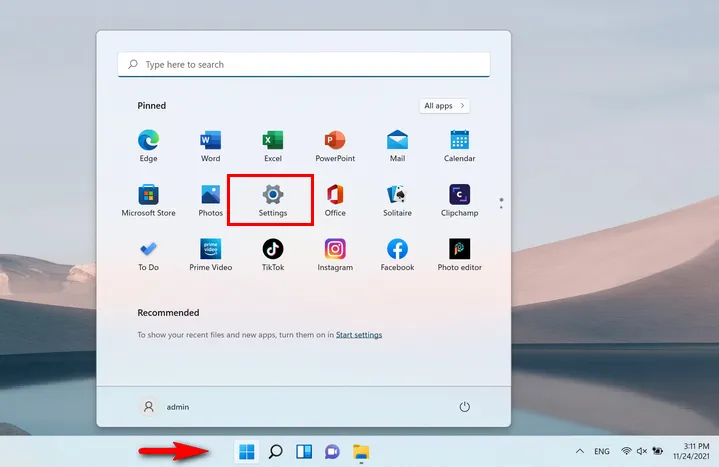
The first thing you need to do is to click on the Windows 11 Start button and then go to Settings.
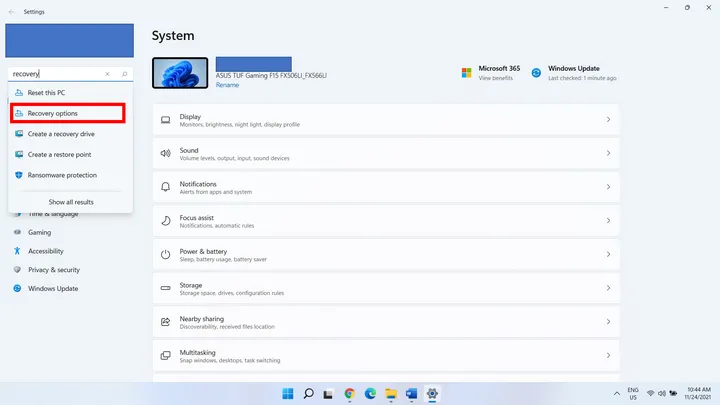
In the Settings window you'll find a search box on the top left corner. Type in "Recovery" without the quotes, and press the Enter button to continue. When you see the option that says Recovery options, click on it to open Recovery Options settings window.
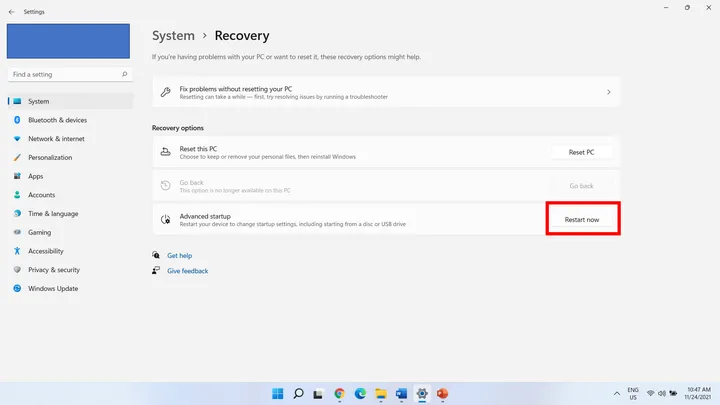
Now, click on the Restart Now button under the Advanced startup option.
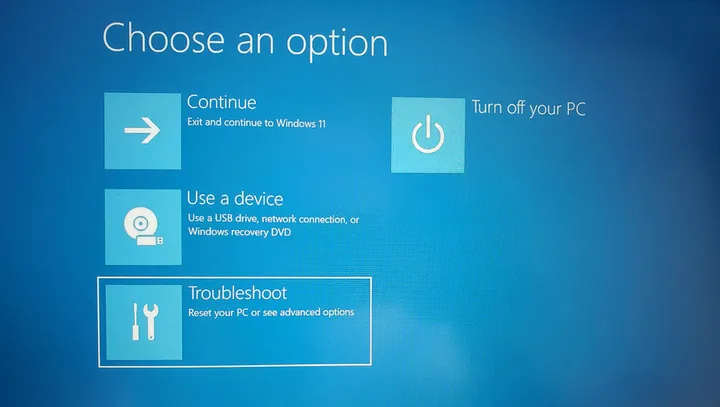
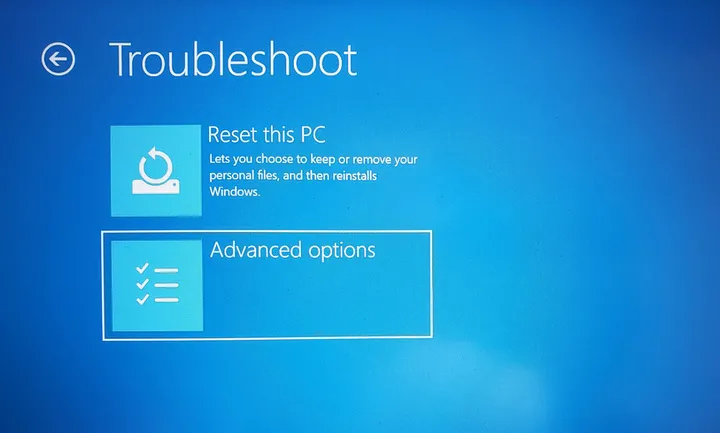
Wait a few seconds and Windows 11 computer restarts automatically. From this time, you'll see a blue screen with a number of options. Please choose Troubleshoot to proceed.
From the new window, click on Advanced options to next step.
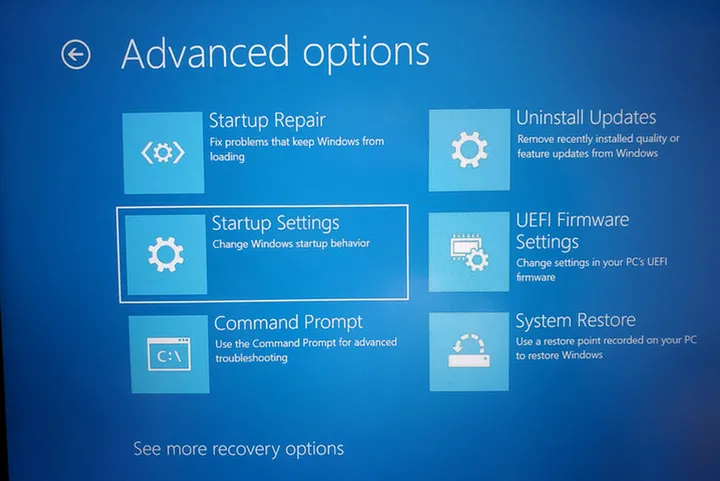
Under Advanced options, there are a couple of menus you can choose from. You need to click on Startup settings to let Windows 11 start in Safe Mode.
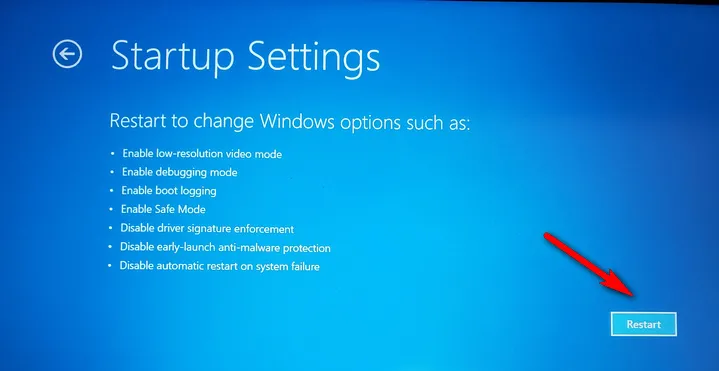
Windows 11 will once again give you the option to restart the computer. Click on the Restart button to continue the process.
After restart, now you will see a number of options out of which one would be to start Windows 11 in Safe Mode.

Don't feel overwhelmed with 3 different options for Safe Mode. The first option is normal Safe Mode which most people go for, the second option is when you need to use the internet in Safe Mode, and the third one is when you want to start Windows 11 in Safe Mode but not the graphical interface, rather a command prompt to type in your commands. If you don't know which one to select, then I would suggest you to go for the first option.
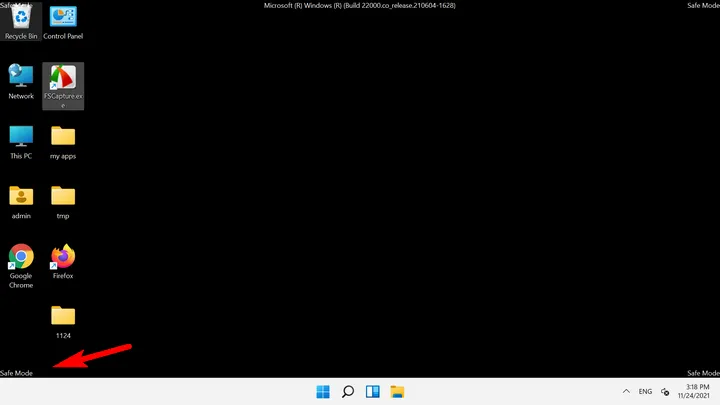
This should start Windows 11 in Safe Mode with a black screen. Safe Mode icon also appears at the four corners of Windows 11 desktop.
However, this method is applicable only if you are able to login to Windows 11 computer. If not, then you should move to the next method instead.
Method 2: From Windows 11 Sign-in Window
In case you have forgotten Windows 11 login password, which can be pretty normal, or if for some reason cannot go beyond the login screen of your Windows 11 computer, then you can use this method to start Windows 11 in Safe Mode. This method is quite similar to the previous one from step4 onwards, the only difference lies in how you reach the blue screen with the option that says Troubleshoot.
Once you are on the Windows 11 Sign-in window, press and hold down the Shift key on keyboard, then click on the Power option on the screen, and then click on Restart. The Power option looks like the icon shown below, and it should be located on the bottom right corner of sign-in window.
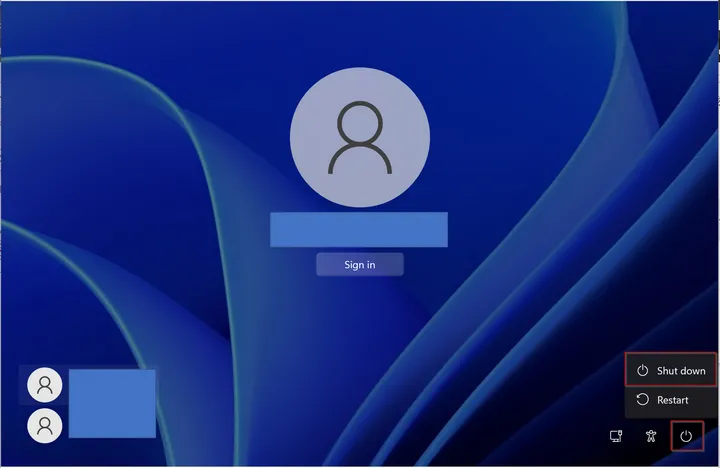
This should restart Windows 11 computer and bring up the blue screen mentioned in step4 of the previous method. Now you need to follow the same steps as the previous method to start Windows 11 in Safe Mode. I am not writing it once again as that can become confusing.
Now that we have discussed these 2 methods, what's left is if you cannot even boot into the Sign-in window of Windows 11, or if you are stuck on a black screen, or if your computer doesn't show anything and is just blank. In that unfortunate case you can refer to the third method discussed below.
Method 3: Windows 11 Automatic Repair
Having a blank or a black screen and being unable to boot into Windows 11 can be quite frustrating. However, using this method you can once again bypass that black or blank screen, and go over to the blue screen that we discussed on step4 in the first method.
You should know that that screen is Windows 11 Recovery Environment (RE). Windows 11 RE can be used to troubleshoot a lot of Windows 11 issues and is a handy tool for Windows 11 support technicians. However, we will only be focussing here on how to reach the Windows 11 RE so that you can start Windows 11 in Safe Mode.
If your computer is on, and you can see the black screen, press and hold down the physical power button on your computer to forcefully turn it off. You may have to hold it down for 10 seconds for this to happen. Once your computer is turned off, power it on once again, and as soon as it restarts press and hold down the power button to turn it off once again. Try these steps a couple of times and you'll see that Windows 11 is booting for Automatic Repair.
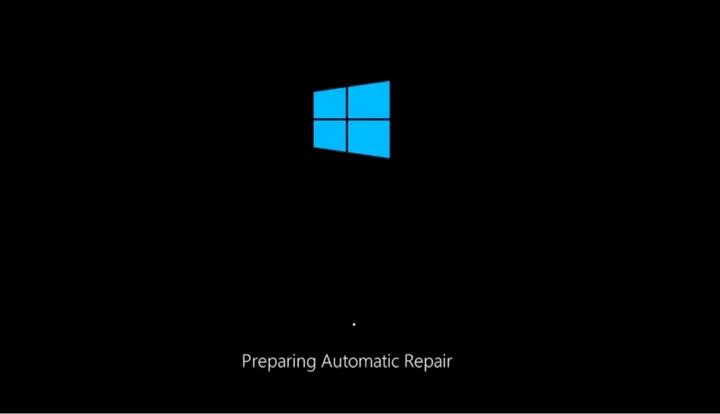
Once Windows 11 boots from Automatic Repair, you need to select Advanced Options to go to the Windows 11 RE. From then onwards, you can follow from step4 as shown in the first method and you'll be able to start Windows 11 in Safe Mode in no time.
Turning Windows 11 computer on and off like discussed here is not normally recommended, but having a black screen is not a normal circumstance and can be tried to start Windows 11 in Safe Mode.
As mentioned at the beginning of this tutorial, booting into the Windows 11 Safe Mode can be a bit tricky. However, if you follow the steps as mentioned in the above methods, you will be able to start Windows 11 in Safe Mode in no time!

Petty is editor in chief at UUByte and writes various topics about Windows and Mac to help people make the most of current technology.