
Moving from a Windows PC to a Mac can be an exciting experience, but it also brings with it a number of challenges, not the least of which is migrating all your data. Assuming you don't have a full and recent backup of your PC's hard drive, you're looking for a way to move all your information from one platform to another. There are several ways to do this - both automatic and manual; this article showcases five different ways to achieve this objective.
Method 1: Move from PC to Mac via Windows Migration Assistant
Major tech companies are constantly trying to entice users away from other platforms to their own, so it's no surprise that Apple would release a software utility to help people migrate from Windows to macOS. The tool is called Windows Migration Assistant, and it does exactly what it sounds like - help people move their data from Windows to Mac. It's a Windows utility, which means you download it to your PC, not your Mac.
The process requires both computers to be logged into the same WiFi network. Alternatively, you can just connect them with an Ethernet cable. Then, follow the steps shown below:
Step 1: First, it's important that you check your PC drives for any anomalies that might prevent the tool from working properly. You can use the chkdsk command in Command Prompt to do this.
Step 2: Once you have the all-clear, download the correct version of Windows Migration Assistant based on the version of macOS you're migrating to.
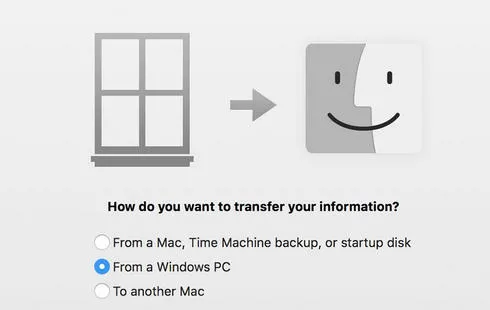
Step 3: Now shut down all windows on your PC and launch Windows Migration Assistant. Hit Continue and then move to your Mac, where you'll see the Migration Assistant window. In this window, select the "From a Windows PC" option, click on Continue and you'll see an authentication code. Make sure this matches with the code shown on your Windows computer and hit Continue there if it matches.
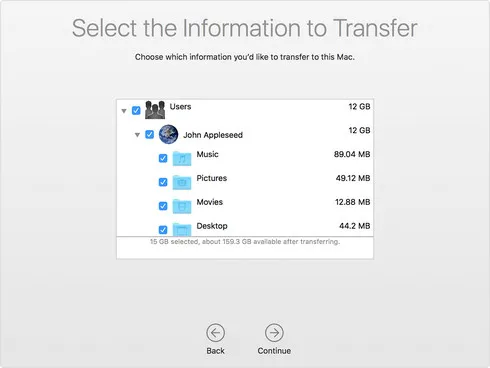
Step 4: The PC is now fully scanned by the app, and you'll see a window (on your Mac computer) that lets you choose the data to be transferred. After the transfer, you can shut down your PC.
Step 5: On the Mac, make sure you authorize the device in iTunes to make sure your media is available to you.
The process might look a little complicated, but it's really not that hard to figure out. Just follow the instructions here and as shown on your computer screens to complete the data transfer from PC to Mac.
Method 2: Use OneDrive to Sync Files from Windows to Mac
OneDrive is a cloud storage service launched by Microsoft way back on August 1, 2007. It is now shipped with Windows 10 in default and offers 5GB worth of free storage, after which you have to tier up to higher plans. Unfortunately, since it's tied in with Office 365, Microsoft's productivity suite, you can only use it if you have a subscription to one of their plans. That's if you want more than 5GB, which in this case will most likely be required. On the bright side, Office 365 is now widely adopted, so if you're a Windows user with an active subscription to Office 365, you can use the OneDrive storage limit of 1TB to transfer data from your PC to your Mac.
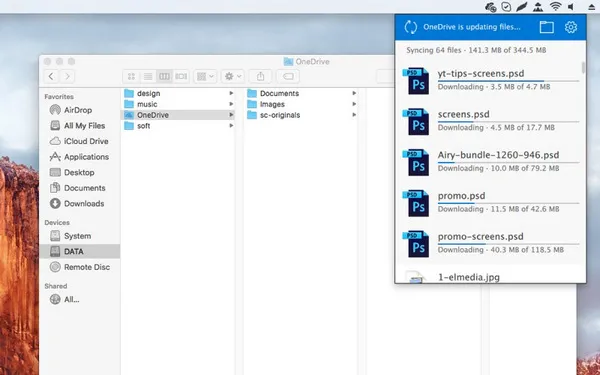
The process is very simple. The first step is to upload everything to OneDrive using a high-speed Internet connection. You will need to be signed into the Microsoft account with which the OneDrive storage is associated. The upload is the part that takes the longest, depending on your connection speed and how much data you have on your PC. Once your data is on OneDrive, simply go to your Mac and log into the same Microsoft account, and you can access your files and folders directly. Alternatively, you can download whatever you need to your Mac for offline use.
Method 3: Transferring Files from PC to Mac via USB Cable
The next method is a manual one involving an external hard drive or other storage device. It's a little tedious and time-consuming, but it offers a simple way to move your data from Windows to Mac. The size of your storage medium matters, so make sure it has enough space to hold all the data on your PC, or else you'll need to follow the process multiple times, which also means you can end up missing some files or folders.

To move data this way, connect your external storage device to your PC and use File Explorer to manually copy-paste files and folders from the PC to the storage device. Once you've moved all the data in this manner, you can eject and unplug it, and then connect it to your Mac. Now open Finder on your Mac, navigate to the external drive and copy everything on it. Go back to one of your local Mac drives and paste the data there. Depending on what speed your device and cable support, it could take a lot of time to first move the data to the storage unit and then to your Mac.
Method 4: Bluetooth Wireless Transfer from Windows to Mac
Another way to move data from your Windows computer to a Mac is to use Bluetooth. Obviously, that means your Windows PC must either be Bluetooth-enabled, or you need to use a Bluetooth dongle to set up the connection. Mac already comes with Bluetooth support. Remember that Bluetooth is not an ideal way to transfer data if you lots of it. Files are all sent one at a time so if you have a large number of them, this process will take a long time to complete. However, if you have very little data to be moved, Bluetooth is an easy way to wirelessly transfer it from PC to Mac.
The first thing to do is to pair the two computers via Bluetooth. The process varies slightly with different versions of Windows and Mac OS X or macOS, but the principle is the same. Make sure both devices are visible, then initiate the pairing. After pairing is successful, go to Devices > Bluetooth & Other Devices on your Windows computer and go to Bluetooth File Transfer by clicking on Send and Receive Files via Bluetooth. Click on Browse to choose your files, then click Next. On the Mac, accept the transfer and wait for the data to be moved.
Method 5: Real-Time File Transfer Between PC and Mac via Skype
For small chunk of files, Skype is a convenient way to move data from PC to Mac. You will need two separate Skype accounts for this - one to send and one to receive. Skype offers an easy way to share multiple files, and the only delay is in the upload/download time, which depends on the speed of your Internet connection. If you have a limited number of files to transfer to your Mac, this might be a good way to go about it.
On your Windows PC, sign into the first Skype account. Do the same on your Mac with the second account. In Windows Skype, click on the file sharing icon next to the chat box. This will open File Explorer, where you can choose the files to be sent. Once uploaded, hit the Send button. On your Mac, you'll see that the files have been received. Click on them and download them to a location of your preference. The process is very simple, and it's perfect for sending just a few files. As you can imagine, it will be extremely tedious to send a large amount of data this way. However, in a pinch, this method will definitely serve the purpose.

These five ways are all effective based on your specific need. For large data chunks or entire drives, it's better to use an external device or WiFi with Windows Migration Assistant. The other methods mentioned here can help with those random files that you may have missed transfering the first time.

Petty is editor in chief at UUByte and writes various topics about Windows and Mac to help people make the most of current technology.