
With the advent of Windows 11, Microsoft has been constantly pushing its users to use Microsoft Edge and Microsoft account. According to Windows 11 system requirement, Microsoft is mandotory for installation.

Although Microsoft Edge can easily be ignored by installing another browser like Chrome or Firefox, it is more difficult to use a local account for sign-in activity instead of a Microsoft account. The main reason for this being that Microsoft cleverly hides the option to create a local account during Windows 11 installation. So, if you don't know how to create a local account while installing Windows 11, you'll almost always end up creating a Microsoft account instead.
I don't like being told what to do, just like I don't like Microsoft forcing me to use a Microsoft account instead of a local account. Moreover, if I create a Microsoft account, I always end up with a gibberish instead of my name on the Users folder. So, I did a bit of research and learned the trick which would let you install Windows 11 without Microsoft account, and I will be sharing that trick with you here.
Advantages and Disadvantages of Local Account
Before I show you how to install Windows 11 without Microsoft account, let me tell you a few pros and cons of local accounts so that you can make an informative decision.
Pro:
1. Increased privacy since the account information is stored locally and not on the Microsoft server.
2. Less consumption of resources since local accounts do not sync account information on the Microsoft server.
3. Easy to toggle between admin and local account logins using the Windows and the L keys on your keyboard.
4. Same system updates are available for local accounts as that of a Microsoft account.
Cons:
1. Since syncing is not allowed, you won't be able to transfer system settings to another computer.
Now that we have put all the cards on the table, I hope you have decided whether you want to use a Microsoft account, or if you would still like to install Windows 11 without Microsoft account. In case you have gone for the later decision, read on to know how to do it.
How to Install Windows 11 without Microsoft Account
To install Windows 11 without Microsoft account, the installation process remains the same. The difference occurs during the Windows 11 OOBE (Out-of-box Experience), which is prepared for first use of Windows 11. Remember to disconnect the computer from internet if it is already connected and then continue with the process. Before getting started, please make a Windows 11 installation media first.
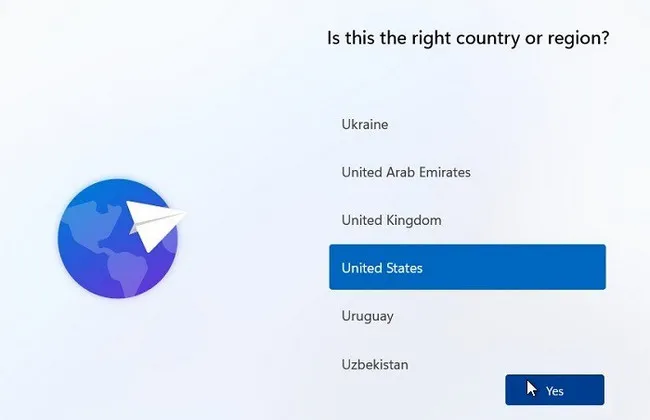
1. Boot the computer from Windows 11 installation media. This will bring up Windows 11 setup utility once the computer starts. When you see the installation wizardl, you will be required to select the right country/region. Make the selection and click Yes.
2. The next step is to select a keyboard layout. Make the proper selection and click Next to continue.
3. Now, you need to specify whether you would like to add a secondary keyboard. Make your necessary selection and continue.
4. Next, it will ask you to connect to a network. Press the Shift and F10 keys on your keyboard here if you do not see an option to NOT connect to the internet. This should bring up a Command Prompt where you need to type the below command and press Enter. This should ignore the prompt to connect to a network and move to the next window. If you can see the option to not connect to a network, choose that and move to the next step.
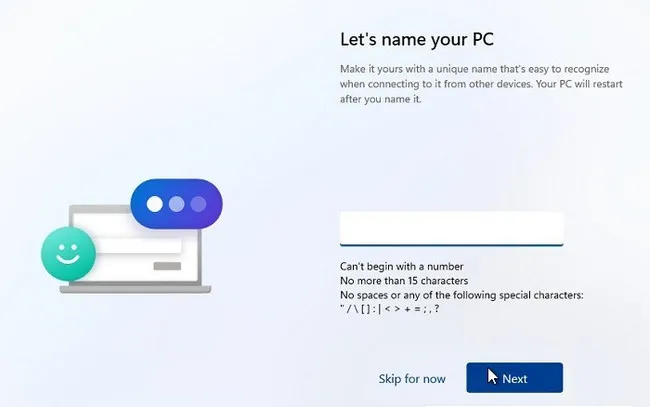
taskkill /F /IM oobenetworkconnectionflow.exe5. You need to specify a name for your computer. Type in the name and click Next.
6. You'll be asked how you would use this computer; whether for personal use or work/school. You might also get to see this option towards the end of the Windows 11 installation.
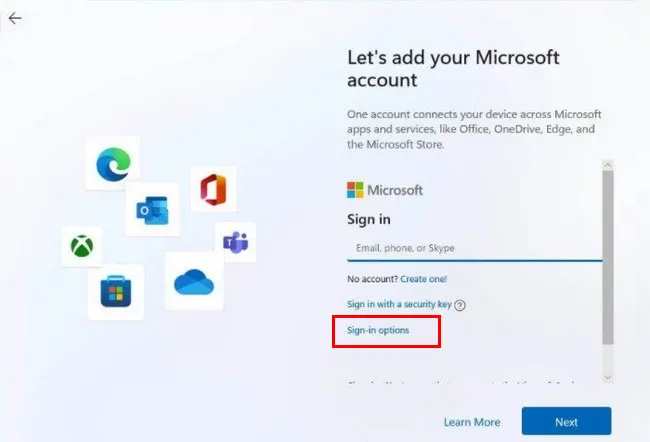
7. Follow all the instructions on the screen, when it asks you to connect to a network, do not connect just yet and you'll reach the below window. This is where you need to mention whether you would like to install Windows 11 with a Microsoft account or a local account. Here, you need to click on Sign-in Options instead of filling in the details and clicking on Next.
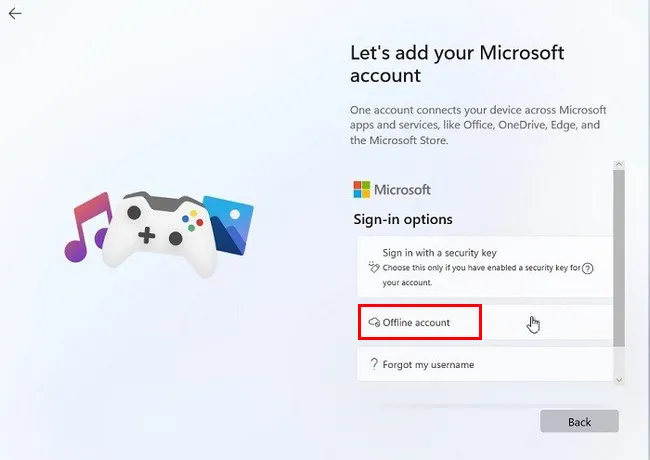
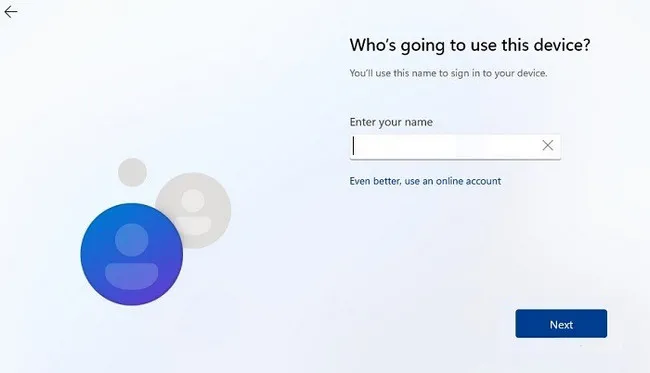
8. Even though you have selected to Sign-in Options, Windows 11 will still show you details about Microsoft account on the next window. Here, you need to click on Offline account. If this option is disable in your computer, click on the Back button and you'll get the option to an offline, local username field.
9. A warning screen pops up and tells you that if you choose an offline account, you'll get to a limited experience. Click on Limited Experience to choose the offline local account. You need to provide the username for this local account. The click on the Next button to continue.
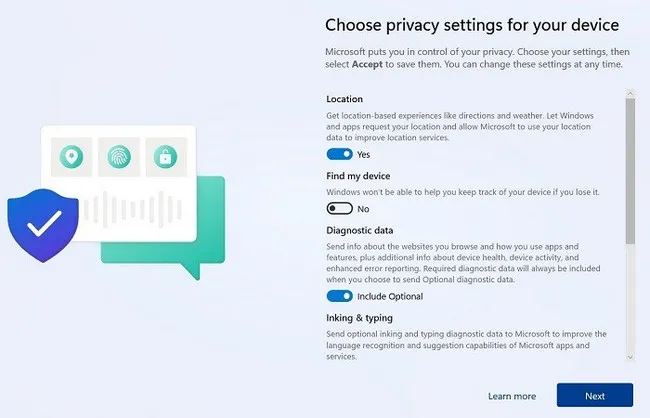
10. Under Privacy settings, as shown below, please make the necessary selections, then follow the instructions to install Windows 11 with a local account.
At this time, you should be able to install Windows 11 without Microsoft account. However, if at some point of time you would like to change to a Microsoft account from this local account, you would still be able to do that. You can also create a Microsoft account on top of the local account while installing Windows 11.
I personally chose to work on a local account, as I had mentioned earlier, and have been using it for a while now. Till date I have not come across any issues for not using a Microsoft account. So, if you want to use one too, just go ahead and follow the instructions given in this tutorial and you'll do just fine.

Petty is editor in chief at UUByte and writes various topics about Windows and Mac to help people make the most of current technology.