
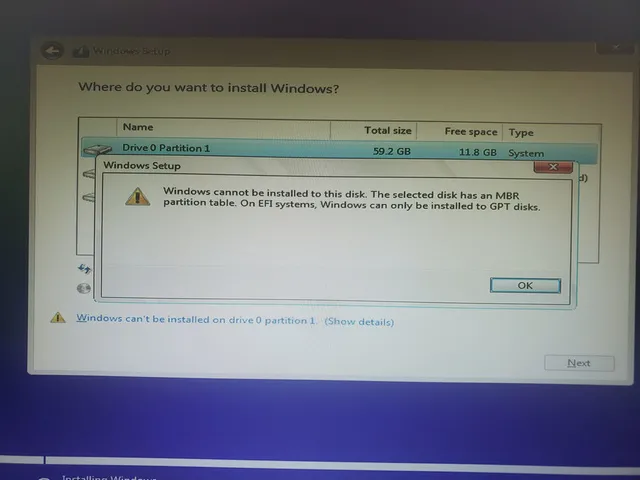
On EFI systems, Windows can be only installed to GPT disk.
The above is an error message I received when trying to install Windows 11 on a PC. Currently, my local hard drive is partitioned by MBR.
If you want to install Windows 11 on a computer, then it needs to meet a long list of system requirements. One of these requirements is that your computer should have a GPT disk instead of MBR. If it doesn't have a GPT disk, it will not be able to install Windows 11. But don't get disheartened yet, we have three solutions for you. You can simply convert mbr to gpt without any data loss. But first, let me give you a quick overview of what is GPT and MBR.
What is GPT and MBR
I am going to explain this without going into the technicalities of GPT and MBR. These are a part of your hard drive. MBR is used by old computers and does not support larger hard drives, whereas GPT (better known as GUID Partition Table) stores partition information about the hard drive (or hard drives) present on your computer. Unlike MBR, GPT does not have any limitations towards hard drive capacity or the number of partitions.
This is a good time to tell you that whether your computer uses GPT or MBR depends on the BIOS settings. BIOS is a bridge between the hardware and software of your computer. If you want to convert the partition table from MBR to GPT in order to get install Windows 11 installed, you need to first go ahead and change a BIOS setting before you use any of the below tools.
This is the Boot settings and you can change it by going into your BIOS using the Del or F10 key while your computer is booting up. Once you are inside your BIOS settings page, look for Boot Sequence, Advanced, or Boot Settings page, depending on your motherboard. Over there, disable the legacy BIOS and enable UEFI mode. Also, don't forget to enable Secure Boot from your BIOS settings. If you are having a hard time locating these, search for "change to UEFI motherboard_model" and don't forget to replace motherboard_model with the model's name of the motherboard of your own computer. Once done, you can go ahead and change the disk from MBR to GPT using any of the tools discussed below.
Diskpart Command
diskpart is a native disk management tool shipped with Windows OS. It is a free but command line based utility. It is targeted towards more experienced and technically proficient users who are more used to typing commands than clicking on buttons. I usually steer clear of this tool precisely because of this reason.
Another drawback with DiskPart is that all the files and folders present in the hard drive will be deleted while converting it from mrb to gpt. So, if you have important data in local hard drive, I would suggest you to back them up first before attempting to use DiskPart or you can use other tools instead, which has no data loss at all.
How to use diskpart to convert MBR to GPT
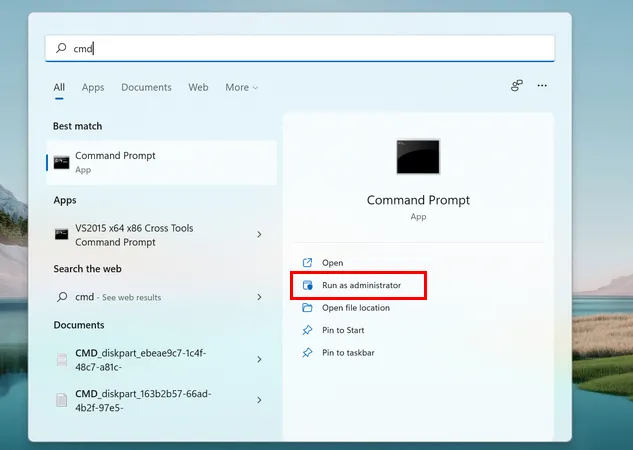
Click on the Windows Start button, type "cmd", and then click on Run as administrator against the Command Prompt app. In case, for some reason, you don't have access to CMD, you can use PowerShell instead.
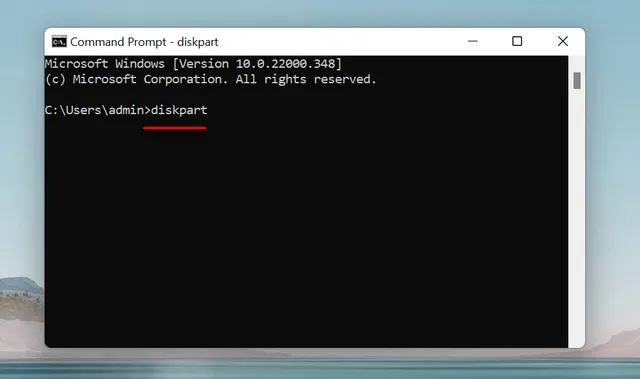
Once the Command Prompt window is open, type diskpart and press Enter. This should open diskpart utility.
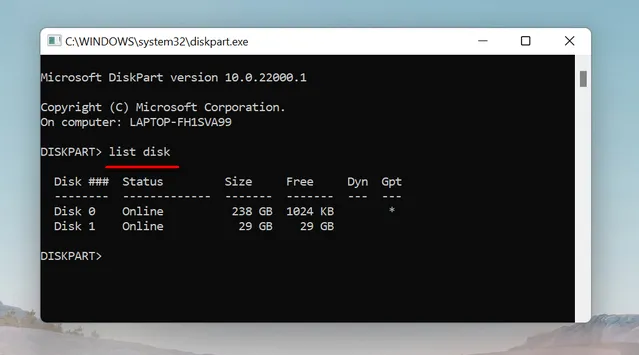
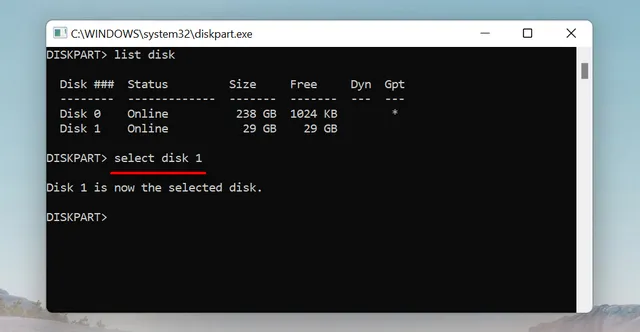
Type list disk and press Enter to view the list of storage available on this computer. Remember, this would list all the drives present on your computer, including removable USB flash drives. Note down the number against the drive that you want to convert from MBR to GPT.
Now you need to select the drive that you want to convert, you can do that by typing select disk 1. Don't forget to replace 1 with the number written against the disk you noted down in the previous step.
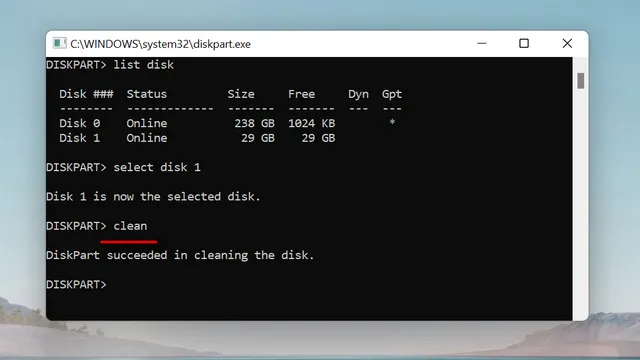
Next, type clean to remove all the files and partitions from selected drive.
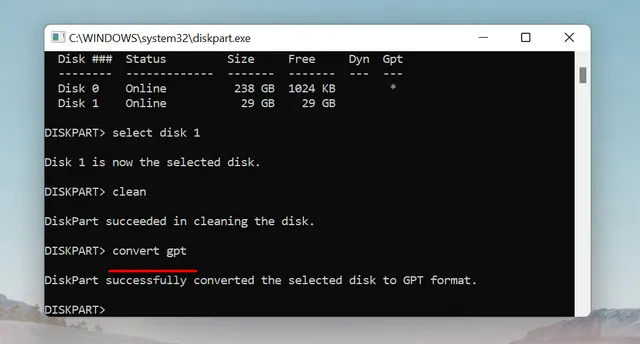
Once done, type convert gpt and press Enter to convert that drive from MBR to GPT. That's it, we're finally done!
As you can see, this process is not quite suitable for beginners. And once you have used diskpart tool, there's no way to recover the data without using a third-party tool. There are other, more safe methods to convert partition table from mbr to gpt for clean installing Windows 11. We have discussed below.
DiskGenius
DiskGenius is a GUI based third party disk management softwarel which you can use to convert MBR to GPT without data loss. It is much easier to use than dispart tool, and you can complete the entire conversion process with just 4 clicks that too without losing any data.
Also, they have a free version available on their website, albeit some functional restrictions. However, these restrictions will not hinder you in converting your hard drive from MBR to GPT. They also have 24 hours support available for their product. The only challenge that I found with DiskGenius is that the GUI can be a bit confusing for beginners, and you may have to look them up on the DiskGenius support site.
How to use DiskGenius to convert MBR to GPT
Download DiskGenius from their website, install it on your computer and fire up the utility. You'll see all the disks listed on the tool, including any USB flash drives or external hard drives.
Click on the drive that you would like to convert MBR to GPT, and then click on Disk from the menu at the top. A dozen of options will be available from drop-down menu. Now, click on Convert To GUID Partition Table. You can also right click on that disk and click on Convert To GUID Partition Table from content menu.

This will show a warning asking you to confirm whether you would want to go ahead and convert the hard drive to GPT. Click on the Yes button to continue.
Finally, click on the Save All button at the top left, this should show a pop-up asking you to confirm if you want to save all the changes you made to the hard drive. Click Yes and we're done, the tool will automatically convert MBR to GPT without data loss.

As you saw, Convertiing mbr to gpt with DiskGenius is much easier than typing cryptic commands. Moreover, DiskGenius has several data useful features for disk management, such as quick partition, rebuilding MBR, deleting partition, splitting partition, etc... And all of them are free!
Active@ Partition Manager
This is another tool to convert hard drive partition table from MBR to GPT so that you can install Windows 11 on it. There is a free version of this tool available on their website. It has multi-boot support for Windows and DOS, it can be loaded from a USB flash drive, using the Active@ Partition Manager you can recover deleted or damaged data, and you can use it to get exclusive access to a computer which no longer boots up. The only challenge with this tool is its support documentation. It took me almost half an hour just to find how to convert the hard drive from MBR to GPT, which is a pretty basic task.
How to use Active@ Partition Manager to convert MBR to GPT
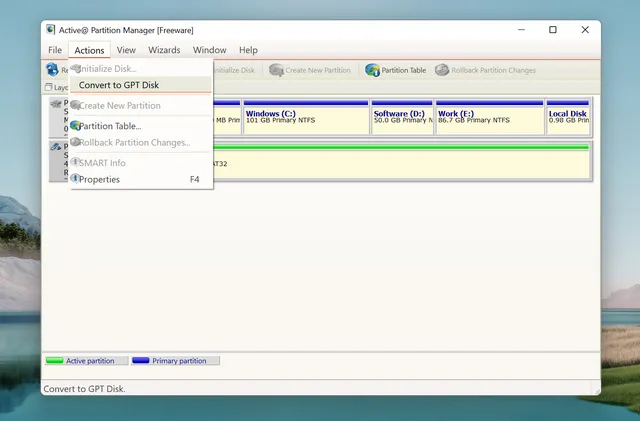
Once you fire up the Active@ Partition Manager, you'll get to view a list of all the drives present in your computer. Select the one which you would like to convert from MBR to GPT by clicking on it.
Click on Actions from the menu at the top, and then click on Convert to GPT Disk from the main menu. Wasn't that simple? Imagine having to look for half an hour for this only to find out that you can do it in just 2 simple clicks.
Now that we have discussed all the tools to convert MBR to GPT so that you can install Windows 11 on your computer. The first one is free and requires no software installation. However, the drive will be formatted during the conversation. The rest two third-party software is more safe and no data loss happens when converting from mbr to gpt.
Lastly, here's a good piece of advice. Backup your data before you attempt this, even if the tools says that it does not delete existing data. It's better to be safe than sorry.

Petty is editor in chief at UUByte and writes various topics about Windows and Mac to help people make the most of current technology.