Table of Contents
A bootable USB could be a great help for computer troubleshooting and system installation. This involves the process of writing OS disk image (.iso) to a USB drive. For Mac users, particularly those with the latest Apple Silicon chips, burning ISO files to USB drives is now very challenging task, especially for Windows ISO as many apps does not add support for Apple Silicon Mac.
This guide demystifies the task of writing ISO files to USB drives on Mac computers with Apple Silicon support. All the apps tested in this post are working smoothly on the latest macOS Sonoma operating system. So no worries to the system compatibility issues. Intel Mac and old macOS version are also supported!
Introduction to ISO Disk Image
An ISO disk image is a digital replica of an optical disc that encapsulates everything from the disc’s structure and contents to its file system. This format, universally recognized by its .iso extension, is a cornerstone in data storage and distribution, particularly useful for archiving, sharing, and creating exact copies of CDs or DVDs. The versatility of an ISO image lies in its ability to be easily stored, transferred, and accessed across different operating systems and platforms. It’s commonly used for distributing large software packages, operating system installations, and backing up physical media.
Different Types of ISO Disk Images
Different operating systems use distinct ISO images that are tailored to their unique installation and boot requirements. This means that the content and structure of an ISO image will vary significantly depending on the operating system it’s intended for.
Windows ISO contains the entire Windows operating system, including the boot and setup files necessary for installation. These ISOs are specifically formatted to be compatible with Windows’ installation process with unique file structures and setup routines.
macOS ISO is designed to work with Apple’s hardware and software ecosystem. They often include specific files and structures required for booting on Mac devices, particularly given the unique hardware architecture, like the T2 security chip in Intel-based Macs or the M1 chip in Apple Silicon Macs.
On the other hand, Linux ISO are available in a variety of ISO formats and each one is customized to different flavors of the operating system, like Ubuntu, Fedora, or Debian. These ISOs not only contain the operating system but also a collection of software and a desktop environment, which can vary widely among distributions.
Can a USB Be Bootable by Simply Putting ISO to USB?
No. Making a bootable USB drive is not as simple as just copying an ISO file directly onto a USB stick. The process of building a USB drive bootable involves a bit more than just copying files.
A bootable USB needs a specific file system and boot sector that isn’t created by merely copying an ISO file. You typically need special software that can ‘burn’ the ISO file onto the USB drive in order to make it bootable as an installation media. This process involves extracting the files from the ISO and correctly laying them out on the USB drive, along with the necessary boot information.
How to Write Windows ISO to USB on Mac
Windows is still the most popular desktop operating system on this planet. And many Mac users want to know how to write Windows 10 or Windows 11 ISO to USB on the latest macOS Sonoma operating system. We will show you how to create a Windows 10/11 bootable on Apple Silicon Mac, including M1, M2 and M3 Mac.
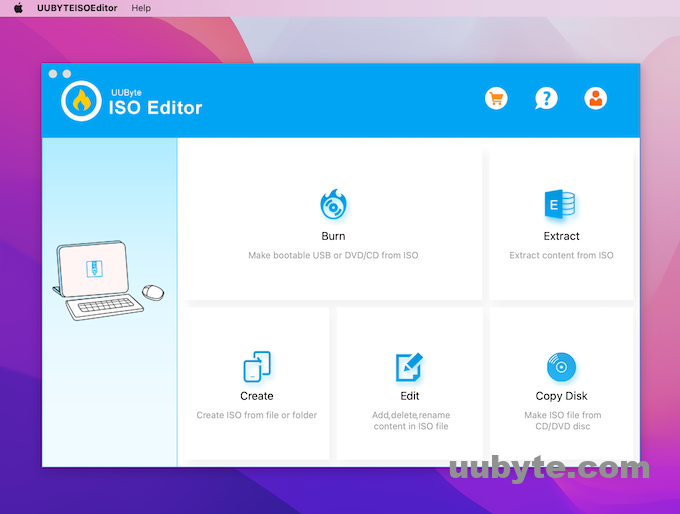
UUByte ISO Editor is the most rewarded app for working with Windows ISO files on Mac. It’s particularly notable for its ability to create bootable USB drives from Windows ISO images, making it a valuable tool for users looking to install or run different operating systems. Available for both Mac and Windows, UUByte simplifies the process of burning ISO files to USBs, offering a straightforward interface for both beginners and advanced users.
Steps to Write Windows ISO to USB on Mac Using UUByte ISO Editor:
Step 1: Begin by visiting the UUByte website and downloading the Mac version of the software. Follow the installation instructions to install it on your Mac.


Step 2: Once installed, launch the application. You’ll be greeted with a simple and intuitive interface.
Step 3: Connect a USB drive to your Mac. Ensure that it has sufficient space for the Windows ISO file.
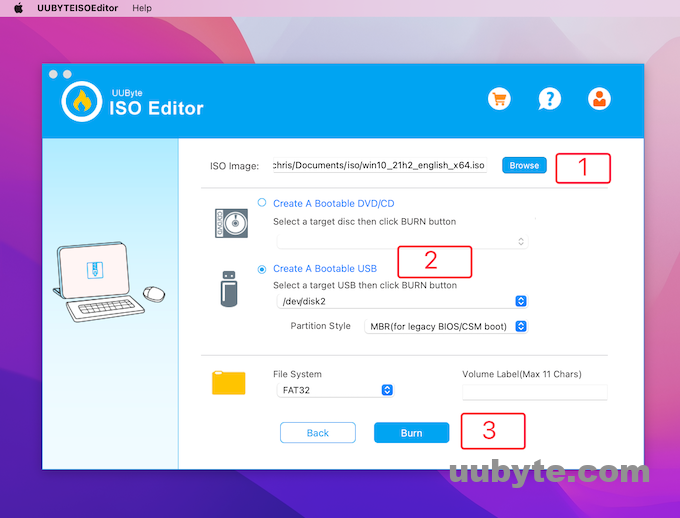
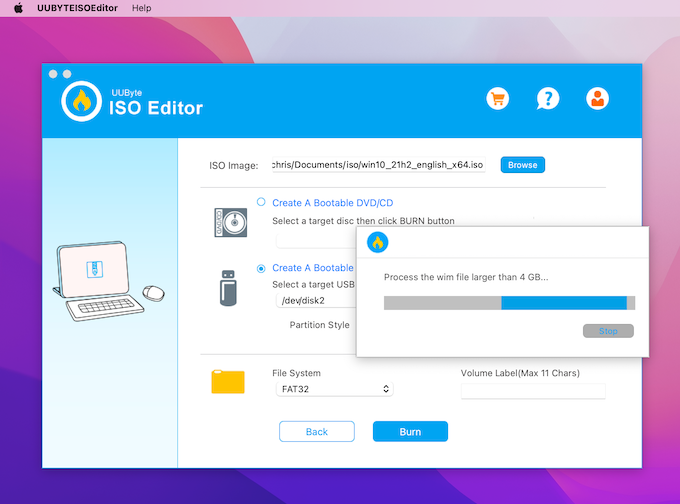
Step 4: In the UUByte ISO Editor, choose the ‘Burn’ module from the main menu. This option is specifically designed for creating bootable USB drives.
Step 5: Click on the ‘Browse’ button to locate and select the Windows ISO file that you want to write to the USB drive.
Step 6: From the list of available drives, select the USB drive you inserted. Be sure to double-check to avoid selecting the wrong drive.
Step 7: After ensuring all settings are correct, click on the ‘Burn’ button to start writing the ISO file to the USB drive. The process may take a few minutes, depending on the size of the ISO file.
Step 8: At the end of burning task, this app will split the install.wim file into two small pieces so they can sit on a FAT32 partition.
Using UUByte ISO Editor to create a bootable Windows USB on a Mac is a straightforward and efficient process. This powerful tool simplifies what can often be a complex task, making it accessible even to those who may not be tech-savvy. Whether you’re a professional setting up multiple computers or a home user preparing for a system installation or upgrade, UUByte ISO Editor ensures that your bootable USB is created quickly and with minimal fuss.
How to Write Linux ISO to USB on Mac
Unlike the Windows 10 ISO, it is much easier to write Linux ISO to USB on Mac with the help of free Etcher app. Etcher, also known as balenaEtcher, is a free and open-source utility used for writing image files such as .iso and .img files, as well as zipped folders, to storage media to create live SD cards and USB flash drives.
It’s widely praised for its simple and user-friendly interface, making it a preferred choice for users of all skill levels. Etcher is compatible with Windows, macOS, and Linux, and stands out for its reliability and speed. It’s particularly popular among Linux users for creating bootable Linux USBs, thanks to its straightforward process and the ability to handle various distributions smoothly.
Steps to Write Linux ISO to USB on Mac Using Etcher:
Step 1: Go to the Etcher website and download the macOS version of the software. Once the download is complete, open the .dmg file and drag Etcher to the Applications folder to install it.
Step 2: Open your Applications folder and click on Etcher to start the application. You might need to confirm that you trust the software if you downloaded it from the internet.
Step 3: Plug in the USB drive that you want to use.
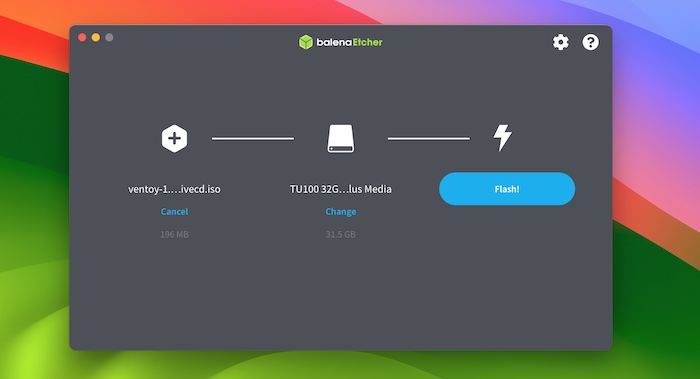
Step 4: In Etcher, click on “Flash from file” and navigate to where you’ve stored your Linux ISO file. Select the file and open it in Etcher.
Step 5: Click on “Select target” to choose the USB drive you want to use. Etcher should automatically detect the USB drive, but ensure you select the correct one to avoid data loss.
Step 6: Start the Flashing Process. With the ISO file and USB drive selected, click on the “Flash!” button. Etcher will now write the Linux ISO to the USB drive. This process may require your macOS password and can take several minutes to complete.
Etcher simplifies the task of creating a bootable Linux USB drive on a Mac, making it accessible and efficient. Its intuitive interface eliminates the complexity often associated with this process. Whether you’re setting up a new Linux distribution, testing a live environment, or need a portable operating system, Etcher proves to be a reliable and straightforward tool. Its ability to handle different Linux distributions with ease makes it an invaluable resource for anyone looking to explore the world of Linux.
How to Write macOS ISO to USB on Mac
The createinstallmedia command is a powerful and integral part of MacOS, specifically designed by Apple for creating macOS bootable USB drives. This built-in command line utility makes it straightforward to create a bootable installer for macOS and this eliminates the need for additional software. However, the process involves using the Terminal app, a command-line interface.
Steps to Create macOS Bootable USB with createinstallmedia Command:
Step 1: Start by downloading the MacOS installer from the App Store. Ensure you have the installer for the version of MacOS you want to create a bootable USB for.
Step 2: Connect a USB drive to your Mac. The drive should be at least 12GB in size and formatted as Mac OS Extended (Journaled).
Step 3: Launch the Terminal application, found in the Utilities folder within your Applications folder.
Step 4: In Terminal, enter the createinstallmedia command. The command format is generally as follows, but replace ‘MyVolume’ with the name of your USB drive and adjust the path to the installer if necessary:
sudo /Applications/Install\ macOS\ [Version Name].app/Contents/Resources/createinstallmedia –volume /Volumes/MyVolume
Replace [Version Name] with the name of the MacOS version you’re using (e.g., ‘Sonoma’, ‘Ventura’, ‘Monterey’).
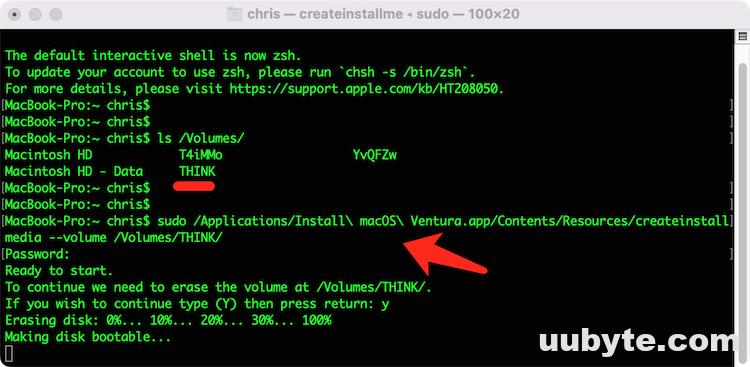
Step 5: Enter Your Admin Password. After entering the command, you’ll be prompted to enter your admin password. Type it in and press Enter.
Step 6: Terminal will ask for confirmation as this process will erase the USB drive. Type ‘Y’ and press Enter to proceed.
Step 7: The process can take about 15 minutes. Wait until Terminal indicates the process is complete.
Creating a macOS bootable USB using the createinstallmedia command is an efficient and streamlined process, ideal for users who prefer a native, software-free method. This approach not only provides a reliable way to install or upgrade MacOS but also ensures you have a bootable recovery tool at your disposal.
Final Words
Writing ISO files to a USB on an Apple Silicon Mac is not rocket science but it needs to be done with the right bootable USB creation software. With the steps outlined in this guide, you can accomplish this task with ease and confidence. This method not only ensures compatibility with the latest Mac hardware but also offers a reliable and efficient way to handle your ISO files. Whether you’re upgrading software, creating backup media, or setting up a new system, this guide is your go-to resource for a hassle-free experience. Remember, technology is here to simplify our lives, and with the right tools and knowledge, even the most complex tasks can be made effortless.